How to deal with foggy headlights
Foggy headlights - how to deal with it?
The formation of condensation inside headlights is a fairly common problem faced by car owners. If the lighting equipment is in good condition, slight fogging of the optics causes the working light bulb to come into contact with moisture. As a result of the temperature difference inside the headlamp, water droplets form on the inside of the glazing. Most often, such condensation appears during washing.
Since each headlight (block headlight) is equipped with a special ventilation and drainage system, moisture can get inside the optics through its channels. To quickly eliminate this condensation, just open the hood for 20-25 minutes. If fogging of the headlights is constant, this indicates a malfunction of the equipment.
Why do my headlights fog up?
The causes of fogging may be the following:
- violation of the integrity of the headlight housing;
- destruction of the sealant layer connecting the glazing to the body;
- violation of the tightness in the places where the wiring is supplied to the light bulbs;
- microcracks in headlight glazing;
- clogging of ventilation ducts and holes that provide air circulation in the headlight;
One way or another, all of the above malfunctions lead to a violation of the headlight seal. Depending on the specific source of condensation inside the optics, there are various ways to eliminate fogging from the headlight.
Consequences of optics fogging from the inside
- The constant presence of condensation inside the headlight creates a lens effect, which leads to refraction and scattering of the rays. As a result, the lighting efficiency is sharply reduced, which makes driving more difficult.
- The presence of moisture negatively affects the contacts, significant oxidation of which can cause failure of the electrical wiring.
- Moisture falling on the heated surface of the reflector leads to its destruction.
- The presence of condensation on a metal surface leads to corrosion. In turn, sooner or later, rust can lead to a loss of functionality of the metal parts of the headlight.
- High humidity significantly reduces the service life of lamps.
If a headlight fogs up, only an experienced specialist can tell you exactly what to do. After all, this requires certain knowledge, skills and equipment. For example, it is almost impossible to detect microcracks in the glazing of optics with the naked eye. Therefore, in most cases, the best option would be to seek help from the service center technicians.
If you decide to fix the cause of the problem yourself, it will be useful to use the following recommendations.
Do-it-yourself removal of headlight fogging
Before you start looking for the causes of fogging headlights, you need to thoroughly wash and dry the car's optics. After this, it is necessary to thoroughly clean the drainage and ventilation system of the headlights, if provided by the manufacturer.
In most models of modern headlights, access to the ventilation system channels is provided through the engine compartment or under the front bumper. If, after performing this procedure, fogging of the headlights is not eliminated, you should begin removing the optics from the car.
Since the headlights fog up from the inside, to eliminate this problem it is necessary to remove them from the car. First you need to disconnect the battery and then remove the optics. Having thoroughly cleaned the headlamp housing from dirt, check the structure for any violations of the tightness of the seams, the integrity of joints, connections and other damage. Colored gas can be used to identify microcracks.
The removed headlight must be dried thoroughly. To do this, take out the light bulbs and dry them with a hairdryer.
If minor damage to the seam or junction of the glazing with the body is detected, it is enough to restore it using a similar sealant.
If the sealing seam is significantly damaged, it is recommended to disassemble the headlight and completely remove the old sealant. After this, degrease and fasten the parts of the headlight unit using new sealant. The headlight housing should be carefully treated with sealant. Particular attention should be paid to the place where the wiring goes under the gasket and joints.
After completing all the measures, the headlights should be dried and, after the sealant has completely cured, installed on the car.
If cracks are found in the glazing or in the headlight housing of a large size, it is recommended to replace these elements with new ones. As a rule, do-it-yourself repair of significant damage does not provide an effective result. In most cases, the headlights will fog up again soon. Remember, the best option for eliminating headlight fogging is to replace the old optics with a new device.
Very often, the cause of fogging of the headlight may be a violation of the sealing of the docking chip connecting the turning light to the headlight. In this case, it is necessary to treat the connection with sealant.
In any case, after removing the headlight, it is necessary to thoroughly clean the drainage and ventilation system of the headlights. To do this, you can use thin wire.
Recommendations from experienced craftsmen
- Vented plugs . If during the inspection of the optics no damage, cracks or blockages of the ventilation system were found, the experts recommend doing the following. Drill 4 holes with a diameter of 5.0-6.0 mm in the previously removed plastic plugs of the headlight units. Insert polyester fibers into the plug through these holes as ventilation tubes. Coat the edges of the fibers with sealant or “Moment” type glue. The edges of the substrate are sealed using waterproof silicone sealant.
- Xenon headlights and silicone sealant. In xenon headlights, fogging may be caused by poor quality silicone sealant. If, when gluing a headlight unit, a large amount of silicone is poured, then during the curing process of the sealant, silicone oil and its vapors are released. As a rule, oil first settles on the inner surface of the housing. During operation, when heated, silicone oil evaporates and accumulates on the colder glazing. If the external temperature is low or it is raining, the headlight glass cools faster and silicone vapor deposits on it more actively. Unlike water vapor, which condenses into droplets, silicone vapor accumulates on the glazing in the form of a film. If the car is left in the sun and the optics warm up well, the reverse process occurs. Silicone oil evaporates from the glass and settles on the cooler parts of the headlight housing. Thus, the effect of “wandering” silicone fogging appears.
This problem can be resolved in this way. Remove the headlight unit and disassemble it, separating the glazing from the body. Carefully remove silicone stains, wipe all internal surfaces, with the exception of headlight reflectors and chrome. You should also remove old silicone sealant from the seams. Using a hairdryer, heat all parts of the headlight to completely remove any remaining silicone.
After this, it is recommended to connect the headlight unit using a more reliable high-quality sealant.
What to do if your car headlights are sweating from the inside
Insufficient road lighting significantly reduces driving safety. If your car's headlights are sweating from the inside, which is a fairly common problem, you need to act quickly. The insidiousness of this malfunction is that it can catch the driver at the most unexpected moment.
Consequences of optics fogging
They won't keep you waiting long:
- reflectors, lenses or unit adjustment mechanisms will be damaged;
- internal gaskets will collapse;
- perspiration will disrupt the centering of the light beam and reduce the illumination of the road surface;
- a lens effect is formed, leading to light refraction;
- the performance of electrical parts will deteriorate;
- Contacts will oxidize and wires will break.
If the headlights sweat, it is recommended not to turn on the optics until they are completely dry. The power connectors must be immediately disconnected to protect against breakdowns. Gas-discharge lights are especially dangerous in terms of short circuits.
Why do car headlights sweat: possible reasons
They sweat due to condensation that forms for a number of reasons. Droplets of moisture, mixing with the warm atmosphere, turn into a gaseous state. Perspiration collects on the lampshade, despite the visible tightness of the headlights.
Moisture entry through check valve
In fact, the inner area of the headlights has an outlet realized through a check valve. It is designed to cool and release expanded air, since any type of modern source works on the principle of heating. It is from here, through the valve, that water can enter.
Breathers (vents) can also become clogged and fail to perform their functions. Because of this, the interior space is not ventilated, and condensation gradually accumulates here.
Loose connection of elements
Violation of the tightness of the seams in the area where the lamp is adjacent to the car also causes fogging. The fact is that it is extremely difficult to fix the headlight unit as tightly as possible. To eliminate micro-gaps, special types of sealants are used. But the best of them sooner or later dry out and lose their original properties. Moisture can penetrate even through the smallest cracks. Most often, the headlights of Chinese and domestic cars become depressurized.
Depressurization due to cracks and damage to glass
The headlight fogs up from the inside also due to a crack. It can be so invisible that it is difficult to find without a special device. Water seeps from here into the block, is heated by light and turns into steam.
Violation of geometry during production
Violation of standard instructions during the production of headlights also becomes a factor in the occurrence of the problem. This is usually called a warranty case or a manufacturing defect, and is eliminated by dealers throughout the entire operational period.
How to properly dry optics
Fixing foggy headlights is usually quite simple. The main thing is to adhere to this order:
- Unscrew the lamp cover and pull it forward a little;
- turn on the low beam headlights for 10-15 minutes;
- leave to dry overnight in a warm garage.
In the morning there should be no moisture left. But if a relapse is detected, we must resort to a more effective method. You will need a hairdryer to blow out the lampshade. Seal the identified chips with sealant, and also treat the joints and the places where the headlights adhere to the body with silicone. But cracks in glass cannot be eliminated using this method. Here you already need high-quality tinting.
In some cases, it is not practical to deal with moisture seepage. For example, when the plastic headlight housing loses its working properties over time and turns into a hard and homogeneous material. Only replacement will help here.
How to disassemble and reassemble optics to eliminate condensation from the inside
To most effectively get rid of condensation, it is advisable to remove and disassemble the headlight. This is done according to the following instructions:
- Remove the headlight block. Separate the turn signal from the lamp and unclip the back cover. Check the inside of the cover - there should be no noticeable cracks, chips, or scratches. Pay special attention to the gasket. If it is not soft, does not fit well and does not provide a tight seal, then it should be replaced;
- Remove the glass by pressing the six latches with pliers. Check the gap between the glass and the gasket - this is where water often penetrates;
- Separate the gasket placed around the entire perimeter of the headlight. It should not be hard or stiff. The area underneath is clean, free of dirt, leaves and other debris. The rubber fits tightly on the headlight body and seals the edges well;
- Remove the high/low lamps and the marker. Clean the copper pins where the wires are inserted from dirt and oxides. It wouldn't hurt to clean the terminals of the common connector as well. The reflector can be successfully cleaned of dirt and condensation residues using a chemical glass cleaner (dirt is visible as a white coating); you will also need a soft makeup brush. You must work as carefully as possible so that the spray layer does not come off;
- Remove the lamp reflector caps. A lot of soot and moisture collect inside them; this must be cleaned out.
Proper cleaning and assembly
At the final stage, blow the surface of the reflector with hot air. Wash the glass and dry thoroughly with a cloth. Replace the problematic seal with a new one. Be sure to wash and dry the seat of the rubber cuff. Place the gasket on the sealant so that after drying there is no room left for moisture to seep through. It is also recommended to apply silicone over the rubber to seal the now seam between the glass and the headlight.
Traditional ways to prevent headlights from fogging from the inside
There are several effective folk ways to prevent headlights from fogging:
- Remove the lens. Apply sealant to the joint. Assemble the optics;
- Open the headlight. Place a bag of silica gel inside so that it does not come into contact with the light bulb;
- It helps if there is a barely noticeable crack on the ceiling. You need to remove the glass, apply Moment transparent glue to the chip;
- In some cases, it will be enough to open the hood for half an hour to ensure air exchange;
- Make 10 mm holes in special, hollow areas of the headlight unit. Insert polyester fibers through them, which will serve as ventilation tubes. The edges of the fibers must be coated with glue or sealant.
Avoid sudden changes in temperature - this can cause the headlight to sweat. Before washing your car, turn off the headlights for a while, allowing the bulbs to cool. Now you know what to do if the headlight fogs up.
Is the headlight sweating? Two ways to remove moisture and water from a lantern
Automotive optics belong to the security system, providing the driver with a clear orientation at any time of the day. But even in new cars there can be a problem with fogging of the optics. If the headlight is sweating, what should the driver do to fix the unit on his own, adjust the head lighting.
Causes of fogging
There may be several reasons why headlights sweat:
- clogged breather in the ventilation system;
- the light bulb is installed incorrectly;
- cracks in the structure;
- depressurization of seams;
- hydraulic corrector failure;
- design defect.
The monoblock ventilation system is necessary for high-quality heat removal generated by a burning light bulb. The air heats up faster due to the operation of the reflector. On the back of the headlight there are several ventilation holes, closed with flaps and flaps.
When the optics are turned on, the warm air inside the headlamp comes out; after the light bulb is turned off, cold air gradually enters the unit. Natural circulation occurs. If the breather in the ventilation system is clogged, heat is not removed in a timely manner, and condensation forms in the headlight.
Headlights with installed standard LEDs and xenons sweat less often than halogen ones. Xenon lamps generate a minimal amount of thermal energy, the unit heats up minimally, and there are only one, or less often two, ventilation ducts in such structures.
What causes headlights to fog up:
- Cracks in the monoblock. Glass or plastic will sweat if microcracks appear in the structure (accident, incorrect installation). In this case, moisture will constantly penetrate into the part.
- Depressurization of seams. The seal deteriorates after an accident, if the headlight unit is dislodged, or when the sealant loses its elasticity. When assembling domestic VAZ cars, white silicone glue is used, which becomes brittle after 18 months. Car owners of Lada Kalina are faced with a problem: the headlights of their cars sweat more often than others.
- An incorrectly screwed in crooked bulb will displace the location of the socket block, moisture will penetrate into the housing and lead to condensation settling.
- Manufacturing defects. The design may be crooked, with incorrect geometry; this is the problem with counterfeit headlights. The original optics are sealed and do not trap air from the outside; the internal system is ventilated through two breathers with a membrane.
- Failure of the hydraulic corrector. Installed for some headlight designs, for example on VAZ cars. If the hydraulics break down, water gets inside and the headlight sweats.
Do-it-yourself removal of fogging
At home, eliminating fogging of headlights is possible when the reason why condensation accumulates is discovered. Microcracks in the plastic of the headlight cannot be seen, because the surface of the structure is corrugated, there are decorative bends, etc. The structure sweats over the entire surface. To check the unit, you need to remove the headlight from the car:
- disconnect the terminals from the battery;
- disconnect the light bulbs;
- clean the body;
- check the sealing of the seams.
If the headlights are fogged up due to torn seams, it is necessary to completely remove the old glue, dry the headlight from condensation, and degrease the surface. To avoid the question of how to seal the headlights, use a silicone-based sealant.
Depressurization of the connecting seam of the connected turn signal is one of the common causes of sweating. It is necessary to check the seam between the glass and the body, contact exit points, plugs, and drainage channels.
Immerse the optics in a bowl of water. If bubbles are observed, there is a crack in the block. If the glass is cracked, the part will sweat systematically, regardless of the weather and temperature. It is necessary to seal the area with a colorless sealant.
If the headlights in Japanese cars fog up, then when you examine the inside of the body you will see only one breather and two sealed plugs. The part cannot “breathe” properly, hence the constant sweating. It is necessary to make optimal ventilation of the housing - drill an additional hole.
How to remove moisture from a headlight without removing the part
Natural drying of the headlight through the ventilation system should occur after a maximum of 20 minutes. After you have turned on the optics, you can dry the headlight without removing it from the car if condensation rarely appears. For example, after the car has been standing in the rain for several hours.
If your windows sweat periodically, here’s some advice on how to remove the moisture yourself in a few minutes:
- Open the plugs on the inside of the headlight and check the breather. Air exchange will go faster.
- Blow with a hairdryer, directing a stream of warm air to the place where the light bulb is being replaced.
- Without removing the part from the car, place a bag of silica gel into the body from the inside.
The reason for condensation collection is natural and is not related to cracks in the headlight or a defective unit.
If moisture regularly enters the unit, it is necessary to find the place of depressurization. Often this is a loose fit of the light bulb to the body due to a worn gasket. After blowing the block with a hair dryer, it is necessary to replace the gasket and check the tightness of the fasteners.
You can clean the drainage channels without removing the optics from the car: remove the breather through the hood or crawl under the bumper. In the Infiniti model, a membrane is installed in the breather that prevents dust from entering the headlight housing. Over time, the membrane becomes clogged and the ventilation system fails.
Clean the channels with thin wire. Some manufacturers make one ventilation hole in the case, but to ensure convection it is necessary that there are two channels in the case. In this case, experienced mechanics recommend making ventilated plugs, this will prevent the glass from sweating:
- Remove the standard plastic plugs.
- Drill two holes with a diameter of 2-3 mm in the plugs.
- Insert polyester thread into the hole as a ventilation tube.
- Cut the thread.
- Coat the edges of the substrate with sealant.
If external checks show that the body is intact, ventilation is normal, but the unit is sweating, it is possible to determine the location of moisture entry only after dismantling the unit from the car.
Danger of fogging
If the headlights sweat from the inside, the danger for the driver and pedestrians is obvious: the illumination of the road is distorted. In addition to safety issues, the defect will not allow the driver to pass inspection. According to traffic regulations, any malfunctions in the lighting system are excluded. In addition, a sweating part will lead to the following problems:
- Corrosion of the internal parts of the block.
- A halogen lamp may burst if a drop of moisture falls on its heated surface.
- The electrical wiring contacts will short out if a large amount of condensate systematically accumulates in the part.
- The appearance of the car suffers: foggy optics are simply ugly.
Today there are enough ways to dry a headlight in the garage without removing it or with dismantling and complete self-diagnosis of the glass and housing. In 70 cases out of 100, simply re-gluing the structure is enough to restore the insulation. If the unit is damaged after a strong impact, it is better to replace the optics with a new one.
How to overcome fogging of headlights and flashlights
Many car owners have experienced fogging of headlights and taillights. If condensation that appears from the inside on the glass of lighting devices disappears soon after the headlight or lantern is turned on, it is treated as an annoying misunderstanding. However, moisture is not always so easily dealt with, and then it becomes a problem that has at least two serious consequences.
Firstly, when mixed with dust, which can also penetrate the headlight or flashlight, moisture initiates corrosion, which affects metal parts and electrical connections. This can lead to damage to the mirror coating of the reflectors to the point where it is necessary to replace the reflector, failure of electric corrector motors, xenon headlight ignition units, light bulbs and other components.
Secondly, the quality of light that the headlights are supposed to provide deteriorates. Each droplet is a miniature lens that refracts and scatters the light beam that the headlight should form. As a result, road illumination deteriorates, which in itself does not contribute to traffic safety, and also causes the driver to strain his eyesight and get tired faster during the trip.
There are known cases when fogging of the headlights became the reason for the car’s refusal to pass inspection. There is a solid basis for this in the traffic rules, recorded in the list of faults, which prohibits the participation of vehicles in road traffic if there are objects (liquids) not intended by the design inside the optical elements of their lighting devices.
We talk about the causes of fogging and ways to get rid of this problem with Yuri Borisenko, a specialist in the repair and adjustment of automotive lighting equipment :
— I can not only tell you, but also show you why headlights and lanterns fog up. For example, recently an owner who had imported an Infiniti from Russia approached me with this problem.
What immediately caught my attention was that the sweating headlight was set with gaps that should not have been there if the car had not been in an accident. Since there was an impact, it means that the headlight housing could have been damaged and lost its seal.
I lifted the hood and saw that the headlight was not even screwed to the body. But they didn’t screw it on because the hole in the headlight ear did not coincide with the base hole for attaching the ear to the body. If they started to tighten the eyelet with a bolt, something would break. As a result, whoever did the renovation left the place as is.
But elsewhere the repairmen did their best. Due to the impact, the wing mount cross member moved 2-3 centimeters to the side, so the factory mounts did not line up. Instead, two new holes were drilled for non-standard bolts and nuts. Since the signs of an accident were obvious, I began to look for a crack in the headlight housing.
I didn't have to search for long. From my experience I can say that in no less than 90 percent of cases it is damage that causes fogging of headlights and flashlights. Whether this problem can be overcome depends on the nature of the damage. A crack or small chip can be repaired with a soldering iron, glued or covered with silicone - depending on the owner, that’s up to you.
What is noteworthy in this case is that not only did a crack appear on the headlight due to the impact, but the mounting lugs also broke off. It is clear that they were restored, but why they did not repair the crack on the body is a question. This often happens: they repair a headlight, but they do it thoughtlessly. The ear was restored, but they ignored the fact that there was a crack - it was small and didn’t seem to affect anything. But it was through it that water got into the headlight in the rain and during washing.
Other causes of fogging relate to problems with the ventilation of headlights and lanterns, or to factory defects in sealing the joint between the glass and the housing, leaky fastening of light bulbs, electrical correctors, and casings covering the compartment where the lamps are located.
In this particular case, Infiniti had to remove the vapor barrier membrane from the headlight breather. Lighting devices are equipped with breathers so that the housing is ventilated from the inside and so that the air expanded from heating has the opportunity to escape from the headlight. When the headlight cools down and the air inside is compressed, the part of it that was forced out when heated returns to the headlight through the ventilation ducts. The purpose of the membrane is to prevent humid and dusty street air from entering the headlight. Air passes through, moisture and dust remain on the membrane.
Over time, the membrane becomes clogged. The headlight stops ventilating, and this is also the cause of fogging. If you try to blow out the membrane, but it tries to inflate like a balloon, then it needs to be changed. But try to find a repair kit.
Therefore, they usually follow a simple procedure - remove the membrane altogether. Such membranes are an example of Japanese engineering excellence. It turns out that there are plenty of eccentrics in Japan too. In addition to the fact that the membrane performs its function only for a few years and then becomes unusable, in the headlights of Japanese cars you can often see only one breather, although, in my deep conviction, there should be at least two of them - at the bottom of the headlight and at the top, for convection to occur. At the same time, on the casting of the headlight housing there may be places for two or three air vent valves, but for some reason they are muffled. Then you can drill a hole - the headlight will begin to “breathe” normally, which helps to cope with fogging.
Non-Japanese manufacturers usually do not suffer from this. Their headlights and lanterns have as many breathers as needed; the breathers themselves are a simple rubber U-shaped elbow, sometimes with a piece of foam rubber inside. So, when removing the membrane, there is no need to be afraid that dust will flow into the headlight. The experience of other manufacturers shows that a simple breather without any membranes copes with its task quite well - the headlight is ventilated and does not sweat, dirt does not penetrate into it, the breather itself is almost eternal.
As for the factory defect in the leaky fastening of the casing covering the compartment where the lamps are located, again, I recently had one Volkswagen.
There were signs of an accident under the hood, but when I removed the headlight and began to inspect it, I found no damage to the body. I assumed that the leak appeared at the junction of the glass and the body. I don’t know what kind of sealants some manufacturers use to glue glass to the body, but often after some time the sealant dries out, cracks appear in it, and when you start to detach the glass, the sealant falls out like dust.
True, in this case the sealant had nothing to do with it. I poured water into the headlight and it didn't leak anywhere. This means that there are no leaks between the glass and the body. I dried the headlight, assembled it and began to pour water on it from the outside until condensation appeared on the glass from the inside.
I dried the headlight again and carefully opened the lamp compartment. There were traces of leakage on its lid.
The problem was caused by a “chewed” rubber seal. In my opinion, this is a design flaw. It was possible to install the lid tightly only after several attempts - the rubber band kept trying to twist out and “escape” from its place. I have no doubt that when it is necessary to replace a burnt-out lamp in a headlight in order to hermetically close the lamp compartment, the headlight will have to be removed - you can’t do this correctly on a car, no matter how hard you try.
Also in the same Volkswagen there was water in one of the fog lights. Everything turned out to be simple with her.
I removed the fog light and found a hole in the upper part of the housing. I sealed it with silicone - water stopped flowing into the headlight. Generally speaking, it is not always so easy to deal with the problem. It happens that you find several obvious reasons and eliminate them, but the headlight continues to fog up. This means that there is something else that is not visible to the naked eye. Diagnostics is needed, and in the case of fogging, it only consists of pouring water into the headlight or watering the outside of the headlight and then looking for leaks. After fixing the problem, it is important to completely dry the headlight using a household hair dryer, or, if carefully, a technical one. Moreover, if it is easy to remove moisture from the internal space of the headlight housing, then for hidden cavities, which are electric motors and other components, a long “frying” with a hairdryer will be required.
Our verdict
The main reason for fogging of lighting equipment is mechanical damage to headlights and lanterns. In addition, lighting devices can fog up if there are problems with housing ventilation and sealing the joint between glass and housing, due to leaky fastening of light bulbs, electrical correctors, and casings covering the compartment where the lamps are located. It is possible to defeat fogging, but to do this, in each specific case, you need to find all the reasons why water penetrates inside the device.
Eliminate fogging of headlights
How to reuse old brake pads
Car jack attachment
Lifehack from a plastic bottle for storing screws and bolts
Device for welding pipes and other metal structures
How to make a stove for a cauldron from old car wheels
Fogging of headlights from the inside is not as harmless a phenomenon as it seems at first glance, when steam and moisture accumulate on the glass of the optics, the illumination of the road at night becomes worse, and accordingly, the level of safety of the driver and passengers in the car decreases.
- 1 Why do car headlights sweat from the inside?
- 2 Ways to remove headlight fogging
- 3 Fogging headlights on Priora
- 4 Elimination of defects in Lada Granta taillights
- 5 Fogging headlights on Hyundai Solaris
- 6 Eliminate fogging of the front optics on a Ford Focus 3 car
- 7 Clogged vents
- 8 Cloudy headlight glasses
Car owners often ask the question: if the headlight sweats, what should you do in this case? In this article we will look at the reasons for fogging of car optics and possible methods for eliminating this problem.
Why do car headlights sweat from the inside?
The headlight often fogs up in humid weather or after a car wash. Moreover, this phenomenon does not depend on the mileage of the car; the headlights inside can be damp even on a practically new car. A car headlight (tail light) is a closed space in which, as the temperature from the incandescent lamp increases, the internal pressure also increases. To prevent excess pressure from being created, all automotive optics have special valves.
The purpose of the valves is to let air in and out of the optics, but dust, dirt and water should not fly into it. In the evening after a trip in the off-season, the headlight cools down, the pressure in it decreases, and moist air enters through the valve. Moisture condenses on the glass, causing the optics to fog up. There is nothing wrong with this if the moisture quickly evaporates after the car warms up and starts moving. But condensation does not always go away, and then it already causes a lot of problems for the car owner. The most common cause of the defect is caps falling off the ventilation valves; in this case, the optics require repair. Also, moisture can penetrate into the headlight through a barely noticeable crack in the glass or in the housing - if condensation lingers in the optics for a long time, it must be repaired.
Ways to eliminate fogging of headlights
There are several ways to eliminate fogging of headlights in a car, it all depends on what defect is detected in the optics. If a crack is found on the case, it must be soldered using a soldering iron or hair dryer; you should be aware that in this case it will not work:
- seal the crack with glue;
- seal the defect with tape or adhesive tape.
The headlight is made from special ABS plastic, which cannot be glued together.
Glass is often glued to the headlight with silicone sealant; over time, the sealed layer sags, and moisture gets into the optics through small gaps. To eliminate the defect, in this case, you should remove the glass and lay a new layer of sealant.
If the cause of fogging of the flashlight is the ventilation valve, it is necessary to eliminate the defect - clean the valves from water and dirt, provide air ventilation. Unfortunately, valves for headlights are not sold separately, so you have to rebuild them.
There are several popular ways to combat fogging of car optics; car owners fix the problem like this:
- place a bag of silica gel in the headlight housing (the substance absorbs moisture well);
- pour some brake fluid into the optics.
Each of the methods has its own side effects: the brake fluid causes the glass to become cloudy, and the silica gel itself swells with water over time and can damage one of the elements inside the structure.
In some cases, foggy headlights are a design flaw, but car manufacturers are aware of this and are taking all measures to combat the unpleasant phenomenon. For example, the Kia company standardly installs containers with silica gel on some models; a similar Kia Sorento headlight can be seen in the photo below.
Fogging headlights on Priora
On Lada Priora cars, the optics sweat very often; the problem occurs on almost every second car. The reason for the defect is that the back cover does not fit too tightly to the body, because of this moisture penetrates into the optics. To fix the problem, you can try replacing the rubber seal. But still, the main cause of the defect is poor ventilation; you must first of all pay attention to the ventilation valves.
Here is one way to deal with headlight fogging on a Priora; it is better to do this in warm (hot) sunny weather:
- We install the car with optics on the sunny side;
- remove the rear covers from the headlights;
- warm up the insides of the optics with an ordinary hairdryer;
- We heat the silica gel in a frying pan, pack it in cloth, and place it in the case so that it can then be easily taken out.
You need to keep an eye on the silica gel and change the bag when it swells.
Elimination of defects in Lada Granta taillights
On the Lada Granta, as well as on the Kalina, the taillights often sweat in the winter, and in the summer they get clogged with insects and dust. How can you deal with such an unpleasant phenomenon?
Let's consider eliminating a defect on Grant's car:
- disconnect the protective cover in the trunk, turn off the power from the optics, remove the rear light (it is secured with three 8-mm nuts);
- thoroughly rinse the glass, place the lantern in a bath of water, add two or three drops of Fairy to wash dishes;
- after washing, let the plastic dry thoroughly;
- install the flashlight in place, take a bag of silica gel, attach it to the back of the optics, for example, between the wires;
- seal the lantern - seal it with tape at the back;
- We put the plastic in place and close the lantern with a plastic plug. After the work has been done, the lights should not fog up for a long time.
Fogging headlights on Hyundai Solaris
Headlight fogging can occur on any car model, and the Hyundai Solaris is no exception. There is nothing wrong if the optics sweat in damp weather, and 5-10 minutes after turning on the light, the condensation from the glass disappears. If the Hyundai Solaris is under warranty, if the defect is severe, in many cases official dealers change the optics under warranty, but often car owners have to solve this problem themselves.
As mechanics explain, the headlight sweats because the headlight glass shifts on its plane due to vibrations of the car, and air and moisture enter the optics housing through the joints and irregularities of the sealant. To eliminate the defect, it is necessary to remove the headlight, dismantle the glass, and re-glue it with silicone sealant.
If the headlight is foggy and you need to drive urgently, we use the following method:
- open the rear housing cover on the headlight;
- turn on the high beam;
- wait until the condensation from the glass disappears.
In many cases, this method helps, and the owner of the car can hit the road in the dark. If this method does not work, you can try warming the insides of the headlight with a regular hairdryer with the rear covers removed.
Eliminating fogging of the front optics on a Ford Focus 3 car
It is worth noting that headlights usually do not fog up opposite the lamps; most often, condensation appears on the glass below. On a Ford Focus 3, moisture accumulates most in the area of the turn signal; let’s look at how to eliminate the defect here.
We purchase corrugated door wiring and a standard nylon tie. We carefully make a hole in the lower ebb of the turn signal, use a soldering iron, since when drilling, the chips will get inside the body.
We fake holes on the sides of the ebb and install a screed in them.
We put the corrugation on top and fill it with padding polyester inside.
To ensure that the corrugation does not dangle, we tighten it with another tie to the body.
We got a new ventilation hole next to the turn signal, and now the glass on the headlight will not fog up.
Clogged vents
Each headlight is necessarily equipped with a ventilation hole, which plays the same role as a breather in an engine or gearbox to relieve excess crankcase gas pressure. If the valve becomes clogged, the resulting condensation cannot escape from the enclosed space and is deposited as fog on the headlight glass. To prevent the optics from sweating, these valves must be cleaned periodically.
On modern cars, there are usually two or three valves in each headlight; the location of the ventilation ducts depends on the car model.
On the outside, the plastic rounds look like plugs, but in fact there are channels located here.
Most often, dirt clogs the ventilation ducts and gets into the headlight at the bottom, which is why the optics become dirty and the glass fogs up.
To protect the optics from dirt from the road, it is necessary to install protection for the front fenders. If the headlights sweat, you should drill additional ventilation ducts, but it is better not to do them at the bottom. It is convenient to install the valves in the rear covers; in this case, you do not have to drill the headlight itself.
Cloudy headlight glasses
During operation, car headlight windows can not only fog up, but also become cloudy; because of this, the optics do not shine so brightly, which also affects traffic safety. Plastic glasses can lose their appearance for various reasons:
- the outer surface of the headlight is wiped with a dry cloth (this cannot be done);
- Dust and sand flies onto the glass from the road, as a result, small scratches form on the glass surface and yellowness appears;
- The glass becomes dull over time, natural aging occurs, and the glass also burns out under the sun's rays.
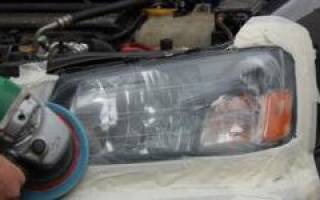
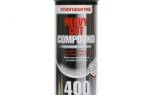
To return the glass to its normal appearance, they are polished. After polishing, the headlight will not look like new, but its light transmittance will increase. If the glass is inexpensive and sold separately, it is easier to replace it than to polish it. The optics are polished using special polishing pastes, first processed with a coarse-grained compound, then with a fine-grained paste.