How to tint car windows
DIY car window tinting
Car window tinting is, without a doubt, an important element of external tuning. To tint your car or not is a matter of choice for every car enthusiast. In this article we will talk in detail about how to properly tint car windows with film yourself. And at the end you can watch a training video.
Tinting is a process that requires care and preliminary preparation. But with some skill, you can do car window tinting yourself.
You may also be interested in the following materials on our website:
Below we have prepared for you step-by-step instructions for tinting car windows: from choosing a tinting film to gluing a reflective strip on the windshield.
Choosing a film for car window tinting
The tinting film market is so large that to review it, we wrote a separate article about films for tinting car windows.
We do not recommend buying cheap Chinese DIY kits; instead, we recommend purchasing only high-quality roll film for window tinting.
Also listen to the recommendations of sellers who sell tint films. From them you can purchase all the tools necessary for tinting windows.
Still, it is better to see once than to hear a hundred times. Therefore, we suggest watching a video tutorial on tinting car windows with your own hands, which is located at the bottom of this article.
And for better assimilation of the material, all stages of self-tinting windows are described below and can be used as a cheat sheet.
Materials and tools for tinting car windows
In the process of tinting your car windows yourself, you will need the following tools:
- Spray,
- Soft and hard forcing,
- Paper napkins,
- Sponge,
- Scraper,
- Ruler,
- Knife,
- Hair dryer.
To work with the tint film, use a water-soap solution prepared in the following proportion: 5 drops of washing shampoo per 1.5 liters of water. Mix the solution thoroughly (you can use the container of your spray bottle for this).
Before you start tinting, you should thoroughly clean the exterior of the glass using a prepared water-soap solution.
Pattern of film for tinting car side windows
Before you start tinting your car windows, you need to cut out the tint film.
To do this, you need to determine where the adhesive layer is located - it is protected by a transparent liner. Always cut the film along the roll and make sure that the cut piece is a few centimeters larger than the glass.
- Moisten the outside of the glass and place a pre-cut piece of tint material on it with the liner facing toward you. The bottom of the film should be parallel to the outer horizontal window seal and overlap it by approximately one centimeter.
- Using a punch and a knife, make side vertical slits in the film so that you can then place the pattern over the vertical seal by about one centimeter.
- Next, having folded the bottom part of the pattern, lower the glass a little and, having secured the film along the upper edge of the glass, make a horizontal cut in it, and then give it its final shape.
The blank for tinting fixed glass is cut out so that it is several millimeters larger than the transparent area of the glass.
- Pre-fix the film on the outside of the wet glass surface.
- Cut out the workpiece carefully and slowly.
- If the transparent area is limited by the seal, then cut along the seal using a forcing.
Be careful not to damage the car's exterior parts with a knife!
- For ease of work, try to remove excess pieces of the pattern immediately after the cut.
- If the transparent area is limited by an opaque strip of paint, then the cut should be made so that it extends a few millimeters into the opaque part.
Be sure to ensure that the knife blade is always sharp (break off dull parts of the blade in a timely manner).
Pattern of film for tinting the rear window
The pattern of the tint film for the rear window of a car has some features due to its spherical surface.
- Before cutting, the outer surface of the glass and the film for tinting must be completely dry.
- The letter “H” is drawn on the surface of the glass with a wet sponge, and the tint film is rolled out along the roll with the adhesive layer facing out. Our blank must be larger than the transparent area of the glass.
- The remaining tint material along with the roll must be carefully removed. To do this, it is better to resort to the services of an assistant.
- After this, place the workpiece on the outside of the rear window so that there are no horizontal folds, but only vertical ones.
- Smooth out the film in an “H” pattern, since glass has a spherical surface.
Wrinkles on the tint film must be smoothed out using a hair dryer. Be careful - do not overheat it; only the vertical folds can be heated!
- After removing all the folds, moisten the surface of the glass and film, and carefully smooth the pattern. As a result, it should take the shape of glass without wrinkles.
- Smooth the workpiece from the center of the glass to its edges, both vertically and horizontally.
Carry out this operation carefully using forcing. Make sure that the film does not break during the tinting process, but is evenly smoothed over the surface of the glass.
The next stage of tinting is precise cutting of the film. In this case, it is recommended to use a spotlight to illuminate the car interior, and the cutting line should extend several millimeters onto the opaque area of the glass (see the video below).
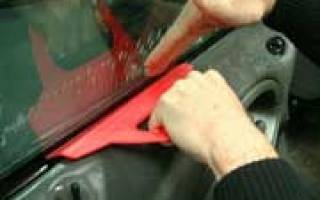
Applying film for tinting on car side windows
Wet the surface of the side glass and use a scraper to clean its lower part. Then lower the glass a few centimeters, wet it and also clean the rest of the surface using a scraper.
Clean the surface with the blade consistently and make sure that there are no uncleaned areas.
Next, wash the glass with a hard sponge and wipe dry using a rubber pad. Wipe the edges of the glass with a napkin. Moisten and wipe the glass again with a rubber pad.
- Before applying the tinting film, wet the glass generously.
- Then it is necessary to remove two-thirds of the liner protecting the adhesive layer from the workpiece and moisten the adhesive surface. It is convenient to carry out this operation on the rear window of the car by placing the pattern with the adhesive layer facing outwards.
- It is better to cut off the excess liner removed from the workpiece before applying the tint film.
Wet your fingers. Your fingertips must be clean, since in the process of tinting the glass you will need to touch the adhesive layer of the film.
Carefully take the workpiece and place it on the prepared glass surface.
Try to ensure that the adhesive layer only touches the surface of the glass and does not touch the seals or other surfaces.
Align the tint film along the top edge. Make sure that there are no gaps or gaps anywhere, and begin to carefully squeeze the solution out from under it.
Follow a few simple rules:
- Hold the pattern with your hand, since when you initially squeeze out the liquid, the workpiece will slide along the glass.
- Squeeze water from the center to the edges.
- Use rubber and then hard forcing. Using hard distillation, expel the liquid in the same directions - from the middle to the edges.
- Then, using a forcing tool and a hair dryer, fix the film at the top edge of the glass.
- After this, use a knife to remove the excess tinting film protruding onto the upper edge of the glass - this technology allows you to avoid leaving gaps along the upper edge.
Raise the glass. Bend down the bottom part of the pattern protected by the liner and generously moisten the glass with the solution. Remove the liner completely.
Do this extremely carefully and make sure that the film without a liner does not touch anything other than the glass with its adhesive layer!
Carefully tuck the tint film under the glass seal. Squeeze out the horizontal inner seal using a force and, when inserting the film for tinting, make sure that it does not break - this operation also requires certain skills, so be especially careful (pay attention to how the master will carry out this operation in the video tutorial below) .
- Squeeze the solution out from under the film using hard forcing: squeeze out the water in successive movements from top to bottom and from the middle to the edges.
- Finally remove any remaining moisture using a distiller wrapped in a napkin and a hairdryer.
- Make sure that no water bubbles remain under the film during the tinting process.
The technology for cleaning and sticking small fixed glasses will be identical.
Applying film for tinting on the rear window of a car
The process of cleaning the rear window of a car is slightly different as it has heating filaments and extreme care must be taken not to damage them. It is also recommended to use a plastic spatula instead of a scraper.
- After cleaning, the glass should be washed with a hard sponge, wiped dry using a hard scrub and wiped with a napkin around the perimeter.
- Before applying the film for tinting, moisten the glass generously with the solution, while covering the rear shelf with a rag or some other available material so as not to flood the car’s electrical equipment with water.
To apply the tint film to the rear window, it is better to use an assistant.
- When removing the liner, immediately wet the exposed adhesive layer with a soap and water solution.
- Carefully, without touching the adhesive layer to foreign objects, place the workpiece on the glass - this is a very important operation and requires a certain skill.
- Make sure that the film does not curl, wrinkle or bend.
The adhesive layer of the pattern should only touch the treated surface of the glass and, in no case, any parts of the car’s interior or the installer’s clothing.
Align the pattern with the glass so that there are no gaps, and begin to smooth it using a rubber pressing tool.
When tinting the rear window, smooth the film from the center to the edges so that no air or water bubbles remain under it. Use a plastic spatula in hard-to-reach places.
- Next, moisten the tint film and squeeze out the remaining solution from under it using hard forcing.
- Squeeze along the heating threads - from the center to the edges.
- Then perform this operation by hard forcing, but already wrapped in a napkin.
The final stage is pressing the tint film around the perimeter by forcing, while simultaneously heating the glass from the outside using a hairdryer.
Be careful not to overheat the glass with a hairdryer - it may burst!
Pasting a reflective strip on the windshield
The tint strip must be cut along the roll with a small margin. Then wet the surface of the glass and place your workpiece on it with the adhesive layer facing out.
Make slits along the seals and remove excess tinting film.
Do not forget that you must use only special blades that do not leave scratches on the glass!
- Smooth out the pattern so that there are no horizontal folds - only vertical ones.
- Then, using a hairdryer and forcing, heat and smooth out the vertical folds.
The windshield is sensitive to temperature changes, so do not heat it up or cool it down suddenly!
- Moisten the workpiece, fold it in half and smooth it carefully so that there are no folds or wrinkles.
- Then, using a ruler and a knife, make notches at a distance of 10-12 centimeters from the top edge of the pattern.
Make notches as often as possible. Using this method you can make a reflective strip of any width. The width will depend on how far from the edge you make the notches.
- After this, remove the excess tint film.
- Then lay out the pattern along its entire length and use a ruler to cut the notches between each other (this process is clearly shown in the training video below).
When working with film when tinting windows, always place the adhesive layer and liner on yourself.
- After this, place the resulting workpiece again on the damp windshield from the outside.
- Wet and smooth the pattern and use the light from inside to make precise cuts.
To avoid gaps after applying the tint film, make a cut so that the film extends a few millimeters onto the opaque area of the glass.
Clean the glass and apply the film for tinting from the inside in the same way as in previous cases.
Video tutorial on how to tint car windows yourself
How to properly tint a car
An article about how to properly tint car windows. Film selection, work process, subtleties and tips. At the end of the article there is a video on how to tint a car with your own hands.
Modern films make it possible to almost completely close the interior from prying eyes. At the same time, their light transmittance does not affect the quality of viewing. In this article we will talk about how to perform high-quality tinting without resorting to the services of a tuning studio.
Choosing a film
The modern market for car tinting films is truly huge, and a quality review of it would require a separate article. The main recommendation when choosing film is to refrain from purchasing simple sets from Chinese manufacturers. The miser pays twice, and the quality of Chinese goods in most cases leaves much to be desired.
If you want to get a high-quality coating, purchase high-quality roll-type film. It would be a good idea to talk to film sellers and listen to reviews from motorists who have already had tinting done.
We select materials and tools for work
The set of tools for tinting is not very large and is quite affordable for purchase:
- Sprayer (manual);
- Scraper;
- Sharp scissors;
- Paper napkins);
- Metal ruler;
- Sponge (hard);
- Forcing (soft and hard);
- Stationery knife;
- Mounting hair dryer.
In addition to the film itself, when tinting a car, the main consumable material is a soap solution. It’s not difficult to prepare – take five drops of car detergent for one and a half liters of water. The solution should be mixed thoroughly and poured into a spray bottle. The solution is intended for high-quality cleaning of tinted surfaces and to simplify its smoothing during the pasting process.
Making a pattern for the side glass
For any part of the car that you are going to tint, you must first cut out a pattern. When making patterns, you should follow a few simple rules.
First, we find a layer with an adhesive composition. This is not difficult to do - just look at which side the transparent protection is on.
The cutting is always carried out along the roll, and it is necessary to give a small allowance for further adjustment. The allowance is made of a few centimeters. The beginning of making a pattern begins with moistening the glass and cutting off a piece of the required size from the roll, which must be laid on the moistened glass with a protective layer towards itself.
Then you need to align the bottom edge of the workpiece parallel to the bottom glass seal. The workpiece should be placed with an overlap of about one centimeter over the seal. After this, vertical cuts are made in the pattern blank so that it overlaps the vertical sealing edge of the door.
The pattern for non-opening glass is made with a smaller allowance than the previous one. The allowance should be only a few millimeters.
For these glasses, the cutting of the film is carried out similarly to the cutting for moving glasses. It is also applied to the moistened glass with the adhesive side facing you. Particular care should be taken here where the opaque area is limited by the seal.
In order not to damage the sealant, the film must be cut using a forcing device, which is applied to the sealant for safety. Do not forget that for a high-quality and clean cut you should always have a sharp knife. At the slightest dullness, remove parts of the blade that have become unusable. If there is an opaque layer of paint on the glass, make a pattern that slightly overlaps the paint.
Making a pattern for the rear window
Making the pattern for the rear window is slightly different from the side windows. Unlike previous works, we will need dry glass and dry film. Next, we write the symbol “H” on the glass with a wet sponge.
The film is laid on the glass along the roll, and its adhesive surface should face outward. As before, it is necessary to make a sufficient allowance, taking into account the sphericity of the glass.
We carefully trim off the excess tinting material. It’s not very convenient to do this alone, and it’s good if you have a partner. The workpiece is aligned on the glass in such a position that it does not have horizontal folds - only vertical ones are allowed for this operation. The film is smoothed with light horizontal and vertical movements.
It should be remembered that only folds located vertically are smoothed out by heating. After removing all the wrinkles, apply a soapy solution to the glass and pattern piece and smooth it out again. If everything was done carefully, the film will take the shape of glass and will not have wrinkles.
The pattern blank is smoothed from the center to the edge. This operation must be done carefully, and to simplify the work, use forcing. Pay special attention to the film creases - there should not be any. The film must be smoothed carefully and evenly.
The final step in creating a pattern for glass is precise trimming of the edges. The cutting line that runs along the workpiece should slightly overlap the opaque areas of the glass. To make this task easier, use lighting, placing it in the car interior.
Car side window tinting
Once all the necessary patterns have been prepared, you can begin tinting. Before you begin pasting, you will need to thoroughly clean the glass. This operation is performed using a scraper and abundant wetting with the prepared solution.
After cleaning the lower glass segment, the upper part is cleaned. To perform this operation, you will need to lower the window. Carefully ensure that there are no uncleaned areas.
After processing the glass with a scraper, it must be thoroughly rinsed again with a hard sponge. Wipe the glass with a rubber pad, and its edges with a paper napkin. Having finished processing, thoroughly wet the glass again and walk over it with a rubber pad. All these operations are necessary for high-quality adhesion of the film to the glass.
Immediately before gluing the film, the glass is once again generously moistened with soapy water. They begin to paste over the glass by lowering it a couple of centimeters from the top. Part of the protective layer is removed from the pattern, approximately two-thirds the size of the pattern itself. The adhesive layer is also moistened with soap solution.
In addition to wetting the glass and film, wet your hands as well. You need to wash your hands, because during the pasting process they will come into contact with the adhesive composition of the pattern.
After preparation, the pattern is carefully placed on the glass. Contact of the film with seals and other parts should be avoided. The pattern is aligned in accordance with the upper edge of the glass being glued, and after checking for the absence of gaps, the liquid is carefully squeezed out from under the film being glued.
At the initial stage of squeezing out the solution, the pattern may slide a little on the surface, so hold it with your hand to be safe. The solution is extruded from the center to the edge of the pattern. First, soft material is used, and then forcing from hard material.
Hard forcing is used in the same way as soft forcing - from the center to the edge. Using a forcing tool and a mounting hairdryer, the pattern is fixed to the edge of the glass along the upper edge. The excess pattern protruding beyond this edge is cut off with a knife, which will allow no gaps to be left.
After pasting the upper part of the glass, it rises and is abundantly moistened with the solution in the lower part. The protective layer is finally removed, and the film is carefully tucked under the lower glass seal. During this operation, care should be taken to ensure that there are no creases in the pattern. It is convenient to bend the seal using forcing.
The solution is removed from under the pattern, as in previous cases. You can completely remove moisture by forcing it out, wrapped in a napkin. Once again, make sure that all the solution is removed and that there is no air or moisture left under the pattern.
Pasting of fixed car windows is done using a similar technology.
Car rear window tinting
Since this car window is in most cases equipped with heating filaments, cleaning it is slightly different from cleaning the side windows. It is not recommended to use a scraper for this purpose - it is better to use a plastic spatula. After treating the glass with a spatula, rinse it thoroughly with a hard sponge, wipe it with napkins and use a hard scrub.
The glass, as in the operation with side windows, is generously moistened with soapy water. After removing the protective layer, immediately moisten the adhesive with the solution. Next, the pattern is drawn over the glass. The film tends to curl, so it is advisable to seek outside help to avoid creases.
The pattern is aligned with the glass and the absence of gaps is checked. The pattern is smoothed from the center to the edges using a rubber pressing. In places where smoothing is difficult, you can use a plastic spatula.
The film is moistened again and the solution is finally removed using a distillation wrapped in a napkin. This operation must be done by carefully working along the heating threads, trying not to damage them. The final step is to press the film around the perimeter, while the edge is heated with a hairdryer. But be careful - don't overheat the glass!
Car windshield tinting
To tint a car's windshield, the same film is used as on other windows. A reflective strip is made from it. The bandwidth can be almost any, but reasonable limits should be observed.
The pattern blank is cut along the film and, as mentioned above, a small allowance is made. The windshield is wetted with liquid, and the workpiece is laid out on it with the adhesive composition facing out. The film is carefully trimmed along the edge of the seal, and the excess is removed.
The pattern is smoothed out according to the same principle as the previous ones - vertical folds are allowed. The folds are heated with a hairdryer and smoothed out by forcing. When performing this operation, be extremely careful - the windshield does not like sudden temperature changes and the pattern should be heated gradually.
Next, the workpiece is folded in half, and before that it is wetted, and notches are made on it at a distance of about 100 mm from the top edge. The notch is made along the edge of the workpiece and then goes down several tens of millimeters at an angle to the horizontal cut. If possible, serifs should be applied as often as possible.
After the notches are made, the lower unnecessary material is removed and the workpiece is unfolded. The bottom edge will now have a lot of teeth that are cut off. This method will allow you to make a reflective strip of almost any width.
The final stage of making the pattern is its placement on the glass and precise trimming. Otherwise, gluing this glass with film is no different from gluing side windows.
Conclusion
In conclusion, it is worth noting that the production of patterns is carried out from the outside of the car, but the filming is done from the inside. This process is not the easiest, but with the right amount of patience you can handle it.
Video on how to tint a car with your own hands:
avtoexperts.ru
It seems that many car enthusiasts have more than once looked with hidden envy at cars passing by and tinted to zero. Of course, high-quality tinting changes the appearance of the car, making it visually attractive. However, in addition to a purely aesthetic role, car window tinting also performs useful functions. For example, it allows you to reduce the temperature in the car interior in the summer, without letting in a significant share of solar energy, and in the winter it helps to accumulate heat - after all, the sun's rays warm up a dark surface better. In addition, tinting performs a protective function, hiding from the eyes of ordinary people what is in the cabin and trunk (if it is a hatchback or station wagon) of the car. The only inconvenience that tinting can cause is a decrease in visibility at night.
The windows of many modern cars can be tinted at the factory. The manufacturer often determines the comfortable degree of tint (the throughput of the tint film) in accordance with international safety standards. The traffic police has no complaints about such tinting. If the film used to tint car windows does not meet the specified standards, the traffic police may fine the car owner and force him to remove the tint. However, we are talking only about the glass of the front doors: according to GOST, the throughput of the tinting film for these windows should not exceed 30% (that is, the tinting should absorb no more than 30% of the light).
These standards do not apply to the glass of the rear doors and trunk, which today many automakers tint themselves on the assembly line. Consequently, they can be tinted “to zero”, that is, with a tinting film whose throughput ranges from 5 to 15%.
Let's say you decide to tint the windows of your car. But you don’t trust companies that do tinting and want to do everything yourself. Commendable. We will try to help you with some tips.
Tip #1. Film selection.
You are probably not your own enemy, and therefore you must approach the choice of film responsibly. First, remember that a good film, characterized by durability and optimal transmission capacity not only for sunlight, but also for the driver’s vision, is not cheap. However, is it worth saving the budget when it comes to high-quality car tinting? Secondly, it is worth deciding which glasses will be tinted. All car windows can be tinted, but the throughput of the films for the windshield, rear and side windows will be different. Let's say you wanted to tint all the windows of your car. Then a film with a transmission capacity of 50% is suitable for the windshield, for the front side windows - 35%, and the rear windows and trunk windows can be tinted with a film whose transmission capacity is 15%.
In addition to the degree of transparency of the film, its color must also be taken into account. The optimal choice is charcoal gray, which is comfortable for the eyes of car passengers and well prevents sunlight and prying eyes from entering the cabin.
Tip #2. Preparing for tinting film.
You have purchased the tint film, now you need to prepare the tools, materials and the car windows themselves for pasting. The tools you will need are a hair dryer, a utility knife, a spray bottle, a marker, a plastic spatula, a needle, and a piece of clean cloth. Materials: the actual tint film, soap solution (5 drops of washing liquid per 1.5 liters of water).
Now all that remains is to dismantle and clean the glass. We advise you to remove them, since covering car windows with tint film without removing them is a complex matter and you cannot do it without experience. It's better not to risk it and remove the glass. Then they should be thoroughly washed with soapy water, complex stains should be removed with a solvent, and then washed again with soapy water. The next stage is preparing the “pattern”. To do this, take a piece of tint film, apply it to the glass and mark the edge of the cut with a marker, leaving a tolerance of 5-7 millimeters. Then we cut this pattern with a stationery knife.
Tip #3. Covering car windows with tinting film.
The soap solution that we used to clean the glass from dirt will also be useful to us during the pasting process. It is important to remember that this procedure must be carried out in a clean room where there is no dust, otherwise microparticles may get under the film and damage its appearance. Apply a thin layer of soap solution to the surface to be glued using a spray bottle.
This is necessary so that the piece of film used to cover the glass can be freely moved over its surface during adjustment. Then wash your hands and wet your fingertips with soapy water. We take the tint film in one hand, and with the other we remove the protective film from its inner surface. Wet the released adhesive side with soapy water. Then, being careful, apply the film to a clean and damp surface, making sure that there are no horizontal folds. Vertical - allowed. Then we begin to carefully level the film using a plastic spatula, moving it from the center of the glass to the edges. In this case, the film must be heated with a hair dryer.
Difficult task? Very. Therefore, it is better to cover the surface of the glass with a tint film with an assistant who, for example, will warm up its surface while you smooth out the vertical folds.
It is very important to ensure that the film adheres as tightly as possible to the glass and does not allow bubbles to form. If this cannot be avoided and bubbles appear on the surface of the film, air or excess soap solution can be removed from them by piercing the bubble with the tip of a needle. The hole will be microscopic and will not affect the appearance or life of the tint film. When the film is applied, we leave the treated glass to dry for several hours and move on to another. Having completed all operations, being careful, we install the tinted windows in place - the work is ready.
Watch a useful video on car window tinting
How to tint cars
Do you know what a Caucasian will do with a time machine if it falls into his hands? The correct answer is toned). You've probably heard this joke a long time ago. I was able to visit a place where they will do any tint for your money. Not very expensive, reliable and practical. Time machines are not tinted here yet, but any other one is easily tinted.
This is what a regular tint box looks like. Let's go inside.
It's spacious inside, you can even live.
The entire range of films.
The degree of sunlight penetration is written with a marker. Previously, film with a low percentage of permeability was very popular; many motorists glued it “in a circle”. But from July 1 of this year, film below 70% light transmission is prohibited, although this restriction applies to the front half of the car, which is why many people glue “light front” and “dark back”. The film is produced by different companies and its quality is different, but there is nothing bad here. All products are American made.
A cutting table on which the film is cut according to pre-prepared templates.
Tools are placed on this table; front and rear windshields of domestic brands are also processed on it before tinting.
A special hair dryer for forming film. I will show you what it is later.
A bottle of soapy water is a necessary item for a toner; without it, nothing can be done here.
Windshield stand.
While the toner is working, the client can relax, smoke, drink tea, watch TV and watch the process of gluing the film.
Opposite the sofa there is a TV from which the head of the press service of the Prosecutor General's Office is broadcasting. “Good news everyone!” - he seems to say.
Let's start with the tinting process itself. After measuring the dimensions of the windshield, cut off a piece of film.
Spray soapy water on the windshield, remove dirt, and spray water again.
We unfold the film on it.
Next comes the molding process: a hairdryer is used to heat the fold on the rounded surface and with smooth movements of the terminals (a plastic rectangle) the film is shaped like glass.
Then it is cut again more precisely so that the film extends slightly under the glass edge. Since the film is dark and the edging is not visible through it, I illuminate it with a lamp from below.
The finished, molded film is removed from the glass and, using soapy water, attached to the plastic on the wall, while waiting for the inside of the glass to be prepared for gluing.
Place a cloth on the rear shelf so as not to wet it and the speakers.
Spray the inside with soapy water and wash thoroughly to remove all particles of dust and dirt from the surface.
Spray it again before putting the film inside.
The protective film is removed from the film, while soapy water is sprayed onto the adhesive side.
Two people carry the film so as not to wrinkle it and avoid contact of the adhesive part with the interior.
The film is in place, soapy water is again applied on top of it and all that remains is to remove the water with special distillations.
Everything you need for the final part of the film gluing operation.
That's all. After the water is removed, the glue comes into tight contact with the glass and after some time completely sticks to the glass. Soapy water is needed as a kind of lubricant.
Here's what this soap solution consists of: water and fairy cleaner.
The container is filled with water almost to the top.
Pour 20 drops of “fairy”.
Apply pressure using the handle.
That's it, the soap solution is ready, you can use it.
Now I’ll show you how to clean glass from the glue left after the film was torn off.
We clean the glass of the "seven".
And use a scraper to remove the dried glue.
Everything is ready, you can tint again.
The process of gluing the side windows is simple. There is no need to mold anything here, you just need to cut the film exactly to the shape of the glass.
Now I will show you the process of tinting windshields for domestic cars. They are usually removed before tinting.
Using a screwdriver, carefully bend the edges of the rubber seal inward.
In 5 minutes everything is ready. The toner asked not to show his face, I fulfill his request.
Place the glass on the table and remove the seal.
Again we cut the film to the size of the glass.
Apply soap solution.
We remove dirt, dust and 99% of all germs and bacteria.
Spray again. Then everything is clear without comment.
This is where windshields are tinted.
We also need to remove the “patch” for the rear view mirror. Heat it with a hairdryer and pry it out with a screwdriver.
Cool with soapy water.
The inside of the glass is polished to perfection.
After applying the film, leave it to dry in the sun for 10 minutes.
All that remains is to put the seal on the glass and put it in place.
To do this, you need to insert the rope into the seal.
The one sitting inside the cabin carefully removes the rope.
The one who is outside slams the glass with his hand so that it fits tightly into place.
Tint price list. Prices are not fixed, you can negotiate if a regular client gives him a discount.
The tint box is located in this republic, guess which one).
After the working day, the garbage accumulated on the floor is thrown away.
Well, that’s probably all, now you can safely tint your car yourself). If something is not clear, you can ask a question.
By the way, I made a video of the tinting process, for those who didn’t have enough photos, welcome here.
How to do car tinting yourself - detailed instructions.
Each driver decides for himself whether to have his car tinted. You can go to a car service center and pay a lot of money for the services. Or you can study in detail the article presented on how to properly tint a car with your own hands, and do everything yourself.
Why do you need to tint your car?
If you want to protect yourself from prying eyes, the best option would be to tint your car . Tinting has several other useful functions .
- The film coating has the property of reflecting heat rays. In summer, the car interior will not be so hot, the plastic elements will not heat up, and the sun's rays will not annoy the driver and passengers.
- The film blocks ultraviolet radiation. In a cabin whose windows are covered with a tinted coating, the upholstery and plastic elements will not fade so quickly.
- Provides additional strength. Tinted windows are more difficult to break.
- This tuning improves the appearance of the car. The design of the car acquires a certain gloss and chic, of course, provided that your vehicle is well-groomed and clean.
Types of tint films
The variety of film coatings takes a person who wants to tint their windows themselves literally by surprise. To make the right choice, you need to decide which windows you plan to tint and what functions the tinting should perform.
Coatings intended for the windshield, front side, rear side windows and rear window will differ in their light transmittance.
Film coatings also differ in color . Color pigment is part of the structure, but the more of it, the lower the light transmission properties . You can also install metallic tinting. It is highly reflective, but at the same time creates certain interference for cellular communications. In addition to the above film coatings, reinforcing films are produced; they are often called “armored”.
The best brands producing film:
- LLumar (used by 70% of masters)
- SunGuard
- Infinity
- Contrast
- Johnson
- SolarGuard
- SunControl
How to choose a tint so you don't have to remove it
Situations arise when toning needs to be removed , this happens:
- when the light transmittance does not meet the requirements of traffic regulations;
- when the material turned out to be of poor quality and defects began to appear;
- when the color of the coating spoils the appearance of the car.
The throughput degree directly affects the safety of driving a vehicle. There are requirements for technical regulations , which stipulate the permissible transmittance coefficient.
If these requirements are not violated, you can drive a car without fear of traffic police fines.
These rules state that the filter :
- For the front it has a tolerance of at least 75%
- For side – at least 70%
The rear is not standardized; there you can install an opaque tint or a transparent one with minimal light transmittance, with the exception of a mirror film coating.
Now that you have decided on the parameters of light transmittance, we advise you to pay attention to the quality of the film tinting coating. The most durable and best quality is metallized film , but it also costs more. But painted material is cheaper and will last less, only 2-3 years.
If you do not have experience in gluing yourself , then it is better to opt for inexpensive painted film. However, you shouldn’t buy the cheapest tint in the store either. In such products, the front material and glue itself are far from being of the best quality.
We prepare materials and tools for tinting with our own hands
The most ideal place for such work is a garage with good lighting .
You can’t tint outdoors: wind, dust, and midges will make their negative contribution.
What to cook:
- buy the required amount of film, it is better if there is a little more of it, taking into account the fit;
- spray;
- soap or liquid detergent;
- pure water;
- blade, construction knife or for cutting paper;
- cloth napkins;
- a plastic spatula for smoothing the film and removing air bubbles from under it (often a forcing tool is included with the film);
- high power hair dryer.
Also have a glass scraper ready. Make a soap solution by diluting a couple of drops of detergent in 500 ml of water.
We tint car side windows
Before pasting the side windows, it is better to remove the glass and wash it with soapy water.
Making a pattern for the tint film
Before making the tint, we will make a pattern from the film . For cutting you will need a table; it must be clean and of a suitable size in order to cut the material not only for the side windows, but also for the rear window.
The cutting must be done taking into account allowances for errors, apply the film to the glass and add 5-7 mm on all sides, use a marker to mark the cut line and cut it out. If the glass will not stretch, the edge is made minimal, 2 mm.
Side window tinting sequence
We have the blank, now let’s start gluing it.
- Before fixing the tint, the entire area to be pasted is generously moistened with soapy water from a spray bottle.
- The gluing process starts from the top. Two-thirds of the protective layer is removed from the film and also sprayed with the solution. Hands should also be moistened with water.
- The workpiece is applied with an adhesive layer and aligned along the top edge.
- If everything is smooth and there are no gaps, begin to force the liquid from the center to the edge. These actions must be performed carefully. In this case, the film can slide over the surface. Use a soft cloth, and then a hard spatula and a hair dryer.
- After removing the bubbles, the protruding edges of the pattern are cut off with a stationery knife.
- Next you need to glue and also smooth the bottom part. The protective layer is removed from the pattern, the adhesive layer is moistened with a soap solution and applied to the glass surface. The liquid is distilled out in the same way as when gluing the upper area. To avoid vertical folds , follow the direction of movement: from the center to the edges.
How to tint a car's rear window
When tinting the rear window, it is worth considering that there are heating filaments on it. The heating elements must be thoroughly cleaned of dust and debris and the glass must be washed.
Making a pattern of film for tinting the rear window
is not removed for tinting , so the pattern is made right there “on the spot”. The sheet is applied to a wet glass surface (for this you need to generously spray the glass with a solution) and cut out with a good margin, 2-3 cm. Then the workpiece is applied again and the excess is cut off.
Rear window tinting steps
The technology for gluing the film to the rear window is no different from the process of tinting the side windows.
- Spraying a glass surface with soapy water.
- We apply the pattern, remove two-thirds of the protective layer from it, and also spray the adhesive layer.
- Using the smoothing method from the center to the edges, we remove air bubbles and all liquid from under the material, correct creases and smooth out folds. We make sure that the pattern does not move during the knurling process.
Recommendations on what to do if you notice defects
Errors in work happen even among experienced craftsmen; the main thing is to eliminate them in time. Therefore, it is better to do gluing with a partner.
If the result is not satisfactory, for example, bubbles remain, they must be “expelled” from under the material with a spatula. This is easy to fix when the tint is still damp. If the film has already “grabbed” well on the glass surface and vertical folds have become visible, it can be heated with a hairdryer or steam generator.
Sometimes, especially for beginners, the pattern begins to move; the curvature can be removed by heating the material with a hairdryer, peeling it off and repeating the whole operation again.
The film coating dries completely in about a day. At this time, it is better not to go anywhere, and if the trip cannot be cancelled, then it is recommended not to open the windows and it is advisable not to turn on the air conditioning.
learn more about the car tinting from the following video.