How to get rid of bugs on a car body
How to remove rust and bugs from a car body? Means and methods of combating corrosion
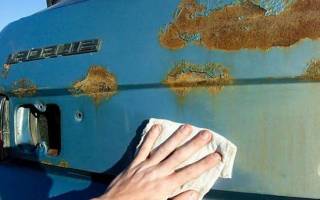
Hi all! In this article we will look at the interesting topic of how to remove rust and bugs from a car body.
Rust is the most common and common problem that motorists have to deal with when servicing their car. Corrosion damage to the body is very difficult to stop. To do this, it is necessary to promptly carry out a number of protective measures to ensure the safety of the body, rather than subsequently eliminating any damage.
The most common cause of body damage is small crushed stone flying out from under the wheels of oncoming or passing vehicles, as well as chemical reagents that are used to reduce icing of the roadway and sidewalks.
Motorists often ask the question: “How to remove rust from a car body?” I will try to briefly answer this question.
The process of removing corrosion from a car body consists of several stages:
- car washing, removing dirt and dust from the car body;
- body drying;
- examination of the body for the presence of areas damaged by rust, chips and cracks of paint with a mandatory inspection of wheel arches, sills, the bottom of the car and a thorough examination of the floor inside the car;
- areas damaged by bugs must be highlighted with adhesive tape;
- preparing the body for rust removal work;
- carrying out work to remove corrosion;
- additional treatment of cleaned areas from rust;
- applying putty with sanding until a smooth surface is created;
- painting the prepared areas.
Car wash
The process of washing a car is carried out manually or with the help of mechanization, using special sprayers. Washing must be carried out outside and inside the body, as well as the engine and luggage compartments, while simultaneously inspecting metal surfaces.
To increase the efficiency of the washing process, it is necessary to use car shampoos, which provide thorough, gentle cleaning of the body and prepare the body for the necessary work. Car shampoo easily washes away dirt, salt and fats. Returns natural shine to surfaces and protects paintwork. The product does not contain wax, does not remove polishes, and does not leave stains or streaks. The composition of car shampoos does not contain phenols, formaldehyde preservatives and other toxic components.
For manual washing, the most widely used car shampoos are: Blesk-Premium, Lux-Premium, Car-Wash, Biolux.
When using automatic washing stations, Koch Chemie series car shampoo is widely used.
Drying the car body
Drying the car body can be carried out in natural conditions or using fan heaters. After washing, the car must be thoroughly wiped, removing all drops of water, which during drying in the sun can lead to the formation of stains on the surface of the body.
Inspecting the body and identifying areas with damaged surfaces requires the immediate installation of protective covers to prevent the ingress of chemicals and paint during painting work.
Carrying out rust removal work
When using a car for a long time, especially in humid climates (and not only), “bugs” form damage on the body. How to remove bugs from a car body?
There are two main methods used to process metal to remove rust:
This type of repair involves removing bugs from a car with your own hands, as a rule, it is carried out in a personal garage using a set of tools for car maintenance.
Mechanical method
How to remove bugs on the body? To do this, areas damaged by rust are usually treated with sandpaper or a wire brush. Cleaning the damaged area at the initial stage is carried out with coarse-grained sandpaper, with the transition to fine-grained sandpaper in the further processing process.
Sanding can be done using a “dry” or “wet” method. With the “wet” method, the metal surface is moistened with kerosene or white alcohol.
Video: how to remove a bug (small rusty spot) on the roof of a car.
When using a metal brush for cleaning, you must be careful, since metal that is susceptible to corrosion is easily destroyed.
Rust can be removed from the car body using a grinding machine. A set-up sanding disc is suitable for this, with the help of which the layer of rust is removed and the damaged area is finally cleaned to obtain a smooth surface without traces of rust, using fine-grained sandpaper.
A very good result is obtained by using a sandblasting machine for cleaning, which combines high efficiency and helps prevent damage to the body. Removing rust using a sandblasting machine is carried out by cleaning the metal with a stream of air containing sand particles. This method allows for high-quality cleaning of damaged areas from bugs.
Video: sandblasting gun.
Video: what tool can you use to remove corrosion on a car?
It should be noted that when using cleaning mechanisms, it is imperative to use safety glasses and gloves, observing safety regulations.
Chemical method
When using a chemical method to remove corrosion from a car body, various rust converting reagents are used. They are able to prevent the spread of corrosion in damaged areas. Companies producing car cosmetics offer a wide range of different products.
1. Among car enthusiasts, the composition “Rust Neutralizer VSN-1” has become widely known, after treatment with which, rust is converted into a gray substance that is easily removed with a rag.
2. The most commonly used product for removing rust from a car body is phosphoric acid, which is included in many rust conversion preparations.
3. Recently, motorists have been using zinc spray, which forms a protective film of zinc particles on the damaged area, thereby preventing the metal from reviving.
Retail stores offer a special “Zinkor-Auto” kit consisting of a solution for degreasing and removing rust, as well as a solution for coating the metal with a protective film of zinc particles.
When using the kit, the site of rust damage is treated with a rust converter, and then connected to the battery using electrodes and zinc particles are formed on the surface of the metal. During an electrochemical reaction, zinc particles coat the metal, forming a protective film.
Video: removing rust and galvanizing metal using the Zinkor-auto kit.
Additional processing
After cleaning the body from rust, a surface degreasing composition is applied to the damaged area and, after drying, another layer of anti-corrosion primer is applied, but this is only if the metal is clean. And if it happens that after cleaning the metal remains covered with factory primer, then there is no need for a primer.
Primers are used to protect the metal surface and provide better adhesion to the applied substances. Primers are available in three types:
- epoxy primer;
- primer or leveling primer;
- sealant.
Body putty and painting
A layer of putty is applied to the surface to be treated, which is processed using moisture-resistant sandpaper and leveled to a flat surface. The putty can be applied in several layers, and each time it is leveled with sandpaper to give it a smooth surface. And the last step before painting is applying a primer.
Video: correct application of putty and sanding it. Preparing for priming.
To paint the body, a paint color corresponding to the main color of the body is selected. It is better to choose the body color in a car repair shop using the paint number in the car’s passport. Painting is carried out using a paint sprayer, in at least three layers.
Video: car painting.
Properly selected and carried out treatment of the car body, adherence to the order of implementation of all technological processes will help motorists prolong the operation of the vehicle while saving money and time.
How to remove bugs from a car body with your own hands? (carefully many photos)
Good afternoon. In today's article I will tell you step by step how to remove bugs from a car body with your own hands. This article will also be useful for those who decide to turn to professional painters to understand what and how much it costs.
What is a bug on a car?
Everything is extremely simple - a car, in most cases, is made of iron, which has the unpleasant property of rusting. Any, even microscopic damage to the paint to the metal (it doesn’t matter - a chip, a microcrack or something else) can lead to a situation where the rust does not come out, as in the picture:
And for paint like this:
This is how a bug turns out. It is useless to paint or polish it, it will still appear again, and if you do not remove it in time, a HOLE may rot, and welding work will be required!
I’ll warn you right away – it won’t be possible to do this inexpensively! According to the mind, such details are completely repainted, with a complete dissection of the “bugs and cobwebs,” but the reality is that sometimes you can get by with “a little blood.”
Required tool:
So, in order to remove the beetles we need:
- Grinder or drill with brush
- Airbrush (order in China)
- Polishing machine
- Sandpaper with numbers 80-120-180-240-360-500-600-800-1000-1500:
- Epoxy primer
- Base enamel in color (acrylic or metallic)
- Varnish (possibly)
- Universal putty (possibly)
- Polishing paste 3m
I understand perfectly well that in order to tint beetles one-time, it is not advisable to buy a tool! But there are rental offices where you can rent an angle grinder/drill, a polishing machine and a compressor. Therefore, if you decide to remove beetles yourself, you should not buy the entire tool.
Unfortunately, you won’t be able to rent an airbrush, but initial models, suitable only for minor repairs, can be bought relatively inexpensively, in the case of the Russian Federation - from 1500 rubles (2017) or, in China, from 800 rubles. Beetles, as a rule, do not require urgent repairs and waiting 30-40 days is not critical.
Step-by-step instructions for removing beetles from a car body.
We carefully inspect the entire body for damage; when we repaired the car from the example, we missed 2 problem areas.
Using a grinder or a drill (brush - brush), we open all the beetles with a reserve. Those. when you removed all the blistering paint, you did not remove all the rust and the paint will lift again after 1-2 years. BE SURE to remove the rust completely and step back from its edge by 5-10mm.
Using sandpaper with numbers 80-120-240, we remove the step from the brush. And with numbers 500-600-800 we apply a mat on the paint near the damaged area so that the primer does not fall off.
We degrease the repair area and prime it with epoxy primer, using an airbrush, or even with a brush (since you still need to grind it later, but with a brush you can apply a thicker layer and do without putty).
After the primer has completely dried, using sandpaper with numbers 240-360-500-600-800, grind the applied primer flush with the paint. If you can’t do this right away, you will have to apply putty to the damaged area and grind it again…. Well, or come to terms with the unevenness...
The mat must be applied with a reserve, especially with the number 800 because Paint and varnish will not adhere to a flat surface, and polishing will remove small scratches from 800 grit sandpaper.
We again degrease the repair areas and, using an airbrush, paint the damage in several layers, maintaining inter-layer drying in accordance with the manufacturers' recommendations.
If the damaged part is painted metallic, as in our example, after the base enamel has dried, apply 3-4 layers of varnish.
In our example, the color was slightly off, but this is a question for the selectors.
Using sandpaper with numbers 1000-1500, we remove any paint/varnish that has floated over.
Using a polishing machine and paste numbers 1 and 2, we finally remove the transition. The final result will look something like this:
As you understand, in the photo, the lower part of the door and on the car, this defect is almost invisible:
Unfortunately, there will be no video in this article, since this repair was not filmed... But in general, the photos allow you to understand the sequence of actions.
Here is a short video of working with a polishing machine:
If you still have questions about how to remove bugs from a car body with your own hands, or if you want to add to the article, write in the comments.
Operation “Stop Rust”: ridding the car body of saffron milk caps and traces of rust on your own
A red scourge called rust plagues many car enthusiasts. The less protected the car body is from corrosion at the factory (galvanization), the more often the owners will have to make efforts to eliminate red spots. Moreover, it is undesirable to delay liquidation, since over time, damage to the metal only increases. As a result, in six months you will have to spend much more time and money than today. So, what will you need to remove rust and saffron milk caps with your own hands and how to remove them without harming the body.
Causes and places of rust on a car body
Rust is the oxidation of metal that occurs under the influence of air, water and static electricity. Therefore, the main reason for its occurrence is damage to the paintwork of the car body. Microcracks and physical damage allow air and moisture to reach the iron. The speed of the destructive impact will depend on the degree of protection of the body itself and the aggressiveness of the environment. This is especially true in winter, when many chemicals appear on our roads.
The above factors directly affect the shape, color and depth of corrosion. People call them differently: “saffron milk caps,” “bugs,” or simply “rusty spots,” but their essence is the same (only the degree of neglect varies). A single spot of rust is easier to deal with than many small red spots. The latter usually indicates poor quality metal or unsuccessful body repairs. The total processing area will be larger. Moreover, these points often spread in depth rather than in breadth. Blistering of the paint also signals the need to remove corrosion that has begun to develop under the paintwork.
The most common places for bugs and rust spots (photo)
Rust progresses well in places where there is increased exposure to foreign objects: sand, dirt, stones. The hood suffers from small stones from the tires of other cars, the wheel arches from their own “emissions” (by the way, wide non-standard tires or rims contribute to greater damage). The thresholds of the car are also one of the first to rot due to the close proximity to the “aggressive environment”, plus unsuccessful exits from curbs aggravate the situation.
How to delete: options
We have become acquainted with the causes and places, let's move on to methods of correct elimination. There are two methods that differ in the way they remove rust:
- Mechanical - cleaning, priming, puttying, painting.
- Chemical - rust converters or kits for galvanizing metal.
You cannot do without the first method if the rust is strongly ingrained into the metal.
Then it is necessary to completely eliminate traces of corrosion until pure iron (ideally shiny) remains. To do this, you may need additional tools and resources, which we will discuss below in step-by-step instructions. The second option is suitable for hard-to-reach places.
These could be curves on the bottom of the car or the inside of the arches, which are difficult to process using mechanical means. Depending on the product, rust after chemical treatment can turn into foam (you need to rinse with water and dry the surface) or harden and become covered with a protective layer suitable for painting. Be sure to read the instructions and recommendations for the use of chemicals before purchasing. Before starting work, try to assess the extent of damage to the body and assess whether you can etch the damage with chemicals alone. For a positive result, it is necessary that “live” iron remains after the initial cleaning. If there are through holes or the final thickness of the metal after processing is too small, then more serious body repairs will be needed, that is, initially all these areas will need to be repaired using welding or putty with fiberglass.
Reviews of the most popular tools and methods
The ideal option is orthophosphoric acid. Apply a thin layer to the camelina, wait 10–30 seconds, wipe dry with a cotton pad. It eats up rust and forms a phosphate film that is not afraid of water and is inert.
Maxim Leonov
http://avto-flot.ru/blog/kak-udalit-rjavchinu-s-kuzova-avtomobilya-i-ostanovit-ee-rasprostranenie.html
I already tried orthophosphorus - this is still an old-fashioned method, I processed what I cleaned. (As far as I know, all these inhibitors and converters are what it is, only in multi-colored bottles). Indeed, almost cleaned surfaces, this rubbish gets rid of rust residues. But untouched, so to speak, terry thickets of corrosion do not particularly react to it. So, they sizzle a little, darken, turn pale and remain in place.
Saf
http://forums.drom.ru/4×4/t1151267034.html
Nowadays, people no longer burn at the stake for the magic of transforming rust into pure and white metal, but a miraculous transformation does not happen either. And the zealous body workers continue to sand, etch, putty, treat with filler... And that’s why - because you can’t pull it out without difficulty... It’s impossible, you know, to rub it with a cloth and for it to become overgrown - it doesn’t happen. So go ahead, Shura, go ahead...
Zaika 2106
https://forum.auto.ru/chemistry/22048/
Mechanical method (step by step instructions)
If you follow the instructions and take your time, you can forget about rust on your car for 1-2 years (at least in the treated areas). The work is carried out in stages:
- preparing everything necessary;
- initial cleaning of the damaged part of the body;
- degreasing and priming;
- painting and varnishing.
DIY Tools and Supplies
To work you will need:
- grinding tool and sandpaper,
- rust converter,
- solvent,
- anti-corrosion primer,
- paint to match the body color and clear varnish (in cans),
- if necessary, two-component automotive putty (with hardener).
- You can fight rust using a sandblaster, an angle grinder with a grinding wheel, a drill with a special attachment, or the trivial, but always accessible, method - with your hands and sandpaper.
The work can be done manually or using special machines
The main thing is to work carefully and slowly. There should be no deep scratches or rough transitions. Try to get a polished surface with smooth gradients.
A grinder is often included in a car enthusiast’s arsenal.
The damaged paintwork is removed layer by layer and subsequent damaged areas are processed.
The longevity of the result depends on the thoroughness of the work.
Universal types of putty, oddly enough, are not suitable for all types of car bodies
It is applied in several layers and each one is sanded until smooth. Your goal is to fill all the depressions and achieve a perfectly smooth surface when the work is completed.
To work, you will need several types of sandpaper.
Do not skimp on protective equipment, especially if you are doing the job for the first time.
Film, newspapers and masking tape are perfect for this. If you work outside, be sure to consider the direction of the wind.
Make sure that dust and other abrasive particles do not fall on the treated surface.
Painting work requires minimal skills!
The result is not always the same as in the photo; it is often necessary to modify and eliminate flaws
A good way to remove and repair rust on a car door (video)
Do-it-yourself chemical way to get rid of corrosion
The chemical method differs only in the initial stage - cleaning the part from rust. According to reviews from manufacturers, these substances are able to eradicate rust, stop its further spread and do not damage the iron itself (unlike “sandpaper”). Application is very simple - apply the product to the rusty surface for 30-40 minutes, then wipe with a cloth or rinse with water. But to get a nice, smooth surface you will still have to clean, putty and polish (except for the initial stages of corrosion).
Some funds are available to motorists even with the most modest budget
There are kits on sale that allow you to independently apply a protective layer of zinc to the car body. The kit already contains a solution for removing rust and applying a protective layer, as well as an electrode with a zinc tip. This process is electrochemical, so a connection to a battery is required.
The kit includes liquids and all necessary working tools
How to remove “saffron milk caps” and “bugs”
Many people want to believe that if rust has just appeared and the lesions are small, then they can be eliminated with some miracle remedy. Unfortunately, this is impossible in principle. The rust that appears on the surface of the paintwork is like the tip of an iceberg; the main damage is deep inside.
There are products on sale that will help remove the red color from the body. For example, there is Anti-Rust paste - it removes red spots quite quickly and well. This is the same rust converter that we discussed above. It eliminates the visible signs, but not the source itself. Such manipulations usually last for 2–6 weeks (depending on weather conditions), and they are most often used immediately before selling the car.
Small “bugs” sometimes cause big problems for the car seller!
If you want to get rid of the problem in the long term, then you cannot do without physical intervention. It is necessary to stop the access of air and moisture directly to the metal. Theoretically, you can prolong the effect of the paste if, after treatment, you cover the damaged area of the body with clear varnish. But it will work if the converter has managed to remove all the rust. In most cases, this does not happen, since the depth of penetration of the product is small.
Unfortunately, it will not be possible to hide damage for a long time only with the help of paste.
Vehicle prevention and protection
Tools available to every motorist, but which most of them ignore, will help you avoid the work done:
- regular car washing, even in winter (additional waxing increases protection against aggressive environments);
- regular inspection of a clean car (in the initial stages it is much easier to fix the problem);
- wheel arch liners and mudguards on all wheels (will keep the paintwork presentable for much longer);
- anti-gravel film on the hood and part of the roof above the windshield (an alternative is a “fly swatter”);
- anti-corrosion treatment of the bottom of the car.
The work of eliminating “bugs” and “saffron milk caps” is within the power of everyone. But for a good result it will take scrupulousness and time (especially the first time). Think about whether you are able to prevent such sources of trouble. Advanced corrosion leads to expensive body repairs without guarantees. Take care of your car, and it will reciprocate.
Do-it-yourself repairs: how to paint so that rust doesn’t creep in after the first winter?
This question is often heard in various forms from the lips of both owners of used cars, who independently touch up the paint on their cars, and those who have entrusted this task to garage or auto professionals. Well, it’s not without sin: in ancient times, when I was not yet involved in the complete restoration of “self-running strollers” and did not delve into the nature of corrosion, I thought about this question more than once. Why do cars, like everything made of metal, rust? Why does this infection often come out again and again after painting, no matter what you do with it? Popular wisdom on this matter says: “Rust is a cancerous disease of metal, if it appears, it will spread even if you burst” (“Okay Google!”).
At one time, not having found a ready answer either on the Internet or from familiar car painters, I had to start with the theoretical basics. Having conducted a series of experiments on the preservation of corrosion with subsequent observation of “patients,” I can give an accessible explanation of this process and methods of combating it.
“Corrosion, rusting, rusting is the spontaneous destruction of metals as a result of chemical or physico-chemical interaction with the environment.”
It is schematically depicted as follows:
In human terms, iron molecules, interacting with oxygen and water molecules, produce iron hydroxide Fe(OH) 3 (rust).
Well, with the question “who is to blame?” everything is clear, now all that remains is to understand “what to do?”
Answer: the only way to protect yourself from rye in the long term is to carry out a set of measures aimed at removing the corrosion itself (rust) and then preserving the affected area from exposure to oxygen and water.
1. It is necessary to remove rust mechanically.
a) Sandblasting.
On my own behalf, I will say that for local cleaning of small “bugs” a 220 V household compressor with sandblasting “guns” for 400,000-500,000 BYN is quite suitable. rubles
I would like to note that it is almost impossible to construct a full-fledged sandblasting operation in a garage without the presence of 380 V.
b) Mechanical method. Vinyl attachments such as 3M Scotch-Brite Clean'n'Strip™ and their budget analogues are ideal for this.
The attachments exist in mounting options for an angle grinder or a drill (using a simple adapter, which popularly replaces a bolt, nut and a pair of washers) and literally “gnaw” corrosion out of whole metal. It is strictly forbidden to use metal “brushes” and “cups” for such work! Despite the beautiful shiny metal left after their work, in essence, the corrosion is “licked” by the whole metal. It is enough to rub the area treated with a brush with sandpaper to make sure that my words are correct - red dots will appear from under the shiny metal.
Regardless of the cleaning method you choose, the affected area must be controlled using a chemical method (rust converter) with (attention) the obligatory subsequent rinsing of the converter with a solution of water and soda. This is the only way to neutralize the acid contained in the converter. If you don’t do this, if water continues to enter this area, the remaining acid will begin to “devour” the entire metal.
Personally, I prefer to remove rust not by physical, but by electrochemical method.
c) “Okay Google,” show me again “how the electrochemical method of removing corrosion works”
Briefly: a small amount of soda ash (sold in hardware stores) is poured into water, the part to be cleaned and the electrode (an unnecessary piece of metal) are lowered. Afterwards, minus 12 volts are supplied to the part being cleaned, plus 12 volts to the electrode, and depending on the current strength (it’s convenient to take an old computer power supply as a power source) and the area of the part and the electrode, after 1-12 hours all the rust is almost magically removed goes to the electrode. All that remains is to wash the part to be cleaned and clean it from traces of former rust, at least with an iron brush.
The use of this method is essentially limited by the volume of the container used to lower the part and the availability of space to install this container.
And if, say, a brake caliper can be cleaned in a plastic bucket installed on the balcony of an apartment, then to clean a door or hood you will need a container like a “Eurocube”.
Alas, even with this, complete cleaning of the body will remain only in dreams. Although I know of cases when an impromptu “bath” was made at the dacha from lathing and banner fabric and a complete cleaning of the dismantled SUV frame was carried out.
2. If there are several pockets of corrosion, you need to remove all the coating from the element. Yes, yes, as sad as it may be, but if you want to protect your 10-15 year old car from corrosion or extend the life of the repair coating, you need to clean at least some part of the body element, and then draw conclusions.
Under the paint there are often already many nascent “bugs” “living”, which in a season or two will announce their existence.
3. Further, all work with the surface (after the initial washing or washing after the electrochemical method) should be carried out without water. This is done to avoid contact of moisture with the stripped metal or (which is most dangerous) retention of some of the moisture in the applied layers of material. After all, it is known from the school course that moisture expands when it freezes, the water remaining under the soil or in the thickness of the putty can not only cause corrosion, but also, upon freezing, form a microcrack in the coating with subsequent direct access of water and oxygen to the surface so preciously protected by us
4. And the most important point is how to protect the metal after stripping from repeated rusting, or at least slow down this process, extending it over years. There is a special anti-corrosion epoxy primer for this purpose.
Remember: only epoxy resin does not allow molecular water to pass through it. All other types of coating (acrylic primer, which, in fact, is only a filler, is intended to level the surface and does not play any anti-corrosion role, acrylic paint, base paint, varnish, etc.) allow water molecules to pass through to varying degrees.
In fact, all paints and varnishes for water are an analogue of a mosquito net, only the pore cells of all types of coating are of different sizes. In epoxy resin, these cells are the smallest size.
If we summarize the above 4 points, then we can understand the technology of protecting the car body both as a whole and from local “bugs”, which can, in various variations, be suitable for both an ordinary car owner who is thinking about how to remove a “beetle” from an arch, and a paint service center who wants give a guarantee for your work not for the standard 6 months, but for 3-4 years or more!
Technology for car repair shops (for 10-year-old cars and older): bare metal, cleaned using technology - acrylic primer - puttying - grouting - acrylic primer and primer development - correction of puttying flaws - epoxy primer and acrylic primer (wet-on-wet technology) — pre-painting grout (if we are not painting “wet on wet”) — painting.
Technology for an ordinary car owner: we rub the “beetle” with a vinyl wheel on a drill, treat it with a rust converter, wash off the converter with water with the addition of soda - dry it - rub it in with sandpaper - apply a layer of epoxy resin - paint it the color of the car, at least with a brush.
Everyone can make variations between these two options based on their technical capabilities.
Despite the simplicity of the proposed method, I almost forgot to share with you a small but. You know, it’s like the joke about how a Chinese copy differs from the original: in fact, the copy looks exactly the same as the original and is designed like it, but the Chinese copy does not work like the original.
So it is here: any more or less deep corrosion, destroying the metal, forms micropores in its thickness, through which it can “feed” with oxygen and moisture from the back side of the body metal, so when processing one side of the “beetle”, do not forget about the second side ! Unfortunately, it is not always possible to access it, but at least it is necessary to anti-corrode the repair areas on the reverse side, but that is a completely different story!
If you think that a detailed answer has been given to the question posed, I suggest you speak out in the comments, and also tell us how you personally fought against corrosion and how this fight ended.
PS I hope now you understand the reason why rust creeps out from under the paint on painted pieces in the first winter, why do most painting services prefer to give a 6-month guarantee on their work? On my own behalf, I would add that even “old” Soviet cars made using this technology, 3-4 years or more after painting, retain their appearance with a complete absence of corrosion (subject to timely elimination of chips in the coating), in fact, my “Volga” is a living example of this.
Sergey ZHILTSOV
Photos from the author’s archive and open sourcesThe material was published as part of the Reader's Materials Contest, under the heading “Elbows in Oil . The main prize for the best material is a certificate for 6,000,000 rubles for the purchase of any tires in any store of the Autoset company . And the authors of the most interesting materials will receive an offer to work at ABW.BY!
You can find out all the details of participation and the full list of prizes by following the link. We remind you that the acceptance of works has already ended. We received an order of magnitude more materials than we expected, and therefore we will continue to publish works until the end of January, after which we will sum up the results of the competition.
find original used body parts by using the search aggregator site BAMPER.BY. Here we have collected more than 287,000 offers from various sellers with photographs and the price of each item. Search for any spare part in three clicks.
General partner of the competition:
Network of trade and service tire centers "Avtoset"
Partners of the “Dream Route” section:
Automotive parts and accessories store "Tuning Territory"
Official importer of Volkswagen in Belarus JLLC Atlant-M Farzeughandel
“Bugs” on the car, what should I do? How to remove rust from a car? Anti-corrosion car coating
All car owners regularly carry out maintenance of their cars, especially those whose service life has exceeded 10 years. But external signs of wear and tear often go unnoticed. And in vain! Even small “speckles”—foreign particles that get into a car’s paint—can lead to catastrophic consequences over time. They can be prevented if preventive measures are taken in time. You can read about what “bugs” on a car are and how to get rid of them in this article.
Where do bugs come from on cars?
Since childhood, we have all known the main enemy of iron – rust. It corrodes the metal, little by little making your personal vehicle unsuitable for movement. Rust appears on the body due to the destruction of the car’s paint layer, which is applied with a protective film during production. Minor scratches and damage allow oxygen and air access to the iron, which creates ideal conditions for the appearance of “bugs” on the car. The speed of spread of this infection depends on the environment: a humid climate with frequent precipitation speeds up the process several times. In winter, the situation is aggravated by the appearance of chemical reagents on the roads, which act like salt in a wound, corroding the car body even more deeply. What to do if rust appears on your car?
Rust is the bane of motorists
It is unlikely that there will be an owner of such a car older than 10 years who would not have suffered from the “rust disease”. Some people think that hardware was better in the past, not like it is now. Others argue that it's all about proper care and prevention. Be that as it may, quite often on the roads you can see cars covered with orange spots.
Rust can be localized in one place (for example, at the bottom of the car sills) or spread throughout the body. Most often, the affected areas are those that come into closest contact with dirt and small stones: the bottom, sills and bottom of car doors. Mechanical impacts can also aggravate the situation: curb runs, accidents, scratches and damage caused intentionally or accidentally by people. The fact is that even from a small “bare” area of iron, rust can very quickly spread throughout the entire body. At the same time, “bugs” on the roof of a car most often corrode the iron “deeply,” which makes it even more difficult to deal with the defect. How can you get rid of rust?
How to remove rust from a car
There are several ways to get rid of rust on a body - mechanical and chemical. Regardless of the method chosen, the machine cleaning process is divided into several stages:
- Cleaning the body is one of the most important stages of work. Much will depend on its effectiveness, because only it can show how advanced the process is. It often happens that before washing a car looks quite decent, but afterward it looks like cheese eaten by mice. There is nothing strange about this, because dirt and rotten iron often cover damaged areas, preventing one from properly assessing the scale of the disaster. Therefore, when preparing to wash your car, you need to be very careful. You should only use a special car shampoo that will carefully remove dirt and chemical compounds from the body.
- Cleaning damaged areas of the body can be carried out using various methods. Its main purpose is to remove rust from car parts. Here it is even better to overdo it a little, clearing a large area. If you do not carry out this stage of work in good faith, then all your efforts will go down the drain.
- Removing rust residues using a chemical compound.
- Applying a primer, during which a coating is applied to the depression that appears, completely leveling the topography of the body. Primer, of course, does not replace a solid sheet of iron, but it is a much better alternative than rust.
- The final stage is painting the area of the car to be repaired. It is very important to get the color exactly right here. If everything is done as needed, then there will be no noticeable traces of work, and your car will become like new.
Mechanical method
As we found out, there are several ways to remove rust from a car body, one of which is mechanical. It is carried out using a sandblasting machine, a grinder, special metal brushes or sandpaper. This method is chosen in cases where the damage has already started and superficial manipulations are not enough. To remove “bugs” on the metal parts of the car, it is necessary to clean the damage until all traces of corrosion disappear. It is best if the part shines. The most convenient for use is a sandblasting machine, which delivers a stream of sand under high pressure. It allows you to quickly and accurately polish the metal to a shine, giving it its original appearance.
Chemical method
Another method by which you can clean the body of rust is chemical methods. Special reagents that should be applied to damaged areas of the car can significantly reduce the time and effort required to carry out the procedure. But, unfortunately, they are not suitable for everyone: the corrosion depth should be no more than 1 mm. As a rule, chemical reagents are aggressive compounds that interact with rust and destroy it. Therefore, it is very important to follow safety precautions when using them:
- Do not use reagents in confined spaces.
- Protect your respiratory system with special masks.
- Avoid contact with eyes or mouth.
- Use gloves.
Each method has its pros and cons. But they are usually used not separately, but together. The first stage of mechanical cleaning helps to properly treat rust-damaged areas, and chemical reagents finish the job by getting into hard-to-reach places. By combining these two methods, anyone can quickly and easily remove rust from their car.
Anti-corrosion car coating
What is anti-corrosion coating? This is a special coating that can temporarily prevent the appearance of rust on a car. Experts advise everyone, without exception, to carry out anti-corrosion treatment at least once every three years. The poor condition of our roads and the humid climate are the causes of numerous body defects, which inevitably lead to further breakdowns. During anti-corrosion treatment, the car is treated with a special solution, which is selected in accordance with the type of rust and operating conditions. Currently, the following types of coverage are distinguished:
- Transparent liquid plastic is a composition that protects the body from mechanical damage and gives a cosmetic gloss effect. This composition is unlikely to protect the car for a long time, so it should be considered solely as a preventative procedure.
- Bitumen mastic is made on the basis of synthetic and bituminous resins, which form a thin film on the car body and protect it from rust and chemicals.
- Rubber-based anticorrosive is one of the most durable methods of protection against damage. It effectively protects the body from minor scratches and rust. This composition is most often applied in car production plants.
You can make an anti-corrosion coating to protect the car body yourself, after spending some time and effort selecting the necessary product. The main thing in painting yourself is to carefully treat all the nooks and crannies and hard-to-reach places where you usually don’t look. If you treat your car in a timely and regular manner, rust will definitely not appear on it.
How to remove rust with your own hands
How to fix bugs on a car with your own hands? You can remove the hated rust yourself, using a mechanical or chemical cleaning method. In terms of consistency, the independent method is no different from the salon method. You will need pre-prepared equipment, time and a little patience. With proper preparation, the process is quite simple and does not require any specific skills or abilities.
Reviews of the most popular methods and means
The quality of the final result directly depends on what tools you use. Below is a list of several products for fighting rust on your own:
- “Tsinkar” is an effective, but very toxic compound for humans. It is a compound of zinc and manganese. It has an acceptable cost and efficiency. The treatment should be carried out several times until the traces of rust completely disappear.
- “Rust Destroyer B-52” is a cheap and good domestic product. The only drawback is its shape - the gel does not adhere well to inclined surfaces, flowing down.
Prevention
You can avoid problems with body damage from rust if you follow simple steps in a timely manner:
- Wash your car regularly. It would seem, what can a regular wash do against rust? But water washes away chemicals that destroy the metal through holes in the paintwork.
- Regular inspection after washing will allow you to notice and prevent the appearance of rust in time.
- To protect your car from dirt and stones, you can install fender liners and mud flaps. They will significantly improve the appearance of the car.
- Regular anti-corrosion coating of the car (especially the underbody). As a rule, the inconspicuous part of the car - the bottom - is least often paid attention to, but in vain. This is where car rot often begins.
- Anti-gravel film will protect the coating from scratches, chips and cracks.
By applying these simple measures, you can keep your car in new condition for a long time.
Advice from the experts
On the Internet you can find a lot of advice from experienced motorists on how to properly deal with rust. The main thing in cleaning the body from corrosion yourself is to do everything thoroughly, without skipping the affected areas, preferably several times. After the rust has been removed using chemical and mechanical methods, the resulting hole must be filled with putty using a primer. If you try to paint a part without it, the paint will soon just come off.
Body corrosion does not form in one hour. It develops in stages, day after day destroying the iron frame of the car. If you take timely measures, you can prevent expensive repairs without much expense or effort - you just need to regularly clean the body of rust and carry out anti-corrosion treatment. Then your car will serve you for many years and will look like new.