How to measure the density of electrolyte in a battery
Battery electrolyte density
Analyzing the electrolyte from the battery and measuring its density helps the car owner judge its chemical condition. The density of the acid-containing liquid inside the battery cans depends on many factors, so it is important to be able to correctly determine the value of this parameter depending on the operating conditions of the vehicle.
What is electrolyte density
The density of any physical body or liquid is considered to be the ratio of the mass of the substance to the occupied volume. This parameter for the liquid poured into lead battery jars is expressed in grams per cubic centimeter.
It is not possible to determine the density of a substance visually, so a special device is used to measure this parameter.
How can you measure the density of an electrolyte?
You can measure the electrolyte concentration using a 10 cm3 medical syringe and precise digital scales. The work is carried out as follows:
- An empty syringe without a needle is placed on the scale and the readings of the measuring device are recorded in a notebook.
- A thin rubber tube is placed on the syringe, which is lowered into one of the battery cans.
- Exactly 10 ml of acid-containing liquid is drawn into the syringe.
- The syringe, without the rubber tube, is placed on the scale and the measurement result is recorded again.
- Simple arithmetic calculations are performed:
- The mass of the empty medical device is subtracted from the mass of the syringe with electrolyte.
- The resulting value is divided by 10.
The result will be the exact density value in one jar. Thus, it is necessary to measure this indicator in all banks.
Carrying out measurements in this way every time is unprofitable either in terms of time spent or in terms of the convenience of performing the procedure. It is much more convenient and easier to measure the density of acid-containing battery fluid using a hydrometer.
It consists of a special flask with a float inside. The internal part of the float has a lead load; therefore, when pumping liquid into the container, this part is installed strictly in a vertical position. There is a graduated scale on the surface of the float, from which you can find out the exact density of the battery electrolyte.
Why might the electrolyte density increase or decrease?
A change in electrolyte concentration can occur for the following reasons:
- When the battery charge level changes (direct correlation).
- When the battery case is leaking. If there are cracks in it or the plugs are poorly screwed, then liquid will leak out and when distilled water is added, the density will decrease.
- Adding an electrolyte instead of distilled water when the liquid evaporates in the summer (increasing density).
- Incorrectly prepared electrolyte. Most often, this situation can arise when you independently add acid to water.
- Intense evaporation of water from jars in summer.
As a rule, establishing the reason for a change in electrolyte concentration at home is not difficult, but in order to correctly determine the magnitude of such a deviation, you need to know what the reference value is.
What density of the electrolyte in the battery should be
Technical requirements for electrolyte density may differ significantly for acid batteries operated in different climatic conditions.
What should the electrolyte density be in winter?
The need to maintain the concentration of sulfuric acid in the electrolyte at a higher level is due to the danger of freezing of the liquid at low air temperatures. A fully charged battery should have a mixture density of 1.27 - 1.28 g/cm3. Then it easily tolerates frosts down to minus 70 degrees.
When the density drops to 1.20 g/cm3, the liquid is guaranteed to turn into ice already at a temperature of minus 30 degrees. As a result of crystallization, the liquid increases significantly in volume, so when operating the machine in winter, you must carefully ensure that the battery is fully charged.
Failure to comply with this requirement will lead to destruction of the internal plates of the device, which will cause complete inoperability of the battery.
Battery density
The density of the electrolyte in the battery is a very important parameter for all acid batteries, and every car owner should know: what the density should be, how to check it, and most importantly, how to properly increase the battery density (specific gravity of the acid) in each of the cans with lead plates filled with a solution H2SO4.
In the article about battery electrolyte density you will learn:
Checking the density is one of the points in the battery maintenance process, which also includes checking the electrolyte level and measuring the battery voltage. In lead batteries, density is measured in g/cm3 . It is proportional to the concentration of the solution , and inversely dependent on the temperature of the liquid (the higher the temperature, the lower the density).
The density of the electrolyte can determine the condition of the battery. So if the battery does not hold a charge , then you should check the condition of its liquid in each of its jars.
The density of the electrolyte affects the battery capacity and its service life.
It is checked with a densimeter (hydrometer) at a temperature of +25°C. If the temperature differs from the required one, corrections are made to the readings, as shown in the table.
So, we figured out a little what it is, and that you need to check it regularly. What numbers should we focus on, how much is good and how much is bad, what should be the density of the battery electrolyte?
What density should the battery have?
Maintaining the optimal electrolyte density is very important for the battery and it is worth knowing that the required values depend on the climate zone. Therefore, the battery density must be set based on the totality of requirements and operating conditions. For example, in a temperate climate, the electrolyte density should be at the level of 1.25-1.27 g/cm3 ±0.01 g/cm3. In the cold zone, with winters down to -30 degrees, it is 0.01 g/cm3 more, and in the hot subtropical zone it is 0.01 g/cm3 less . In those regions where winter is especially harsh (up to -50 ° C), in order to prevent the battery from freezing, it is necessary to increase the density from 1.27 to 1.29 g/cm3 .
Many car owners ask the question: “What should be the density of the electrolyte in the battery in winter and what in summer, or is there no difference, and should the indicators be kept at the same level all year round?” Therefore, let’s look at the issue in more detail, and a table of the density of the electrolyte in the battery , divided into climatic zones, will help to do this.
You also need to remember that, as a rule, the battery, while in the car, is charged to no more than 80-90% of its nominal capacity, so the density of the electrolyte will be slightly lower than when fully charged. So, the required value is selected a little higher than that indicated in the density table, so that when the air temperature drops to the maximum level, the battery is guaranteed to remain operational and not freeze in the winter. But, regarding the summer season, increased density may threaten boiling.
Battery electrolyte density table
The density table is compiled relative to the average monthly temperature in the month of January, so that climatic zones with cold air up to -30 ° C and moderate ones with temperatures not lower than -15 do not require a decrease or increase in acid concentration. All year round ( winter and summer ) the density of the electrolyte in the battery should not be changed , but only checked and ensure that it does not deviate from the nominal value , but in very cold areas, where the thermometer is often below -30 degrees (up to -50), adjustments are allowed.
Electrolyte density in the battery in winter
The density of the electrolyte in the battery in winter should be 1.27 (for regions with winter temperatures below -35, at least 1.28 g/cm3). If the value is lower, this leads to a decrease in electromotive force and difficulty starting the engine in cold weather, up to freezing of the electrolyte.
When the density in the battery is reduced in winter, you should not immediately run for a correction solution in order to raise it; it is much better to take care of something else - high-quality charging of the battery using a charger.
Half-hour trips from home to work and back do not allow the electrolyte to warm up and, therefore, to charge well, because the battery only accepts a charge after warming up. So the rarefaction increases day by day, and as a result the density also decreases.
For a new and serviceable battery, the normal range of changes in electrolyte density (full discharge - full charge) is 0.15-0.16 g/cm3.
Remember that operating a discharged battery at sub-zero temperatures leads to freezing of the electrolyte and destruction of the lead plates!
Using the table of the dependence of the freezing temperature of the electrolyte on its density, you can find out the minus threshold of the thermometer at which ice forms in your battery.
As you can see, if the battery is 100% charged, it will freeze at -70 °C. At 40% charge it freezes already at -25 °C. 10% will not only make it impossible to start the engine on a frosty day, but it will also completely freeze in 10 degree frost.
When the density of the electrolyte is not known, the degree of discharge of the battery is checked with a load fork. The voltage difference in the elements of one battery should not exceed 0.2V.
Load plug voltmeter readings, B
Battery discharge level, %
If the battery is discharged by more than 50% in winter and more than 25% in summer, it must be recharged.
Density of electrolyte in the battery in summer
In summer, the battery suffers from dehydration , so given that increased density has a bad effect on lead plates, it is better if it is 0.02 g/cm3 below the required value (especially for the southern regions).
In the summer, the temperature under the hood, where the battery is often located, is significantly increased. Such conditions promote the evaporation of water from the acid and the activity of electrochemical processes in the battery, ensuring high current output even at the minimum permissible electrolyte density (1.22 g/cm3 for a warm, humid climate zone). So, when the electrolyte level gradually drops , its density increases , which accelerates the process of corrosive destruction of the electrodes. This is why it is so important to monitor the fluid level in the battery and if it drops, add distilled water, and if this is not done, then overcharging and sulfation threatens.
If the battery is discharged due to the driver’s carelessness or other reasons, you should try to return it to its working condition using a charger. But before charging the battery, they look at the level and, if necessary, add distilled water that may have evaporated during operation.
After some time, the density of the electrolyte in the battery, due to its constant dilution with distillate, decreases and falls below the required value. Then the operation of the battery becomes impossible, so there is a need to increase the density of the electrolyte in the battery. But in order to find out how much to increase, you need to know how to check this very density.
How to check battery density
To ensure proper operation of the battery, the density of the electrolyte should be checked every 15-20 thousand kilometers . Measuring the density in a battery is carried out using a device such as a densimeter. The device of this device consists of a glass tube, inside of which is a hydrometer, and at the ends there is a rubber tip on one side and a bulb on the other. To check, you will need to: open the cap of the battery can, immerse it in the solution, and use a bulb to draw in a small amount of electrolyte. A floating hydrometer with a scale will show all the necessary information. We will look in more detail at how to properly check the battery density below, since there is also a type of battery called maintenance-free, and the procedure for them is somewhat different - you do not need absolutely any devices.
Density indicator on a maintenance-free battery
The density of a maintenance-free battery is displayed by a color indicator in a special window. The green indicator indicates that everything is normal (the degree of charge is within 65 - 100%), if the density has dropped and recharging is required , then the indicator will be black . When a white or red light , an urgent addition of distilled water . But, however, the exact information about the meaning of a particular color in the window is on the battery sticker.
Now we continue to further understand how to check the electrolyte density of a conventional acid battery at home.
Checking the electrolyte density in the battery
So, in order to be able to correctly check the density of the electrolyte in the battery, first of all we check the level and, if necessary, adjust it. Then we charge the battery and only then start checking, but not immediately, but after a couple of hours of rest, since immediately after charging or adding water there will be unreliable data.
It should be remembered that density directly depends on air temperature, so check the correction table discussed above. After taking liquid from the battery can, hold the device at eye level - the hydrometer should be at rest, floating in the liquid without touching the walls. Measurements are taken in each compartment, and all indicators are recorded.
Table for determining battery charge based on electrolyte density.
Instructions for checking the density and electrolyte level in batteries
You can check the battery density using a hydrometer or multimeter by analyzing the operating voltage value. Before diagnostics, the user must ensure that there are no defects in the battery case that could lead to fluid leakage.
Preparatory work before checking the level and density
Video: how to remove the battery from a car
How and how to check the density of the electrolyte in the battery
How to test a car battery with a multimeter
Measuring electrolyte density with a homemade device
How to measure the electrolyte level in a battery
Is it possible to check the level and density of the electrolyte in a maintenance-free battery?
Video: how to increase the density of electrolyte in battery banks
Comments and Reviews
Preparatory work before checking the level and density
Before determining density at home using a special device, you need to keep in mind that:
- The car battery is checked using eye protection glasses and rubber gloves. The electrolyte solution is an aggressive acid that causes burns if it comes into contact with the body.
- The machine's battery density level should be measured after a visual inspection of the device.
- The battery terminals are cleaned from oxidation and contamination. It is necessary to use a special iron brush or fine-grained sandpaper.
- Before measuring the density of the liquid in a car battery, you need to make sure that there is electrolyte in the banks. If the volume of the substance is reduced, you will need to add distilled water to the device.
- If necessary, the battery is removed. The terminals are disconnected from the device and the fixing plate is dismantled.
- Before disconnecting the battery in the car, the ignition system is deactivated, and the operation of electrical equipment and devices is first turned off.
- The battery is wiped with a damp and clean cloth to prevent dust from getting into the electrolyte jars.
Video: how to remove the battery from a car
The “Battery Man” channel in its video spoke in detail about the nuances of removing the battery from a car and turning off this device.
How and how to check the density of the electrolyte in the battery
In addition to a hydrometer and a multimeter, you can check the electrolyte level in the working solution with a homemade device.
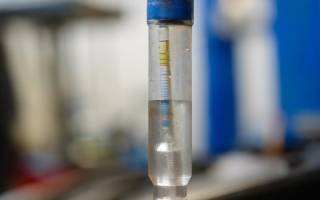
A special device for measuring density (hydrometer) is a regular glass tube, the upper part of which is narrowed and has a graduated scale. The lower part of the tube is wide; it contains shot or mercury, which is poured in a strictly defined amount during calibration of the hydrometer. In car dealerships, such a device is sold as a set with a rubber “bulb” for collecting electrolyte and a measuring flask in which the hydrometer itself is located.
The principle of operation of the device is based on Archimedes' law, and the density of the electrolyte is determined by the immersion depth of the hydrometer (the volume of liquid displaced by it) and the weight of the device.
Hydrometer for measuring electrolyte
Before checking the electrolyte level in a car battery, you must consider the following rules:
- the battery must be placed on a flat surface;
- The battery temperature should be about 20-25 degrees Celsius;
- the density level is measured not in one, but in all banks;
- the operating value is checked no earlier than ten hours after the last trip or three hours after recharging;
- The battery must be charged first.
Hydrometer measurement
Learn more about how to use a hydrometer to measure density levels:
- With the battery disconnected, all banks are unscrewed.
- A hydrometer is inserted into one end of the jar, a bulb is placed at the other end, and liquid is taken with its help. There should be enough of it in the device so that its float dangles freely in the container.
- The density level is determined in accordance with the readings on the tester scale. The received parameters are recorded.
- Diagnostics of the density parameter is repeated for each jar. All obtained parameters are compared with the normalized values indicated in the table.
It is recommended to check the battery density at least every 15-20 thousand kilometers.
Photo gallery: diagnostics of electrolyte level and density in jars
Table: correction to hydrometer readings
How to test a car battery with a multimeter
Step-by-step instructions that will allow you to correctly measure and find out the battery density look like this:
- The meter is being assembled. To do this, wires with alligator clips are connected to the multimeter body. Before taking measurements, the tester itself is switched to “voltmeter” mode.
- The rotary switch on the device is moved to the 20 V position. As a result, the tester will show any parameters below this threshold.
- Then the cables are connected to the terminal outputs of the battery - the black contact goes to the negative terminal, the red one to the positive terminal. If the color of the wires is the same, then you should check the markings directly on the multimeter body. There should be “-” and “+” signs on the contacts where the cables exit the tester.
- The voltage parameter is monitored and the obtained data are compared with the normalized ones. If the battery is fully charged, the operating parameter will be 12.7 volts, therefore, charging the device will not be required. If the resulting parameter is in the range from 12.1 to 12.4 V, then the device is half discharged, which means its density does not meet the norm. In other cases, detailed diagnostics of the battery and its recharging or replacement are required.
Table: electrolyte density when checked with a multimeter
Measuring electrolyte density with a homemade device
The principle of measuring in winter or summer using a homemade device is similar, and such a tester can be built independently, taking into account the following nuances:
- The main element of the hydrometer is the float, which is used to make measurements.
- A glass test tube or other similar container can be used as a reservoir.
- Millet or other bulk substance is poured into a test tube; you can also use a piece of lead or another weight.
- Then the container is lowered into the water. In the place where the water is level, you need to mark the number 1, this is due to the fact that this liquid has a density of 1 g/cm3. Then the values are calibrated for other solutions with higher densities.
How to measure the electrolyte level in a battery
The working fluid level is measured as follows:
- The first method is based on the maximum and minimum marks - the electrolyte level should be between them.
- For the second verification option, the user needs to open the holes in which the cans are installed and inspect everything separately. It should be taken into account that the volume of electrolyte is the same in each hole (10-15 mm above the plates).
- To measure using this method, you need to prepare a glass tube whose internal diameter does not exceed 5 mm. Then unscrew the cap on the battery and lower the tube inside until it rests against the safety shield. After this, close the outer hole with your finger and remove the tube. The electrolyte level in it is the measured parameter.
Is it possible to check the level and density of the electrolyte in a maintenance-free battery?
Check the level and density of the electrolyte in a maintenance-free battery using the special indicators that the batteries are equipped with. Such marks change color depending on the density and degree of charge of the electrolyte. To carry out such a check, you need to find an indicator on the case, clean it from dust and dirt and evaluate its color.
Then you should compare the indicator readings with the compliance scale, and, as a rule,:
- green color indicates that everything is fine with the battery, the electrolyte level and charge are normal;
- white - indicates a low charge and the need to connect a charger;
- if the indicator is red, this means that the acidity of the electrolyte has increased and the water level has decreased.
Battery indicator scale
You can check the level and density of the working solution on batteries without an indicator by following this algorithm:
- From the edge, on the lid, using a drill and a small diameter hole, six small holes are drilled. Through them the user will be able to access each bank, so the distance between them must be appropriate. Before drilling, the car owner must wipe the battery.
- The fluid level is checked visually and added if necessary. Distilled water is used to replenish the volume. Using a hydrometer, the density of the working solution is diagnosed.
- After testing, the user will need to restore the seal. To do this, you can use silicone sealant or cold welding. To ensure that material does not get inside the battery when performing the task, you should straighten part of the plastic that was pressed through when making the hole. This can be done using a homemade metal hook.
If the battery case is damaged, the device will no longer be covered under warranty. If the user makes a mistake during execution, the service life will be reduced. For example, dirt that gets into the cans will reduce the service life and destroy the plates installed inside.
Video: how to increase the density of electrolyte in battery banks
The Denis MECHANIC channel in its video talked in detail about how to check and increase the density of the electrolyte in the battery.
The density of the electrolyte in the battery - when does a car owner become a chemist?
The density of the electrolyte in the battery is a headache for car owners who have opted for dismountable batteries. These batteries can be controlled and recharged, but this requires mastering a little science, which is what we'll do.
What electrolyte density values are considered normal?
The battery is a chemical source of current, and the transformations occurring in it are reversible. The design of such devices is simple; they consist of a housing where the electrodes are located, a separator-converter and a tire. It all closes with a lid with outlet holes and terminals. But the battery will not work without electrolyte. In lead-acid batteries, this is a solution of sulfuric acid, the density of which is measured in g/cm3. It is proportional to the concentration of the solution, and the inverse relationship can be traced with respect to the temperature of the liquid. Checking the density of the alkaline electrolyte will be carried out by those car owners whose cars use nickel-cadmium or nickel-iron batteries.
Car batteries
By the density of the electrolyte of a car battery, you can determine the condition of the battery. If the value drops, then most likely there is a defect in some cell, an open circuit or a deep discharge of the battery. For the latter case, the reduced density will be in all cells. If the battery does not hold a charge, you should check the condition of the liquid inside it. During operation of the battery, the water gradually evaporates, as a result the electrolyte becomes more concentrated, which also negatively affects the condition of the unit. This characteristic affects the battery capacity and determines its service life.
Determining the density of car battery electrolyte
It is very important to maintain optimal electrolyte density in the battery, which largely depends on the climate zone. In regions with a cold macroclimate, it is better to maintain the density of the acid electrolyte in the range of 1.27–1.29 g/cm3. In the middle zone, these numbers will change - 1.25–1.27 g/cm3. In warmer areas, the normal density is 1.23–1.25 g/cm3. Moreover, when pouring electrolyte, it is better to prepare a solution at the lower limit of the indicated ranges. For an alkaline battery, checking the density of the internal contents should show 1.19–1.21 g/cm3. Before preparation, it is important to clarify the composition; there are potassium and sodium electrolytes, each of them will have its own proportions in order to achieve the specified value.
You should not experiment with increasing the density; some believe that it is easier to use concentrated sulfuric acid altogether, for example, when operating a car at critically low temperatures. This cannot be done, sulfuric acid is one of the most powerful solvents, it can simply corrode lead plates. It is unacceptable to exceed the density by more than 1.35 g/cm3.
Checking electrolyte density - devices and their operation
Many motorists have encountered a situation where, after a long recharge, the electrolyte boils and evaporates, then we fill it with distilled water. In this case, the density of the solution is very rarely measured, but in vain. After all, along with the water, the acid itself also boils away, and by adding only the distillate, you will get a mixture with a lower concentration, which will negatively affect the performance of the device.
Pouring distilled water into the battery
To measure the density of the electrolyte in the battery, you will need a special device - a densimeter. It consists of a glass tube in which a hydrometer is placed, a tip and a rubber bulb. We find the battery filler hole and immerse the tip of the measuring device into the solution. Then, using a bulb, we suck some of the acid inside the glass case. Carefully hold the device at eye level - the hydrometer should be at rest, floating in the liquid, without touching the walls.
Measuring the density of electrolyte in a battery
If there is no special device, then you can check the density of the electrolyte in the battery using a voltmeter. We connect an autotester to the battery terminals and measure the voltage. It should fluctuate between 11.9–12.5 V. Then turn the key in the ignition and dial 2.5 thousand revolutions. In this case, the voltage should reach a minimum of 13.9 V, but not exceed 14.4 V. If no changes occur, then you just need to charge the device.
How to increase the density of the working electrolyte?
What to do when the electrolyte density in the battery has dropped? Of course, it is necessary to restore it to the desired value. There are several ways:
- recharge the battery;
- completely replace the electrolyte with a new one;
- add a more concentrated electrolyte;
- add acid.
We prepare in advance all the necessary equipment: a measuring cup, a blower, a soldering iron and a drill. All items must be clean and well dried. We also need distilled water and the electrolyte itself.
You should always try to recharge the battery first. Checking the battery voltage. After gaining speed, did its value change? Then you should charge the device for 10 hours with a current that is ten times less than the capacity. For example, if it is 60 A*hour, then a current of 6 A is sufficient. Then this value is halved and the battery is still left to recharge for 2 hours. It is the second mode that evens out the density of the electrolyte. And if the voltage rises above 14.4 V when the engine is running, then you need to fill the battery with water. Then put the battery on charge. If after such measures the battery still discharges quickly, then you need to work with electrolyte.
Checking battery voltage
To return the electrolyte density in a discharged battery back to normal, you can completely replace the contents. To do this, you should pump out as much liquid as possible from each jar, and then drain the remainder. To do this, tightly close all the holes and turn the unit on its side. We drill holes in the bottom on the side of each can and drain the electrolyte. It is strictly forbidden to place the battery upside down, as in this position a short circuit may occur and the surface of the plates will crumble . After there is no longer any solution in the device, rinse it thoroughly with purified water. Be sure to hermetically seal the holes in the bottom of the device and pour new electrolyte into it.
Typically, the density of the electrolyte in batteries can be increased or decreased by adding a concentrated solution or purified water. First of all, the quality of the conductive substance is checked in each jar separately. If the measurement showed a density of more than 1.18 g/cm 3, then you can simply dilute it with a more concentrated solution. To do this, we select the maximum possible amount of electrolyte, replace half of it with a solution with a higher concentration than we are trying to obtain (for example, we need 1.25 g/cm 3 ), and pour it all back. We shake the battery carefully to mix the updated composition well.
You can prepare a more concentrated electrolyte yourself, then it is better to make 1.40 g/cm3. The purchased one will most likely be 1.27 g/cm3, then the process of increasing the density may take a little longer.
Preparation of concentrated electrolyte
After a short pause, the density is checked. You will find that it has increased, but has not reached the desired figure. Then we repeat the procedure again, only we reduce the dilution step so as not to overshoot the target mark. This time, only a quarter of the pumped out liquid needs to be replaced with a more concentrated electrolyte. After each procedure, the measurement will show that we are getting closer to the cherished mark on the device. It is difficult to accurately obtain the normal density of the electrolyte in the battery in this way; you will probably miss the required mark, but by that time it will be enough to add a little clean water, because the dilution step will become very small and the goal will be achieved.
When the electrolyte density is less than 1.18 g/cm3, acid will have to be added. We carry out all operations in the same order as in method 3. Only the dilution step should be taken small right away, because the acid has a very high density (about 1.8 g/cm3), you can jump over the desired mark already from the first dilution. When preparing all solutions, it is very important to pour the acid into the water, and not vice versa, so as not to provoke splashing of the concentrate. Carry out work in special overalls, protect your skin and eyesight. If liquid comes into contact with your body, immediately wash the affected area with clean water.
How to correctly measure the density of battery electrolyte? 2 ways to check and 5 useful tips
A car with a bad battery is not a reliable vehicle. Experienced drivers know what a dead battery is and what troubles it ultimately leads to. To avoid unpleasant surprises on the road, the battery needs to be serviced correctly and on time - including knowing how to check the battery density yourself.
Battery problems
Most drivers are familiar with the hysterical howl of the starter or the clicking, or even complete silence, under the hood of the car when starting the engine. This unpleasant moment is associated with the following malfunctions:
- Faulty vehicle wiring. Perhaps there is a contact lost somewhere, most often this is explained by the partial absence of “mass”.
- The starter solenoid relay is faulty.
- Ultimate wear of starter bushings.
- Defective starter windings.
- Low voltage in the circuit due to a discharged battery.
The last reason is usually the most likely. The most logical move would be to check the density of the electrolyte in the battery. What does it depend on:
- From the climate zone.
- Depending on the time of year.
In order to correctly check the density of the electrolyte in the battery, you need to know its value and have a device called a hydrometer.
Finding out the correct density is easy - there are special standards. Their average is 1.24 - 1.29 kg/dm3. More precisely:
- cold regions - 1.27 - 1.29 g/dm3, summer and winter;
- middle band - 1.25 - 1.27 g/dm 3;
- warm areas - 1.23 - 1.25 g/dm 3.
You should check the battery density at least once every three months. Even a slight deviation from the norm requires immediate recharging of the battery.
You need to carefully monitor the indicators so that the battery lasts as long as possible and does not let the owner down at the most crucial moment. She especially “does not forgive” neglectful treatment of herself in the winter. The fact is that in the cold its capacity is lost, and sometimes even one unsuccessful engine start leads to battery discharge.
Having a simple device, checking the battery density at home is not difficult.
Density is density, but the electrolyte level must be monitored with no less attention, especially in the summer, when the battery boils away more intensely.
There are a lot of opinions regarding the electrolyte level in the battery:
- Some believe that it is enough to cover the separator meshes with this liquid.
- Others believe that the higher the electrolyte level, the better.
- Still others do not look under the battery plugs at all - until the very moment when the starter stops turning, which often causes genuine surprise among such would-be owners.
There are batteries that have a mark on the case indicating the electrolyte level. It’s not very convenient to use, and you can’t hope for accurate indicators. The proven “old-fashioned” method will help here: a glass tube with an outer diameter of 5 - 6 mm. Marks should be placed on its body in the lower part indicating the correct electrolyte level (according to the battery’s datasheet). The tube is lowered into each jar one by one, until it stops at the separator mesh. Next, plug the upper side of the tube with your finger, and the device is removed from the jar without releasing your finger. The liquid will remain in the tube and its exact level will be visible.
If the level is low, you should gradually pour distilled water into the jar, taking a control measurement after each addition. If the level is too high, which is also not a correct indicator, then the excess liquid is pumped out using a hydrometer. This method is the most reliable.
Need a charger
This is a very necessary device for keeping the battery in good working order; every car owner must have it. Using this device, you can always recharge the battery without resorting to the services of a service station or local “craftsmen”.
Having the right device with an ammeter, the driver can easily do this himself. Procedure for charging the battery:
- You need to connect the charger to the battery.
- Turn on the device.
- Set the charging current. Its value should correspond to ten percent of the battery capacity. For example: if the battery capacity is 60 amperes, then the current should be 6 amperes, 63 - then 6.3 amperes.
The charging time directly depends on the degree of discharge, which is determined by checking the battery density with a hydrometer. The scale indicates the percentage of discharge. For example, the battery is 50% discharged and has a rated capacity of 50 a/h. It follows from this that it is necessary to recharge the missing 25 a/h. If you charge the battery with a current of two amperes, then it will take twelve and a half hours, and if the current indicator is four amperes, it will take six hours and 15 minutes. etc.
The principle is simple and clear, if not for one “but”: each battery has its own unique “norm”, especially when it is no longer new. She charges in different ways: faster or slower.
Adding fluid
Many “bright minds” strongly advise that if the battery is severely discharged, add sulfuric acid to it, which is unacceptable. The acid will not immediately mix with the remaining liquid, and for this you need to charge the battery. Meanwhile, the aggressive liquid will intensively corrode the plates, “eating” at the same time the active mass - the powder applied to them.
If you add electrolyte, the consequences will not be so dire, but such liquid will also have a bad effect on the condition of the battery.
It is recommended to add only water. Exceptions are those cases when it is necessary to change the entire electrolyte, since the one present in the battery can no longer be charged due to its extremely low density.
If the density is too high, you need to pump out the liquid with a hydrometer and then add distilled water. Next, charge with a low current, not forgetting to periodically monitor the electrolyte density.
If the electrolyte needs to be replaced, you need to prepare a new one. For proper preparation, distilled water is first poured into a glass or acid-resistant plastic container, and then acid is poured in a thin stream.
When adding acid in small portions, you need to frequently check the density of the electrolyte, bringing it to the desired value, depending on the region of residence and the season.
Safety precautions
When working with acid or checking battery density, you must be careful:
- Work only in special clothing that you don’t mind throwing away. Even an electrolyte, not to mention concentrated acid, can easily lead any clothes and shoes to a deplorable state.
- You need to work with rubber gloves to prevent possible chemical burns. It’s not even worth measuring battery density without them.
- Safety glasses are also a good idea, especially when preparing electrolyte, when the danger of this aggressive liquid getting into your eyes is especially great. Some people, out of inexperience, pour water into the acid, and not vice versa, as it should be, and as a result, a splash may occur.
- Before charging the battery, you must correctly connect it to the device, without confusing the polarity.
- Don't forget about effective ventilation. If there is no forced exhaust, then a well-ventilated room is quite suitable.
Smoking is prohibited during such work. It is important to remember that acid consists of hydrogen, which is explosive, and this is especially likely when servicing a large number of batteries.
When charging the battery, be sure to check the cleanliness of the ventilation holes in the plugs of all cans, or even better, turn them out completely.
The battery must be protected from shock.
You should not turn the battery upside down, especially if the battery is already “aged”. The crumbled active mass, hitherto resting peacefully at the bottom of the body, will close the plates. When attaching the battery to its regular place, you should remember that it does not like short circuits that arise as a result of careless work with it.
Checking the density of the electrolyte in the battery is the key to long and reliable operation of the battery. By carrying out regular measurements, the driver cares not only about the reliability of his car, but also about the condition of his wallet.