Restoring the paintwork of a car body with your own hands
How to remove scratches and chips from a car’s paintwork: expert advice
Minor scratches and chips do not interfere with the car's ability to drive, but they deprive the car of its aesthetic appearance, cause annoyance to the car owner, and lower the status of a new car. Contacting a service station to paint and restore the varnish on a car costs a considerable amount, and independent local repair of paintwork may be a way out.
Preventing scratches on car paintwork using a special marker
Specifics of local repairs
Modern paint and varnish coatings have increased durability, combining hardness with elasticity. But our lifestyle requires aggressive driving, so scratches and chips on a car’s paintwork are a common nuisance. The reasons for their appearance are familiar to every car enthusiast: impacts of gravel on the body, hasty, inaccurate parking, friction of branches when traveling in a forest area, road accidents, plus the effect of salt reagents and sand on the surface in winter. As a result, it is necessary to restore the paintwork of the car body so that minor damage does not lead to major problems, causing the spread of corrosion.
Restoring a car's paintwork depends on the depth and nature of the damage, as does the choice of materials suitable for eliminating defects.
Local damage is a defect whose area occupies less than 30% of the surface of the part. They are divided according to size, depth and time of appearance into several types:
- superficial chips and scratches that do not reach the metal base;
- small deep scratches penetrating to the metal;
- shallow defects of large sizes;
- old damage under which metal corrosion has begun.
The technology for repairing paintwork directly depends on the type of damage:
- restoration of a car's paintwork without painting using polishing or cosmetic masking methods;
- the use of special paints as a way to repair paintwork damage on cars;
- local repair of a car's paintwork, which involves a full range of work on puttying, priming, and painting over damaged areas on car parts;
- Repair of chipped car paintwork – restoration of deep damage to the paintwork to prevent the development of corrosion.
The work of restoring the paintwork of the body must be done at a high level, if you do it yourself, then work hard
Body repair without damaging the paintwork
The paint layer of any car is dotted with longitudinal and concentric small scratches, cobwebs, cracks, and abrasions. These damages are superficial and do not reduce the protective properties of the paintwork, but unpleasantly spoil the appearance and age the car. Microscratches on the car body are inevitable - sometimes an unfortunate touch with clothing is enough to leave a mark on the paintwork. Even careful owners have scratches on their car body due to thorough washing. You can restore your car’s paintwork in several ways, including polishing and masking with cosmetics.
Advice. The most inexpensive means for masking shallow small scratches, cobwebs, scratches is a car marker or tinting pencil. This product is rather decorative; other methods are used for serious restoration of damage.
One of the most common methods is polishing. It should be remembered that this can be done a limited number of times, since each subsequent impact depletes the paintwork. Repairing scratches on a car using polishing is carried out manually or using a grinder. First, check the depth of the scratch with a fingernail - if the damage is noticeable and the nail clings to the edges, restore the varnish Polishing the car will not work. To remove scratches on a car body, you will need 3000 abrasive sandpaper, polishing paste, water in a spray bottle, a sponge or a soft cloth. Before polishing, wash the car, and before starting work, moisten the sandpaper and the surface of the car with water so that it does not heat up and the dirt rolls off.
Then they begin to remove the scratches with abrasive sandpaper. Work with sandpaper carefully, especially if you use a sanding machine - pressing too hard will damage the paint layer and ruin the car. The thinnest top layer of varnish is removed, then the area is wiped dry with a rag. The treated area of varnish becomes matte; an abrasive polish is used to remove the matte effect. It is applied with a rag or a dry sponge, rubbed into the surface without strong pressure, finally doused with water and wiped dry.
The finishing treatment is carried out with a protective shine restorer - the composition is applied to a cloth or sponge and rubbed into the surface. Polishing is carried out under correctly set directional lighting - spot light helps the polisher to see all the realities of the surface being treated.
To temporarily restore paintwork, eliminate microscratches and cobwebs, you can use a commercially available kit for removing scratches from a car, which can be used to cosmetically mask defects. A typical kit includes polishing paste of the appropriate color, a battery-powered device for manual polishing, a sponge attachment, a microfiber cloth, and gloves. Feedback from car owners about such kits: the kit can be used to mask minor scratches and temporarily restore a car’s paintwork without painting, but the results of the restoration are washed off after several car washes.
A scratch removal kit will be useful to most car enthusiasts
Restoration of car body paintwork
For quick and thorough restoration of small scratches, abrasions, and cracks, there are effective scratch removers on the modern market - repair paints, for example. MOTiP. They provide lasting protection against corrosion, are available in the form of 400 ml aerosol cans and 12 ml retouches. Repair paints are used to paint over defects and restore varnish on a car. To do this, you need 2 cans - paint plus varnish. Repair enamels were created specifically for restoring paintwork on your own. and the reviews about them are positive. The cost of the compositions is low, and a large variety of shades ensures an exact match to the original factory colors.
The technology of work is very simple - the surface is cleaned, degreased, and then enamel is sprayed on it, and after it dries, varnish is applied. If there are deep scratches, they are filled with putty, an aerosol filler primer is applied on top, and then paint and varnish are sprayed. If repairs to a plastic surface (for example, a bumper) are required, special paints for plastic are used. Their peculiarity is the mandatory use of primer, onto which paint is applied, and finally varnish.
Local paint repair
Local repair of the paintwork is carried out in case of small but noticeable damage to the paintwork on parts - the most common type of defects that every car owner encounters. Repairing the paintwork of a car will require the entire range of work - from cleaning the damage site to the substrate, puttying and painting. The restoration of the paintwork begins with localizing the area - limiting it with tape, gluing with protective film or paper areas that are not planned to be affected.
This is what localization of a paint repair area looks like
The next preparatory step is to thoroughly degrease the surface (with an alcohol solution) so that dirt, grease or silicone does not become a risk of damage - they can subsequently cause the applied coating to peel off.
To prepare the surface for puttying, it is sanded down to the substrate. Grinded with a P180 abrasive wheel slightly beyond the boundaries of the damage (by 2–3 cm) to smooth out existing irregularities and ensure a smooth transition. The remaining sanding dust is blown off with air, the area is sanded with foam-based sanding material with the same P180 gradation and again cleaned of dust. The old base is demolished to the substrate, then the surface is degreased and dried.
Putty is applied to the prepared base. Before use, the putty composition is mixed to a uniform consistency, since during storage the polyester resins and filler are separated. Before application, a hardener is added to the putty - work with two spatulas, mixing the composition with chopping movements (not rotational, so that air does not get into the composition). After mixing, the putty is applied to the base in a thin layer and dried.
Then the putty layer is sanded, preparing it for priming. Grinding is carried out with P280 abrasive (use from 220 to 320 is possible).
The sanded layer is degreased, and small specks are removed with a sticky napkin. The next step is to apply a primer diluted according to the instructions. To mix the compositions, measuring containers are used, the soil brought to the required viscosity is poured into the spray gun and sprayed onto the surface in two layers - one light, the other denser. The primer is cleaned with P500 abrasive and degreased.
The restoration of the car's paintwork is completed by applying new layers of paint and varnish using a spray gun.
Car chip repair
Repair of chips in a car's paintwork that reach the ground is carried out immediately after they appear due to the destructive effect of the external environment on the metal. It is necessary to touch up chips, otherwise they may “bloom.” The drying time of modern products is about 2 hours; in summer, at high temperatures, repairs of chipped paintwork can be done even faster.
To remove a small chip, you will need aerosol enamel, a degreaser, and a rust solvent. First, wipe the surface, spray rust solvent onto the chip and remove all rust from the scratch. Then they wipe the chip with a degreaser, take a little paint with the tip of a toothpick and fill the chip just above the level of the main paint coating, since it sank when it dries. Leave to dry - a couple of days after complete polymerization, the hardened area of the chip is treated with polish.
If scratches, chips, abrasions and other damage occur without dents or surface deformations, restoration of the car’s paintwork can be done independently, and at low cost.
Restoring the shine of paintwork without painting
With ideal vehicle operation, repairs to the varnish and paint surface, logically, should be carried out extremely rarely. But even such careful operation is preceded by “garage” and factory painting, the quality of which is directly related to the durability of the metal. It is possible to increase the interval between major repairs only by restoring the paintwork of the car without painting. The essence of the work is polishing minor scratches and then applying protective agents. If you treat defects and protect paintwork on time, you will not have to visit workshops due to traces of corrosion, clouding of the varnish layer, or peeling and cracking of the varnish.
Methods for restoring shine
Regardless of how well the initial painting was done, the shine of the paintwork disappears over time. This happens due to evaporation or mechanical removal of oily substances that are part of modern products to increase their reflective abilities. Nowadays, methods are used both to prevent the evaporation of such substances and to restore tarnished paintwork. Modern technologies can solve these two tasks simultaneously during repairs. The paint coating can be restored to its original shine only by removing a small layer from it. There are several ways to do this:
- Abrasive – polishing the body with abrasive pastes and polishes.
- Chemical – the use of chemicals.
When using chemicals on paint without varnish, be extremely careful, because... Most of these surfaces immediately absorb chemicals, which is absolutely undesirable. Therefore, polishing is often used to remove the top layer from paints. Let us describe the basic principles of polishing, since mechanical polishing and manual polishing require detailed lighting. So:
- coarse abrasive is used to eliminate significant scratches and remove dried paint;
- fine abrasive polish is used to restore shine to paintwork;
- non-abrasive pastes and polishes are used for finishing;
- protective polishing – to protect paintwork from sand, dust, bitumen, dirt, etc.
Restoring paintwork using chemistry
Polymerization of acrylics, even the fastest ones, lasts about 20 - 30 days, and the evaporation of solvents from many other materials is possible even longer. You can polish the car body after a couple of hours after it has completely dried, and it is advisable to use chemicals no earlier than after one to two months. After this time, the driver can already use the following aggressive substances against pollutants:
- damage to the paintwork by cement or slaked lime - treatment with vinegar, rinsing with water, polishing and treatment with protective polish;
- drops of resin - use a resin remover;
- industrial dust, which is very difficult to remove after just a couple of days - it is possible to remove fresh stains with a special product;
- damage to the paintwork by brake fluid - restore shine with polishes, and the swelling will be eliminated by drying for an hour (an oven or an infrared emitter can be used at a temperature of - 60 ° C);
- oxidation of paintwork from bird droppings - grinding the top layer, polishing with subsequent application of protection;
- insect residues – removing insect residues with an insect remover, then repeatedly degreasing the surface with a product containing alcohol. Finishing – cover the varnish layer with hard mastic;
- Battery acid can be removed with a simple car cleaner.
From the list above it can be seen that each chemical product has its own neutralizer. For example, traces of wood resins can be removed with kerosene and similar substances, and swelling of the paintwork can be removed by heating the car, and solid mastics are used for final fixation. It’s a different matter if the damage is mechanical or the shine is lost after a while - this problem can be solved by polishing. The shine can be restored without pre-polishing, but often defects can only be eliminated by mechanical processing.
Types of polishes
Before you begin restoring paintwork without painting, it is necessary to determine the nature of the damage and the required composition of the polish. Let's look at some of them:
- Liquid polishes – when spread, forms a thin layer (saving in use). However, a thin layer requires the use of synthetic resins, which affects the high price of the material. High quality at low consumption.
- Aerosols are easy to apply, but the desired shine without pre-polishing can be obtained using an aerosol containing silicone resins.
- Hard polishes are the best price-quality ratio, however, when applying them to the body, the time consumption will be high.
Characteristics of polishes and their purpose:
- Wax polishes - give a good shine, last until the first wash, low price.
- Synthetic cleaners - remove oxidized paint, contain a small amount of small abrasive grains, restore color and shine.
- Polymer polishes - to protect the car body. Teflon and urethane contained in the composition increase the duration of protection. The price is high and the activity is energy-consuming.
- Abrasive polishes - necessary for removing scratches, abrasions, and holograms. Provide for subsequent application of protection.
The use of abrasive polishes is carried out only if there is no significant damage to the paintwork. If the damage has reached the soil layer, an abrasive polish will not help. Putty will be required followed by painting of the damaged part.
Protective polishes do not always return the car to its original shine. Often for this purpose it is necessary to remove the top layer of paintwork. The thickness of the current painting can be in the range of 30 - 100 microns. Therefore, when choosing a polish and material for its application, consider the thickness of the surface to be repaired.
Application technology
There is a distinction between polishing using a polishing machine and without. In the latter case, apply the polish yourself to the paintwork with a soft sponge, but only after thoroughly cleaning the body from dirt. When working with a polishing machine, do not forget to distribute the polish evenly over the surface and do not polish one area for a long time, because There may be overheating of the paintwork. And to remove such a defect, abrasive polishing will be required.
During polishing, remove polish residue from the body surface with a damp cloth (microfiber). Restoration should be carried out in small sections, without obsessing over polishing along the same route. This can lead to the formation of “corners”, “circles” and other troubles on the car. After drying, all residues should be removed with a soft cloth - the nature of the movements is free.
Restoration of car body paintwork
The body is considered one of the most vulnerable parts of a vehicle. Small pebbles that fly towards the car while driving at high speed damage the varnish coating. Scratches can also appear as a result of a minor traffic accident or after contact with branches. Even a shallow scratch is dangerous.
If the varnish coating is damaged, sooner or later moisture gets onto the metal, which can cause the development of corrosive formations.
To restore a car and give it a spectacular appearance, the car's paintwork is repaired.
Therefore, the faster the car’s paintwork is restored, the better. Tidying up the paintwork of a car body with your own hands is a real undertaking. It is worth noting that the procedure performed independently will cost you two to three times less than the services of a specialized auto repair shop. If you want to learn how to restore paintwork (with or without painting), this article is for you!
Types of damage to the varnish layer
There are three types of scratches and chips that are observed on the surfaces of the car. These include:
- Light damage. In this case, only the outer layer of varnish is damaged. Scratches of this type are easy to remove - an ordinary paint pencil will do. In addition, you can make liquid glass for your car with your own hands.
- Moderate damage. In this case, both the protective film of the car and the ground layer are damaged. It will take more effort to remove medium-severe scratches. However, if you have the tools and experience working with them, you will not encounter problems.
- Severe damage. It is quite difficult to eliminate them, because both the varnish layer, the primer and the metal are damaged. In this case, it will not be possible to repair the car without painting it. If there is severe damage, the rational solution is to contact a specialized service. But if you have all the necessary tools and experience in such work, you can still remove deep scratches on your car with your own hands.
The paintwork of a car not only performs an aesthetic function (giving the car a spectacular appearance), but also protects the body from damage and rust.
Materials for repairing body surfaces
Before you start restoring the varnish on your car, make sure you have the following tools and materials in your arsenal:
- Putty materials.
- Varnish materials.
- Mixture for creating a primer.
- Sander.
- Skins for abrasive work.
- Materials for abrasive work.
- Fragments of felt fabric.
Body repair materials
Car paint restoration
Restoring the paintwork of a car should be carried out in accordance with this algorithm:
- Make sure that all non-working surfaces of the vehicle are reliably protected. For this purpose, covering materials (such as construction film) are usually used, secured with adhesive tape.
- Clean the area of the surface that is being treated (and the entire area around it within a radius of five millimeters). To do this, use a grinding machine or abrasive paper with a high grain size. Cleaning is needed to remove dirt and rust that may have already formed in the scratch.
- Rinse, degrease and dry the problem area. It should be clean when you start working.
- If the scratch affected more than just the varnish layer, apply a layer of primer to the surface and spread it using a rubber spatula
- When the primer has dried, sand the problem area again using a sander or high-grit abrasive paper.
- After this, the direct restoration of the car’s paintwork begins. The varnish is applied using an aerosol can (it is important to observe the principle of color matching).
- Now start polishing the surfaces. An abrasive material is applied to felt rags, and with their help the coating is polished. It is important to take into account that you need to gradually move from products with coarse grains to products with fine grains, as well as from hard rags to soft ones. Polishing continues until the surface becomes completely matte.
- The process of restoring a car's paintwork without painting is completed by applying a protective layer to the surface of the body. This may be a special polish that contains wax-based compounds.
A device for measuring the thickness of a car’s LPK, which will be an indispensable assistant in this matter, is a thickness gauge, which you can find on our website.
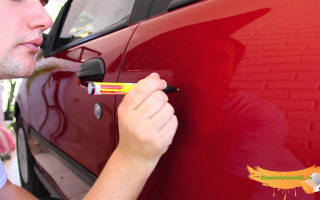
Using an ink pencil
If the scratch is located in a visible place and does not differ in depth, it is quite rational to use a paint pencil.
It performs an aesthetic rather than a protective function, but allows you to completely hide all traces of damage. The advantage of a paint pencil is the speed of its use. The main thing is to choose the exact color shade (this should not be a problem, since there are hundreds of varieties on the market). Before using the paint pencil, the damage is treated accordingly: clean, rinse, degrease, dry. After applying the paint, use clear varnish.
Local repair of chips on the car body
On any highway there is a pebble that, flying out from under the wheels, hits the body of a car with the energy of a bullet fired from a small-caliber rifle. As a result, chips are formed - pinpoint damage to the paintwork of varying depths (from tenths of a micrometer to a millimeter) with metal exposed. They are not as harmless as they seem.
This is usually where body corrosion begins. In addition, the car has a sloppy appearance and significantly loses value. We invite you to learn how to repair chips on a car body using technology from Nussle (Germany), which is engaged in body repair and production of professional tools for repairing dents without painting.
What is needed for repairs
If you are not particularly interested in high-quality repair of chips, then you can take a thin brush, nitro enamel of a suitable color and paint over the damage. For those who do not think a slight spot on their car is a good idea, they should do it differently and spend up to three days repairing the chip.
Work is carried out in dry and heated garages. In extreme cases, repair work can be done in the summer. The room must be electrified. Alternatively, find a portable power generator.
Electricity will provide good illumination of the work area and connect an infrared heater. Before starting work, you need to acquire some tools and consumables.
- acrylic paints for exterior use. You can use water-soluble or hyphtal;
- two-component acrylic primers;
- two-component acrylic varnish;
- waterproof sandpaper P1500 and P2000;
- final polishing paste;
- magnifying glass;
- a metal tool with sharp ends - a tool knife, a hook, etc. You can make them yourself;
- portable infrared emitter. For example, Ballu BHH/M-09.
Technology of main works
Repairing chips is a good reason to thoroughly wash your car. Work begins after complete drying. The repair area is thoroughly degreased, even if you used a product like Fairy when washing. White spirit is best for this.
The light should be placed so that the work area is not obscured by hands and tools. So use two or three sources.
First, you need to determine the type of paint layer on your car. Not all bodies are covered with a layer of varnish. On budget models, a glossy enamel film is formed during hot drying. The assessment is done using a clean cloth and a drop of polishing paste, which should be used to rub the body without applying significant effort. If there are colored stains on the cloth, then there is no varnish, there is only pigment.
Assess the extent of damage using a magnifying glass. If the chip has reached the metal, then it is better to assume that corrosion has already begun.
When working with a chip, a miniature tool and literally homeopathic portions of materials are used - primer, paint, varnish, rust modifiers.
Outline the repair area with a colored wax pencil so you don't lose sight of it.
Clean the metal under the chip using the sharp end of the wire or the tip of a tool knife. Apply rust modifier. Turn on the infrared heater, wait until the body part heats up noticeably and the repair area is completely dry.
Clean the repair area with P1500 sandpaper, making a matte “patch” with a diameter of about 8 cm around the chip. To avoid covering a larger surface, take a piece of wooden slats the size of a matchbox and wrap it with sandpaper.
Dilute a small amount of two-component acrylic primer. It can be expressed into a container from an aerosol can. Using a toothpick, a sharpened match, or a fine-tipped brush, place the primer inside the chip so that it is half full. Use the infrared heater again and wait until the applied material is completely dry. It may shrink, so the priming process is repeated.
If the car is new, then it makes sense to find the paint code, which is written on the model plate, next to the VIN code. Each manufacturer finds a special place for it, but in most cases it is installed under the hood, on the panel between the engine compartment and the passenger compartment. As an option - the lower rear corner of the front door, the middle pillar of the body. After two to three years of use, the color of the paint becomes less saturated. But the lighter the car, the more likely you are to match the color using factory markings.
A common misconception is that automobile dyes are habitually called “nitro paint.” Pigment compositions based on dissolved cellulose (hence the root “nitro”) are not currently used. All modern car paints are made on an acrylic base. They can be water-soluble or hyphthalic, containing an alkyd resin that acts as a binder.
The paint that is considered “native” for a car is probably hyphthalic; when it dries, it forms a durable waterproof film and does not require additional varnish. A prerequisite for its use is thermal curing. Therefore, after application - the process is similar to a primer - the repair area must be heated with an infrared emitter. It should be noticeably warm. Complete drying time is from 5 to 10 hours. At temperatures below 20 °C, such paint will completely polymerize within a month.
It makes sense to use water-soluble acrylic paints for exterior work in two cases:
- the paint coating has changed tone during operation;
- The finishing layer is varnish.
Water-soluble paints can be mixed with each other to achieve the desired shade. Moisture will not be able to penetrate the primer layer and cause corrosion. Despite the fact that after complete drying they form a durable waterproof film, it is better to apply a layer of two-component acrylic varnish on top of them.
It is not necessary to use an infrared emitter to dry a layer of water-soluble acrylic paint or two-component varnish. In this case, it will take at least two days for complete curing.
As a result of sequentially filling the chip with layers of primer, paint and varnish, you should have a pimple no more than two or three tenths of a millimeter high on the surface of the part being repaired. To get rid of it, finishing is carried out.
Finishing
The surface around the pimple is painted with any easily washable paint. For example, water-dispersed. This will allow you to accurately control the position of the abrasive stone and not sand off anything that shouldn’t.
First, take abrasive paper P1500. It is fixed on a small wooden block the size of a matchbox and slightly wetted. Sand the bump until streaks appear on the surface of the control paint. Check the quality of work by running your finger along the tubercle. Ideally, you should not feel the difference between it and the rest of the surface.
The protective paint is washed off, the 1500 sandpaper is replaced with P2000, which finally smoothes out the protrusion. The surface remains matte. Polishing is done with a paste applied to a soft cloth made of natural material. For example, flannel, flannel, felt. A felt buffing pad is too rough for this job.
The technology offered by Nussle is a long and painstaking process. But your time and energy will not be wasted. The location of the former chip is no different from the rest of the body surface.
5 ways to repair chipped car paint
The car body is a part that requires care and careful handling. Sloppy driving, poor quality roads and other factors often cause defects in the paintwork of a car. The appearance of small chips in the paintwork requires repair because it spoils the appearance of the car and causes further damage. For this reason, drivers sometimes need information on how to remove chips on the car body.
Causes and consequences of chips
No car owner is insured against damage to the paintwork. In addition to careless driving, chips on a car appear for the following reasons:
- unfavorable weather conditions - hail, temperature changes;
- road covered with crushed stone;
- insects crashing into a car at full speed;
- carelessness of others, physical damage;
- improper car washing.
The car owner does not notice the formation of small paint chips. Only a careful examination of the body after the trip and cleaning the car of dirt helps to find possible defects. If they are detected, it is advisable to repair the body as quickly as possible. Leaving minor damage unattended can have consequences.
Microdamages violate the integrity of the paintwork and cause further corrosion, and an increase in the defect area will make repairs expensive. While waiting, the situation will worsen when the body begins to rust. Damaged paint will not be able to prevent the oxidation of the metal. In this case, the car body will require lengthy and costly professional repairs.
Types of chips and paint coating arrangement
The paintwork of a car consists of primer, paint and clear varnish, which serves as additional protection. Some paints already contain varnish, so they do not require additional protection. Based on the depth of chips on a car, damage is divided into:
- varnish;
- varnish and paint;
- varnish, paint and primer.
By type, paint coating defects are divided into:
- traces of polishing;
- “cobwebs” - minor damage to the top layer;
- water marks are small but visible defects on the varnish layer;
- isolated small scratches;
- deep scratches;
Repair is required when damage occurs to each layer, and not just scratches that reach the ground. Small chips are much easier to repair.
How to remove chips on a car body
Before you begin the repair itself, you need to find all the chips on the body and assess the damage. To do this, you should carefully inspect the car, especially in the area of the front bumper, headlights and radiator.
To properly restore a car, you should evaluate the general condition and determine whether the soil is damaged. If the damage is not too serious, it makes sense to start repairing it yourself using specialized tools. There are the following methods for restoring paintwork:
- restoring varnish using polish;
- restoring paint with a brush;
- use of an aerosol can;
- Repairing chips in car paint using varnish.
Before applying coatings, the surface must be thoroughly cleaned of corrosion. The damaged area should be cleaned of dirt. Use sanding paper to smooth the surface to create a base for coating.
The use of rust converter is strictly prohibited. When it is used, a stain will appear at the site of corrosion even after painting.
Next, the main restoration coating is applied. There are different application methods, so we will look at them in more detail below.
The last step is grinding and polishing the surface. Sanding is done using P2000 paper using a hard base, and polishing is done using polishing paste and a cloth. To evaluate the result obtained, it is most convenient to use water and make sure that it spreads evenly over the surface.
Polish, anti-scratch, polishing pastes
This restoration method is used to remove small chips on a car. Shallow damage is covered with a special anti-scratch paste after drying. This helps stop further corrosion and make chips less noticeable. The main advantages are ease of execution and reliability of the coating. Among the disadvantages is the duration of work.
Some car owners prefer to periodically treat the entire body with polish. This allows you to get rid of subtle defects at an early stage, prevent further corrosion and renew the appearance of the car, giving it the shine it had after painting.
Covering chips with polishing paste will be noticeable if:
- in case of damage to a large area, the shade changes to matte;
- For deep scratches, the coating will not give an effective result.
This method relates to restoration conditionally. Pencils are most often used as a temporary fix for chips. This is the easiest way to repair chips on a car body with your own hands. Three types of restoration pencils are sold:
- wax;
- gel corrector;
- coloring pencil.
Wax pencil - used to remove chips of any depth. In appearance and method of application, it resembles lipstick. The substances in such pencils contain a corrosion inhibitor, so it is a reliable, but short-lived protection. For temporary repairs, apply a pencil to the surface without removing any corrosion.
Gel corrector - an opportunity to do without polish for the restoration of paintwork. The liquid in such a pencil has a high viscosity and hardens for a long time. After restoring the defect with such a pencil, the surface does not visually differ from other areas.
Coloring pencil - a bottle of paint, ready for use. It is good for covering up small chips on your car or minor damage. Particularly sensitive to corrosion. After use, it is recommended to varnish and polish the surface.
Aerosol cans
The optimal solution for eliminating large chips. It is carried out after sanding and cleaning the damaged area from the old paint layer. If the color is selected correctly, the painted areas do not differ from the rest of the body.
Spray paint lasts longer than pencil paint due to its even application. An additional advantage is the ability to paint hard-to-reach areas.
In addition to paint, the cans contain an auto primer, which is necessary for painting small but deep chips. There is also acrylic paint that does not require varnish.
Repairing chips using varnish
Varnish is the top protective layer of a coating. In case of serious damage, opening with polish is not enough. After local repair of a chip, application of varnish is required.
The surface is coated with varnish after the paint has completely dried. The varnish is applied in several thin layers until the surface of the damaged area protrudes slightly beyond the level of the outer part of the paintwork. After this, the unevenness is corrected by leveling the surface by grinding.
If the chip reaches the metal and causes corrosion
Neglected defects cause corrosion. If the damage reaches the metal, urgent repair of the chip on the car body is required.
To remove such a flaw, you should clean the surface around it with coarse sandpaper. In order for the paint to adhere better, the boundaries of the restored area should be flat. After cleaning the surface, treat it with a primer and wait for the layer to dry.
It is advisable to repair the chip with paint that contains varnish, since when it is applied over the paint layer, the place where the defect was repaired will be noticeable.
Tools for repairing chips
To eliminate defects on the body, special kits are sold in car dealerships. They include primer, paint and varnish, and coating brushes. The kit for repairing chips on the body has a large assortment of colors and allows you to repair almost any defects and scratches.
If you find minor damage to the car body, you should not ignore it. Careful handling of the machine, as well as timely repairs, will keep the paintwork of the machine in good condition for more than 10 years.