How to remove rot from a car body
How to remove rust and bugs from a car body? Means and methods of combating corrosion
Hi all! In this article we will look at the interesting topic of how to remove rust and bugs from a car body.
Rust is the most common and common problem that motorists have to deal with when servicing their car. Corrosion damage to the body is very difficult to stop. To do this, it is necessary to promptly carry out a number of protective measures to ensure the safety of the body, rather than subsequently eliminating any damage.
The most common cause of body damage is small crushed stone flying out from under the wheels of oncoming or passing vehicles, as well as chemical reagents that are used to reduce icing of the roadway and sidewalks.
Motorists often ask the question: “How to remove rust from a car body?” I will try to briefly answer this question.
The process of removing corrosion from a car body consists of several stages:
- car washing, removing dirt and dust from the car body;
- body drying;
- examination of the body for the presence of areas damaged by rust, chips and cracks of paint with a mandatory inspection of wheel arches, sills, the bottom of the car and a thorough examination of the floor inside the car;
- areas damaged by bugs must be highlighted with adhesive tape;
- preparing the body for rust removal work;
- carrying out work to remove corrosion;
- additional treatment of cleaned areas from rust;
- applying putty with sanding until a smooth surface is created;
- painting the prepared areas.
Car wash
The process of washing a car is carried out manually or with the help of mechanization, using special sprayers. Washing must be carried out outside and inside the body, as well as the engine and luggage compartments, while simultaneously inspecting metal surfaces.
To increase the efficiency of the washing process, it is necessary to use car shampoos, which provide thorough, gentle cleaning of the body and prepare the body for the necessary work. Car shampoo easily washes away dirt, salt and fats. Returns natural shine to surfaces and protects paintwork. The product does not contain wax, does not remove polishes, and does not leave stains or streaks. The composition of car shampoos does not contain phenols, formaldehyde preservatives and other toxic components.
For manual washing, the most widely used car shampoos are: Blesk-Premium, Lux-Premium, Car-Wash, Biolux.
When using automatic washing stations, Koch Chemie series car shampoo is widely used.
Drying the car body
Drying the car body can be carried out in natural conditions or using fan heaters. After washing, the car must be thoroughly wiped, removing all drops of water, which during drying in the sun can lead to the formation of stains on the surface of the body.
Inspecting the body and identifying areas with damaged surfaces requires the immediate installation of protective covers to prevent the ingress of chemicals and paint during painting work.
Carrying out rust removal work
When using a car for a long time, especially in humid climates (and not only), “bugs” form damage on the body. How to remove bugs from a car body?
There are two main methods used to process metal to remove rust:
This type of repair involves removing bugs from a car with your own hands, as a rule, it is carried out in a personal garage using a set of tools for car maintenance.
Mechanical method
How to remove bugs on the body? To do this, areas damaged by rust are usually treated with sandpaper or a wire brush. Cleaning the damaged area at the initial stage is carried out with coarse-grained sandpaper, with the transition to fine-grained sandpaper in the further processing process.
Sanding can be done using a “dry” or “wet” method. With the “wet” method, the metal surface is moistened with kerosene or white alcohol.
Video: how to remove a bug (small rusty spot) on the roof of a car.
When using a metal brush for cleaning, you must be careful, since metal that is susceptible to corrosion is easily destroyed.
Rust can be removed from the car body using a grinding machine. A set-up sanding disc is suitable for this, with the help of which the layer of rust is removed and the damaged area is finally cleaned to obtain a smooth surface without traces of rust, using fine-grained sandpaper.
A very good result is obtained by using a sandblasting machine for cleaning, which combines high efficiency and helps prevent damage to the body. Removing rust using a sandblasting machine is carried out by cleaning the metal with a stream of air containing sand particles. This method allows for high-quality cleaning of damaged areas from bugs.
Video: sandblasting gun.
Video: what tool can you use to remove corrosion on a car?
It should be noted that when using cleaning mechanisms, it is imperative to use safety glasses and gloves, observing safety regulations.
Chemical method
When using a chemical method to remove corrosion from a car body, various rust converting reagents are used. They are able to prevent the spread of corrosion in damaged areas. Companies producing car cosmetics offer a wide range of different products.
1. Among car enthusiasts, the composition “Rust Neutralizer VSN-1” has become widely known, after treatment with which, rust is converted into a gray substance that is easily removed with a rag.
2. The most commonly used product for removing rust from a car body is phosphoric acid, which is included in many rust conversion preparations.
3. Recently, motorists have been using zinc spray, which forms a protective film of zinc particles on the damaged area, thereby preventing the metal from reviving.
Retail stores offer a special “Zinkor-Auto” kit consisting of a solution for degreasing and removing rust, as well as a solution for coating the metal with a protective film of zinc particles.
When using the kit, the site of rust damage is treated with a rust converter, and then connected to the battery using electrodes and zinc particles are formed on the surface of the metal. During an electrochemical reaction, zinc particles coat the metal, forming a protective film.
Video: removing rust and galvanizing metal using the Zinkor-auto kit.
Additional processing
After cleaning the body from rust, a surface degreasing composition is applied to the damaged area and, after drying, another layer of anti-corrosion primer is applied, but this is only if the metal is clean. And if it happens that after cleaning the metal remains covered with factory primer, then there is no need for a primer.
Primers are used to protect the metal surface and provide better adhesion to the applied substances. Primers are available in three types:
- epoxy primer;
- primer or leveling primer;
- sealant.
Body putty and painting
A layer of putty is applied to the surface to be treated, which is processed using moisture-resistant sandpaper and leveled to a flat surface. The putty can be applied in several layers, and each time it is leveled with sandpaper to give it a smooth surface. And the last step before painting is applying a primer.
Video: correct application of putty and sanding it. Preparing for priming.
To paint the body, a paint color corresponding to the main color of the body is selected. It is better to choose the body color in a car repair shop using the paint number in the car’s passport. Painting is carried out using a paint sprayer, in at least three layers.
Video: car painting.
Properly selected and carried out treatment of the car body, adherence to the order of implementation of all technological processes will help motorists prolong the operation of the vehicle while saving money and time.
Operation “Stop Rust”: ridding the car body of saffron milk caps and traces of rust on your own
A red scourge called rust plagues many car enthusiasts. The less protected the car body is from corrosion at the factory (galvanization), the more often the owners will have to make efforts to eliminate red spots. Moreover, it is undesirable to delay liquidation, since over time, damage to the metal only increases. As a result, in six months you will have to spend much more time and money than today. So, what will you need to remove rust and saffron milk caps with your own hands and how to remove them without harming the body.
Causes and places of rust on a car body
Rust is the oxidation of metal that occurs under the influence of air, water and static electricity. Therefore, the main reason for its occurrence is damage to the paintwork of the car body. Microcracks and physical damage allow air and moisture to reach the iron. The speed of the destructive impact will depend on the degree of protection of the body itself and the aggressiveness of the environment. This is especially true in winter, when many chemicals appear on our roads.
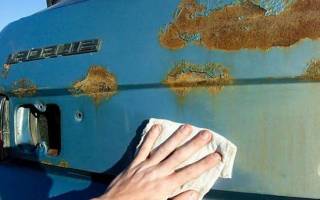
The above factors directly affect the shape, color and depth of corrosion. People call them differently: “saffron milk caps,” “bugs,” or simply “rusty spots,” but their essence is the same (only the degree of neglect varies). A single spot of rust is easier to deal with than many small red spots. The latter usually indicates poor quality metal or unsuccessful body repairs. The total processing area will be larger. Moreover, these points often spread in depth rather than in breadth. Blistering of the paint also signals the need to remove corrosion that has begun to develop under the paintwork.
The most common places for bugs and rust spots (photo)
Rust progresses well in places where there is increased exposure to foreign objects: sand, dirt, stones. The hood suffers from small stones from the tires of other cars, the wheel arches from their own “emissions” (by the way, wide non-standard tires or rims contribute to greater damage). The thresholds of the car are also one of the first to rot due to the close proximity to the “aggressive environment”, plus unsuccessful exits from curbs aggravate the situation.
How to delete: options
We have become acquainted with the causes and places, let's move on to methods of correct elimination. There are two methods that differ in the way they remove rust:
- Mechanical - cleaning, priming, puttying, painting.
- Chemical - rust converters or kits for galvanizing metal.
You cannot do without the first method if the rust is strongly ingrained into the metal.
Then it is necessary to completely eliminate traces of corrosion until pure iron (ideally shiny) remains. To do this, you may need additional tools and resources, which we will discuss below in step-by-step instructions. The second option is suitable for hard-to-reach places.
These could be curves on the bottom of the car or the inside of the arches, which are difficult to process using mechanical means. Depending on the product, rust after chemical treatment can turn into foam (you need to rinse with water and dry the surface) or harden and become covered with a protective layer suitable for painting. Be sure to read the instructions and recommendations for the use of chemicals before purchasing. Before starting work, try to assess the extent of damage to the body and assess whether you can etch the damage with chemicals alone. For a positive result, it is necessary that “live” iron remains after the initial cleaning. If there are through holes or the final thickness of the metal after processing is too small, then more serious body repairs will be needed, that is, initially all these areas will need to be repaired using welding or putty with fiberglass.
Reviews of the most popular tools and methods
The ideal option is orthophosphoric acid. Apply a thin layer to the camelina, wait 10–30 seconds, wipe dry with a cotton pad. It eats up rust and forms a phosphate film that is not afraid of water and is inert.
Maxim Leonov
http://avto-flot.ru/blog/kak-udalit-rjavchinu-s-kuzova-avtomobilya-i-ostanovit-ee-rasprostranenie.html
I already tried orthophosphorus - this is still an old-fashioned method, I processed what I cleaned. (As far as I know, all these inhibitors and converters are what it is, only in multi-colored bottles). Indeed, almost cleaned surfaces, this rubbish gets rid of rust residues. But untouched, so to speak, terry thickets of corrosion do not particularly react to it. So, they sizzle a little, darken, turn pale and remain in place.
Saf
http://forums.drom.ru/4×4/t1151267034.html
Nowadays, people no longer burn at the stake for the magic of transforming rust into pure and white metal, but a miraculous transformation does not happen either. And the zealous body workers continue to sand, etch, putty, treat with filler... And that’s why - because you can’t pull it out without difficulty... It’s impossible, you know, to rub it with a cloth and for it to become overgrown - it doesn’t happen. So go ahead, Shura, go ahead...
Zaika 2106
https://forum.auto.ru/chemistry/22048/
Mechanical method (step by step instructions)
If you follow the instructions and take your time, you can forget about rust on your car for 1-2 years (at least in the treated areas). The work is carried out in stages:
- preparing everything necessary;
- initial cleaning of the damaged part of the body;
- degreasing and priming;
- painting and varnishing.
DIY Tools and Supplies
To work you will need:
- grinding tool and sandpaper,
- rust converter,
- solvent,
- anti-corrosion primer,
- paint to match the body color and clear varnish (in cans),
- if necessary, two-component automotive putty (with hardener).
- You can fight rust using a sandblaster, an angle grinder with a grinding wheel, a drill with a special attachment, or the trivial, but always accessible, method - with your hands and sandpaper.
The work can be done manually or using special machines
The main thing is to work carefully and slowly. There should be no deep scratches or rough transitions. Try to get a polished surface with smooth gradients.
A grinder is often included in a car enthusiast’s arsenal.
The damaged paintwork is removed layer by layer and subsequent damaged areas are processed.
The longevity of the result depends on the thoroughness of the work.
Universal types of putty, oddly enough, are not suitable for all types of car bodies
It is applied in several layers and each one is sanded until smooth. Your goal is to fill all the depressions and achieve a perfectly smooth surface when the work is completed.
To work, you will need several types of sandpaper.
Do not skimp on protective equipment, especially if you are doing the job for the first time.
Film, newspapers and masking tape are perfect for this. If you work outside, be sure to consider the direction of the wind.
Make sure that dust and other abrasive particles do not fall on the treated surface.
Painting work requires minimal skills!
The result is not always the same as in the photo; it is often necessary to modify and eliminate flaws
A good way to remove and repair rust on a car door (video)
Do-it-yourself chemical way to get rid of corrosion
The chemical method differs only in the initial stage - cleaning the part from rust. According to reviews from manufacturers, these substances are able to eradicate rust, stop its further spread and do not damage the iron itself (unlike “sandpaper”). Application is very simple - apply the product to the rusty surface for 30-40 minutes, then wipe with a cloth or rinse with water. But to get a nice, smooth surface you will still have to clean, putty and polish (except for the initial stages of corrosion).
Some funds are available to motorists even with the most modest budget
There are kits on sale that allow you to independently apply a protective layer of zinc to the car body. The kit already contains a solution for removing rust and applying a protective layer, as well as an electrode with a zinc tip. This process is electrochemical, so a connection to a battery is required.
The kit includes liquids and all necessary working tools
How to remove “saffron milk caps” and “bugs”
Many people want to believe that if rust has just appeared and the lesions are small, then they can be eliminated with some miracle remedy. Unfortunately, this is impossible in principle. The rust that appears on the surface of the paintwork is like the tip of an iceberg; the main damage is deep inside.
There are products on sale that will help remove the red color from the body. For example, there is Anti-Rust paste - it removes red spots quite quickly and well. This is the same rust converter that we discussed above. It eliminates the visible signs, but not the source itself. Such manipulations usually last for 2–6 weeks (depending on weather conditions), and they are most often used immediately before selling the car.
Small “bugs” sometimes cause big problems for the car seller!
If you want to get rid of the problem in the long term, then you cannot do without physical intervention. It is necessary to stop the access of air and moisture directly to the metal. Theoretically, you can prolong the effect of the paste if, after treatment, you cover the damaged area of the body with clear varnish. But it will work if the converter has managed to remove all the rust. In most cases, this does not happen, since the depth of penetration of the product is small.
Unfortunately, it will not be possible to hide damage for a long time only with the help of paste.
Vehicle prevention and protection
Tools available to every motorist, but which most of them ignore, will help you avoid the work done:
- regular car washing, even in winter (additional waxing increases protection against aggressive environments);
- regular inspection of a clean car (in the initial stages it is much easier to fix the problem);
- wheel arch liners and mudguards on all wheels (will keep the paintwork presentable for much longer);
- anti-gravel film on the hood and part of the roof above the windshield (an alternative is a “fly swatter”);
- anti-corrosion treatment of the bottom of the car.
The work of eliminating “bugs” and “saffron milk caps” is within the power of everyone. But for a good result it will take scrupulousness and time (especially the first time). Think about whether you are able to prevent such sources of trouble. Advanced corrosion leads to expensive body repairs without guarantees. Take care of your car, and it will reciprocate.
Repair of a rotten body and its features
Repairing a rotten car body is a necessary measure that the car owner resorts to. The main problem of any machine is, of course, its metal frame, which is subject to corrosion. If faulty components and mechanisms of a car can be easily sorted out, repaired or replaced with your own hands, then you will have to tinker a lot with a worn-out body, especially if it is completely rotten in places.
Features of body wear
ATTENTION! A completely simple way to reduce fuel consumption has been found! Don't believe me? An auto mechanic with 15 years of experience also didn’t believe it until he tried it. And now he saves 35,000 rubles a year on gasoline! Read more"
Body repairs are also considered very expensive. Carrying it out in a garage, on your own, without the proper equipment, is several times more difficult than at a service station. They say, and this is rightly noted, that acquiring the skills of a body specialist for the sake of a single sample car is not rational, but this is exactly what the owner will have to do if he decides to take on the task of repairing a rotten body.
Body deformations are the first thing you should pay attention to when buying a used car.
So, the car body wears out according to different scenarios, but in general, only three options can be distinguished.
- Wear and tear caused by natural causes.
- Body defects caused by exposure to rye.
- Dents and damage caused by road accidents.
The first type of wear is inevitable. No matter how carefully and carefully the owner looks after his car, over time the body still wears out. The shine of surfaces is lost, the ostentatious fine decorative features are no longer used, plastic and rubber elements become unusable, and the interior upholstery is worn out. Due to fatigue cracks that occur in the car frame, door straps sag, the functioning of locks and other mechanisms becomes worse, trunk lid torsion bars become weakened, etc.
While some of this can be restored relatively easily, others are restored with great difficulty.
It is interesting that, based on the indicator of natural obsolescence, it is easy to very accurately determine the age of the machine, its operating conditions and regularity of maintenance.
How to identify a weak or rotten body
Usually, a rotten body is easy to spot right away. In some cases, doing this with the naked eye can be extremely difficult. Below are some useful tips to help identify a weak body.
- When open, the car doors are lifted out of the frame. If there is a noticeable lift, this indicates severely worn hinges and poor condition of the body itself;
- Poorly functioning luggage bars can also indicate a worn-out body;
- Pay attention to the hood hinges. If they have a strong backlash, then the body is already worn out;
- In the cabin, the seats and plastic parts wear out the fastest.
Methods for repairing a rotten body and its components
Below are ways to restore the body and its elements with your own hands. An old car, like a woman, has many secrets that will have to be revealed during the repair process. The car may require repair of a rotten sill, apron, fender and many other parts, or it may itself be completely rotten. In the latter case, as a rule, it is easier to replace the body completely.
If the doors of a car are rotten, then this is most likely the work of corrosion. The latter occurs in the place of the door where there is a small gap where air does not enter. Rust starts from here, from the inside. At the beginning of the development of corrosion it is quite difficult to notice, but then it inevitably comes out.
Here's what needs to be done to restore the rotten areas of the door:
- Carefully cut out the rotten part;
- Make a patch of the desired shape from a metal sheet;
- Insert the patch through the triangular hole cut in the body;
- After this, you will need to scald the metal;
- Clean the welds using a grinder;
- Now is the time to apply the rough type of automotive filler. It is also called hairspar or glass spar;
- After the first layer of putty has hardened, it is sanded with 80-grit abrasive;
- After this, grinding is carried out with 120 grit.
Note. Grinding is carried out either manually or using a grinder. The first option is good because it gives excellent results and quality of work. The second option is a big time saver.
- The final layer of putty is applied, sanded off like the first layer in two approaches. First with sandpaper on 220, and then on 320;
- Afterwards a primer is applied;
- After drying, paint.
Among the features of restoration work on doors, one interesting thing can be highlighted. In most cases, doors rust not only in the lower corner area, but also along the entire part of the correct lining.
Severely rotten doors can also be repaired, but it is very expensive. For this reason, it is recommended to replace the door with a new one rather than spend money on exhaustive repairs. This is especially true for domestic cars, because the price of their body parts is relatively low.
Often the threshold on cars also rots. In general, replacing thresholds is considered a popular pastime for garage workers of all stripes. As a rule, repairing this part of the body begins with a thorough inspection of both sides. If you notice rusty spots or even spots, you should immediately begin restoration, otherwise the corrosion will go further.
In many cases, the threshold is hidden by moldings. It is impossible to determine the condition of the threshold until the molding is removed. Often, after removing it, the owner discovers a terrible picture - the threshold is practically not found, it is completely consumed by corrosion.
In addition, holes may appear on the underside of the car, as well as in the area where the connector is located. In these cases, the part has to be changed completely, including all three main elements.
The car threshold itself, as you know, consists of 3 main parts: the “exterior” (the panel on the outside), the amplifier and the connector. All these parts are connected by spot welding.
Corrosion on the threshold occurs more often for the most important reason - water gets into the threshold! The car manufacturer provides drainage holes - 2 or 3 along the edges and in the middle, but over time they become clogged with dirt. If you can clean them regularly, the thresholds will last longer.
On the other hand, if the drainage system is working properly, and the water is constantly drained, all the same, the internal cavities of the threshold become moistened, which also leads to corrosion over time.
Preventive measures to combat corrosion of thresholds include treatment with Movil. However, over time it thickens and becomes hard. It is clear that in this state it is not capable of protecting against corrosion.
In general, many experts do not recommend using Movil to protect thresholds. In their opinion, foreign-made preservatives with the ML index, whose purpose is hidden body cavities, have proven themselves better. If such a composition cannot be found, then processed oil is also recommended, which does not dry out compared to Movil.
So, before starting restoration work with a rotten threshold, you should dismantle both car doors and then remove the rusty thresholds.
It is recommended that before removing the doors, mark their location in the openings, which will make it possible to reduce reassembly time.
- Next, you should pull out the aluminum elements, some of the rubber inserts and raise the mats in the place where they will interfere with work;
- Remove old, rotten thresholds piece by piece. First, the part of the threshold that is located in the area of the front door is removed, then - in the back, and at the end - the part in the middle;
- Welds are also removed by drilling with a thin tool;
- The remains of the connector are drilled out only after removing the bitumen shvi (the latter, as a rule, is applied to a number of car models of domestic manufacturers);
- The outer part of the threshold is removed in such a way that half a meter long sections remain on the side of the wings. They are then used to secure the new part;
- The threshold amplifier is also removed. It is also recommended not to touch some part of the connector, preferably from the front;
- It is advisable to leave a small part of the threshold amplifier under the central pillar. A fresh amplifier will be installed on the remaining overlapped area;
- After the threshold is removed, the metal is cleared of rust, and the rotten part of the body floor is cut out;
- The areas of upcoming welding are also cleaned;
- New threshold components are being prepared for installation.
Note. It is highly recommended to start fitting from the connector. It must be shortened so that at the rear it overlaps the subframe amplifier, and at the front it mates with what is left of the old connector.
- The connector is welded;
- The amplifier is shortened, and a cutout is made on it in the area of the central pillar. The latter is done so that nothing interferes with the installation;
- The lower zones of the parts are leveled;
- The amplifier is welded to the connector through the apertures;
The weld points at the bottom of the connector are cleaned. This is done in order to ensure the correct fit of the body elements;
- We adjust the outer empty panel, and then butt weld it so that there are no gaps left;
- The panel is also welded to the amplifier;
- At the end of the operation, we weld a connector to the body floor;
- Two layers of soil are placed on the new threshold, and then it is painted.
Important helpful tips:
- At the bottom of the amplifier, it is advisable to drill fairleads several millimeters in size in advance. Leave their step around 5 cm;
- The soil on the connector must be removed in all places where welding is planned;
- It is recommended to fix the amplifier first with 2 clamps, and only then it is tacked by welding;
- All work is carried out on a machine that is parked on a level surface;
- Before finally welding the outer panel, it is recommended to hang the doors. This is done in order to be absolutely sure of the correct welding;
- At the end of the work, the threshold must be treated with anticorrosive.
If the body number is rotten
The body number plate also often rots on the car. In this case, if repair work is carried out (a patch is applied), then the officials of the authorities will appoint an examination in case of suspicion of deliberate liquidation or replacement.
As a rule, the car inspector, not finding the license plate, confiscates the car’s certificate and then issues permission to undergo an examination.
If it is proven that the lack of visibility of the license plate is due to corrosion and repairs, then the traffic inspector pastes a photo with the body number into the papers on the car, making the required marks. The audit as a process does not take more than a month.
In some cases, if there is not much rust, it is recommended to treat the number with a converter or lubricate it with grease.
How to quickly and permanently remove rust from a car body
The appearance of rust on a car body is an unpleasant occurrence for every car owner. In this article we will tell you how to quickly and easily remove rust stains from a car body using available means. All methods are simple and effective, you can easily do them yourself.
Corrosion formation
Metal corrosion , or simply rust, appears as a result of metal oxidation under the influence of the environment. The main reason for its appearance is damage to the paint on the car body.
All resulting scratches and chips sooner or later become a source of rust formation, which gradually spreads deeper into the stain and over the entire larger surface area of the body.
The rate at which corrosion spreads depends on the aggressiveness of the environment and the condition of the body itself. For example, in the winter season it spreads many times faster.
It is much easier to deal with a single rust stain that has just appeared than with multiple “saffron caps” or an old stain where the metal is corroded almost completely.
The appearance of corrosion that is not yet visible to the eye is indicated by swelling of the paintwork. Such areas should be immediately cleared of old paint and cleaned.
Vulnerable places
The areas that experience the greatest mechanical stress are the most susceptible to corrosion. These include:
- thresholds are among the first to suffer from corrosion;
- hood - small pebbles from the vehicle in front provoke the appearance of numerous chips;
- wheel arches are constantly exposed to aggressive chemicals.
It is important to promptly detect emerging rust and eliminate it, preventing the further spread of corrosion. To do this, you need to know how you can deal with this unpleasant phenomenon yourself.
Corrosion Removal Methods
Corrosion can be eliminated in the following ways:
- Mechanical - used for severe corrosion, it involves removing rust by stripping down to metal, followed by priming, puttying and painting the area of the body being repaired;
Advantages of the method : elimination of large and deep stains, damage under swelling paint, as well as low cost and availability of necessary materials.
Disadvantages : length of the process.
- Chemical - involves using rust removers. Such reagents are widely represented on the modern market.
Advantages of the method: elimination of corrosion in hard-to-reach places, higher process speed.
Disadvantages: inability to use on heavily damaged areas.
Let's consider the process of eliminating corrosion using each of the methods presented above in more detail.
Step-by-step instruction
Before starting repair work, it is necessary to inspect the body and identify all problem areas. Assess the degree of damage and decide on a method to eliminate corrosion.
Tools and materials
Before starting work you need to prepare:
- grinder;
- sandpaper;
- degreaser;
- putty;
- primer;
- paint;
- car varnish;
- rust converter;
- masking tape;
- clean cloth.
Mechanical method
Removing rust stains mechanically is carried out in several stages:
- cleaning corrosion down to metal with sandpaper. The work can be done manually or using a power tool, such as a grinder. The stain should be cleaned gradually and carefully, avoiding rough scratches. It is important not to damage entire areas of the paintwork and to carry out 100% complete stripping down to “bare” metal.
- treating the prepared area of the body with a rust converter in order to eliminate the smallest corrosion residues that are not always visible to the eye.
- degreasing the surface after the converter ends (on average after half an hour);
- putty (carried out in several layers if necessary) and grinding of the treated surface;
- painting in body color (before painting, protect adjacent parts of the body with newspapers and masking tape and apply an anti-corrosion primer in 2-3 layers). Painting is also carried out in 2-3 layers, each thoroughly drying.
- application of clear varnish (if desired) for more reliable protection and a beautiful appearance.
The result of the work will depend entirely on compliance with all instructions and the correct execution of the work. If the technology is violated, for example, due to poor-quality cleaning or insufficient drying, the result of the work may be completely short-lived.
Watch a video on how to remove rust from a car in 10 minutes:
Chemical method
The significant difference between this method and the previous one lies only in the first stage - cleaning from rusty stains. Instead of mechanical cleaning, specialized chemicals are used. It can remove rust and prevent its further spread without damaging the metal.
As a rule, such preparations are applied to the problem area in accordance with the manufacturer's instructions for the specified time, after which the remaining product is wiped off or washed off.
However, to obtain an excellent and long-lasting result, you will also have to putty, sand and paint. When eliminating minor damage to the body, you can do without these steps.
Popular drugs
The most popular chemicals for removing rust from a car body with your own hands are:
- orthophosphoric acid is the most well-known remedy; it can be used in its pure form or be part of various chemistry;
- VSN-1 Neutralizer - easily copes with rust, turning it into a dark mass;
- zinc - a kit for removing rust and further galvanizing the metal by applying a special protective layer using an electrochemical method. Requires connection to battery. The process of working with the Zinkor product can be seen in detail in the video clip:
Report on the restoration of a rotting body
Theme Options
Search by topic
Report on the restoration of a rotting body
I want to talk about what corrosion of body metal can lead to and how to deal with it when it is too late to prevent it with chemicals and protective coatings.
In principle, any car is susceptible to corrosion, but for some reason, Japanese Toyotas rot noticeably slower than cars from other manufacturers. Mazda is no exception, and maybe even in the forefront with Nissan, whose bodies quickly begin to rust. There are many factors here, but the main one, in my opinion, is insufficient anti-corrosion treatment of the metal and a thin layer of technological paint and varnish. Saving on this (reducing production costs) and the concept of producing machines for a certain service life (usually calculated for five years) are the roots of the problem.So, I own a Mazda Familia 1995 1.6L BHA6R body.
I have owned it since February 2009. In the Russian Federation for 8 years, I am the fourth owner.In the spring, the cabin began to smell disgustingly of rotten earth and rotten potatoes. Cleaning, washing and drying the interior did not give any results. It was decided to dismantle the entire interior to find the source of the stench.
To do this, the seats were unscrewed and removed (the smell clearly did not come from them), and the carpet was removed. Underneath were sheets of soft felt insulation. The carpet and insulation were washed with washing powder and dried. The seats were aired outside for several days and roasted in the sun.
Well, the interior has been dismantled, but the smell remains.
The next step is to peel off the factory bitumen sheets glued to the sheet metal of the floor. This turned out to be easy to do, since the sheets had peeled off in many places due to age.What we see: along the empty beam, the floor metal has rusted and turned to dust. One press with a screwdriver is enough to create a hole. Upon closer examination, the rusty rot turned out to be saturated with moisture, like a wet sponge. It was from her that this disgusting smell came.
Miniatures