How to polish a car body with your own hands
Do-it-yourself car body polishing technology to prevent scratches
Any car enthusiast knows that his vehicle is not kept in greenhouse conditions, and is therefore susceptible to the negative influence of harmful environmental factors. During the operation of the machine, small cracks, chips and scratches inevitably form on its paintwork. As a result, the car loses its presentable appearance. And what’s most unpleasant is that damage to the body can lead to the development of corrosion. To prevent this, it is necessary to polish the car in a timely manner.
Preparation for polishing
To successfully polish a car body from scratches with your own hands, you should take care to create optimal conditions for the work.
- the surface of the machine must be absolutely clean and dry;
- Polishing should be carried out in a closed, clean room with good ventilation and no dust;
- It makes sense to take care of high-quality artificial lighting. To achieve the best result, you should clearly see the surface of the car from all angles.
Before carrying out the procedure, you will need to remove all dents, and apply special tape to significant scratches and chips. If deep polishing of scratches is planned, the damage is processed separately.
Important! You should not polish in direct sunlight, as the polish dries out instantly, and this leads to stains and stains.
Only by following the above rules can you polish your iron horse no worse than in car dealerships, and at the same time win significantly financially.
Choosing a polish for a car body
Before purchasing specialized compounds, you need to assess the general condition of the car’s surface and the degree of damage. If there are no visually visible defects, but the color has faded and the shine has been lost, a simple protective polish will solve the problem.
If there is a network of small scratches on the body, clearly visible on a clean car on a fine day, it is recommended to purchase two types of polish - with abrasive particles and a composition with a low content of abrasive elements. Products of the first composition are able to clean the varnish layer from the depths of scratches. The severity of the damage should be taken into account. For deep cracks, you need to buy highly abrasive pastes.
Please note that products with hard particles intensively remove the varnish layer and make the surface more vulnerable. Therefore, after using them, you cannot do without applying a protective composition.
In addition to the composition, polishes can be classified according to parameters such as cost, scope and consistency:
- paste polishes - have a dense consistency and are suitable for polishing scratches on any area of the car body. The price of such products is quite high, but the pastes are enriched with elements responsible for color saturation;
- liquid polishes - they are used mainly for treating the hood, roof and trunk of a car, since they spread over vertical surfaces. However, they can polish the car thoroughly and for a long time without fear of erasing the paintwork down to the ground;
- Aerosol passwords are easy to apply and easy to use. But the components in the cylinder for effective spraying contain a very small amount of polishing materials.
Polishing scratches on a car body is carried out using selected products and can be done either manually or using a polishing machine or drill. It depends on the severity of the imperfections on the surface of the car.
Stages of simple polishing of a car body
Simple polishing of the surface of the machine can also be called preventative. Car enthusiasts who care about their iron horse will perform it once every 3-4 months. This procedure eliminates minor damage to the car and gives it a flawless shine. The process itself is absolutely not complicated and does not take much time and effort.
The required amount of polish should be applied to a soft, lint-free cloth and distributed evenly. (If an aerosol is used, it must be applied directly to the surface of the car.) The composition on the fabric should dry to a white coating - then it can be used for effective polishing. Next, the body is treated with smooth circular movements until an intense shine appears.
To obtain optimal results, it is recommended to strictly follow the manufacturer’s instructions regarding the drying time of the composition, as well as its quantity and consumption.
Stages of deep polishing of a car body
In order to get rid of significant scratches on the car body, the deep polishing method is used. It is necessary to have certain skills and be armed with knowledge about the procedure in order to get a truly high-quality result. In addition, the process takes a long time, but changing the appearance of the car for the better is worth it.
First you need to prepare tools for deep (abrasive) polishing:
- Pastes of various types - abrasive, non-abrasive and with a medium content of abrasive particles.
- Polishing machine.
- Polishing wheels.
- Sandpaper P2000 and P2500.
- Soft rubber scraper.
- Any soft, lint-free cloth.
- Water in a spray bottle.
Abrasive polishing of a car surface should be carried out in stages:
- cut the sandpaper into small pieces and soak in water to soften it;
- rub the scratched areas with sandpaper, while using a scraper and water to remove the cleaned particles from the surface;
- Sprinkle the area to be treated with water and apply a polishing machine with the hardest wheel (white) to it. Before turning on the equipment, apply and evenly distribute a highly abrasive compound on the wheel;
- After polishing all areas, wash the car with car shampoo.
The grinding machine must be selected taking into account the ability to easily regulate the speed. Polishing a car should begin at the lowest speed of the machine - 900 per minute, then the speed should be increased to 2000 rpm.
Then the same area of the body is polished again, but using a non-abrasive compound and a softer wheel on a polishing machine.
Important! During the polishing process, you should never put too much pressure on the machine - this can lead to damage to the paintwork.
The work process should proceed smoothly and calmly, without unnecessary fuss and haste. Particular care must be taken when processing edges and corners of the body. After polishing an area, you need to thoroughly wipe it with a damp cloth, evaluate the result of the work, and only then proceed to other areas. In this way, the entire body is gradually polished.
The polishing machine moves completely effortlessly across the surface of the car as long as there is a sufficient amount of paste and water on the disc. In case of overheating, it is necessary to turn off the equipment, let it cool down and only then apply water and continue working.
After washing the car with car shampoo, let it dry and then apply a protective polishing compound that does not contain abrasive particles. But wax will also work. It can simply be dripped onto the body and distributed with light movements without rubbing. After drying, you need to remove excess wax with a soft napkin or rag.
Properly carried out deep polishing of scratches on a car body with your own hands guarantees the return of the car to a practically new appearance and gives a second, if not a third life to the paintwork on the surface.
How to polish a car body with your own hands
Wash the car thoroughly. Twice. First, using a non-contact method, as is done at most car washes, then with a sponge.
Screw a trigger sprayer onto a bottle of white spirit and generously spray around the entire lower part of the body. The whole body is perfect. Wait 3-5 minutes and wipe the body with a clean rag or a special napkin. This will remove all the bitumen, insect remains and linden drops.
After cleaning the body with white spirit, it is advisable to wash it again or rinse it with water.
An already clean body must be polished with polishing clay. Clay will pull out all the dirt and debris from your car's varnish that makes the body rough. Do not try to see this rubbish without naked eyes. You won't see it. Run the back of your hand over the body. Clean the area with polishing clay and rub the back of your hand over again. Then you will understand everything.
To clean the varnish from debris, you need to prepare a 20% solution of baby soap and water. You can use a professional lubricant, but there will be no significant difference, you will just waste money.
Moisten the surface of the body with soapy water, knead the clay in the palm of your hand and wipe the body with it.
Three rules for working with polishing clay:
1. Do not rub dry. There should always be a layer of soap solution or professional lubricant between the clay and the surface of the body.
2. Be careful not to get white spirit and other solvents on the clay. even a small drop of solvent can kill a kilogram piece of clay in a couple of seconds.
3. When the clay becomes dirty, knead it in your hand so that all the dirt is inside. When the clay gets dirty on all sides, wash it in warm water. Possibly with soap.
Clay will not be able to remove some contaminants: old drops of paint, road markings, asphalt-concrete additives... such contaminants can be locally sanded without pressure and using a soap solution using sandpaper with a grain size of 1500-3000, no coarser.
After cleaning with clay, it is advisable to rinse the body again or wipe it with a very damp towel to remove soap stains as much as possible. Then the body needs to be thoroughly dried. If you have a compressor with compressed air, blow out the cracks and rubber seals. A vacuum cleaner with a clean filter in blowing mode will also work. There is nothing - then it’s a rag.
A dry body must be thoroughly degreased. Take a soft cloth or microfiber and soak it in degreaser or anti-silicone. Wipe the entire body and wait until everything evaporates from it.
Masking tape.
Let me clarify right away: you should not use molar tape instead of masking tape. The masking tape comes off at a crucial moment... It’s better to use a special masking tape for polishing. It costs a penny.
Apply tape to all decorative elements of the body that you do not intend to damage by polishing and all rubber bands that are adjacent to the body.
Cover the chrome moldings, unpainted plastic, rubber seals on the central rear and front pillars, washer nozzles, radiator grille, plastic on the mirrors... you get the point.
Light and workspace .
LED and halogen spotlights are indispensable for polishing. LEDs cast a cool, white light. Halogen - warm, yellow. When they are used together, all scratches and risks appear on the body, even those that were not visible in the sun.
Place the spotlights opposite each other so that the light slides along the body and does not “hit perpendicularly”.
It’s hard in words... when you turn it on, look at the light, you’ll understand everything.
Can be polished without a spotlight. In this case, you will only see large risks. If you polish for yourself, this is acceptable. If you are polishing for a client, buy a spotlight.
Music .
The polishing process is not fast. You will spend several hours on your feet listening to the monotonous sounds of a polishing machine. It gets boring. Turn on your favorite music in your headphones - it will act like a dope.
A correctly selected set saves from an hour to an hour and a half for the entire polishing process. We measured this indicator several times. Take my word for it.
Don’t try to immediately purchase all the professional equipment for detailing. Many expensive things are absolutely unnecessary and this is not immediately understood.
Other accessories and goodies from detailers can be easily replaced with household analogues.
For example, a detailer's rolling cart costs from 14,000 rubles, while a similar cart at IKEA costs only 2,500 rubles.
Roughly speaking, car bodies are polished by two types of craftsmen: painters and detailers.
Painters use one Makita polisher, one 3M abrasive polish with green cap, one 3M finishing compound and two buffing pads: orange and black.
For professional detailers, the full list of equipment and materials used will fit into a column, at best, on two rolls of toilet paper.
At first glance, there are many offers of polishing machines on the Internet, but in reality there is nothing to choose from.
All machines are divided into two types: rotary and eccentric.
Rotary polishers look like a regular grinder. There are two differences: the sole where the watering disc is attached and the ability to adjust the speed from 600 to 5000 rpm. There are also grinders with adjustment, but the range of adjustments is from 3000 to 10,000 rpm. Don't get confused.
The disk on a rotary machine rotates smoothly, in a circle, clockwise.
The cost of such machines starts from 3,000 rubles. This is where we need to start. I studied some Chinese. I chose according to the principle - the cheapest with delivery for tomorrow. It still works, although it looks like Frankenstein after a fight.
The second type of polishing machines is eccentric. They are also called orbital. In fact, most professional polishing machines are correctly called eccentric orbital polishers. Because the base of the sole on which the disk is attached is fixed on an offset axis and moves in orbit, and between the base and the sole itself there is a bearing due to which the sole performs an additional circular rotation while moving in orbit... In short, such machines polish more safely and without holograms.
These are the kind of polishing machines you see in photographs of cool detailing studios around the world.
Orbital machines differ from each other in the size of the sole on which the polishing disc is attached and the drive: pneumatic or electric.
Rupes cars are especially popular in Russia. Normal price compared to competitors and there are service centers if something happens...
Cost from 16,000 rubles.
Of course, if you have the opportunity to rent from someone or immediately buy for personal use a Rupes type polishing machine with an eccentric and orbital stroke, this will significantly reduce your internal stress. The first polishing is nerve-wracking, and you’ll immediately get a kick out of it.
It is very difficult to break through the varnish when polishing with such a machine, you have to really try hard. Such machines never leave behind holograms, but there is a minus.
An eccentric machine takes much longer to polish deep scratches. Although at the beginning of the polishing journey this minus will not be noticeable to you.
Never polish with a drill, screwdriver, grinder, or any other kind of torque-powered crap that is not intended for polishing. Never!
There are various attachments adapted for construction tools, which are presented as attachments for polishing hard-to-reach places.
If these attachments are sold in a hardware store, they are intended for polishing acrylic, not car varnish.
Professional attachments and adapters for machines used by detailing gurus are still difficult to buy in our country, even in online stores.
Do-it-yourself car body polishing
An important step in protecting your body from aging is polishing. It will hide pores and microcracks in which fine dust accumulates, and protect the paintwork from the aggressive effects of external factors. Plus, polishing will help your car literally shine!
There are two types of polishing:
Abrasive polishing – carried out when there are visible scratches on the body surface.
Protective polishing helps prevent the coating from being affected by external factors for some time. The most important thing in this matter is not to overdo it with polish, so as not to cause more harm to your car than good. We will tell you how to do this below.
What will help maintain the shine of the body:
- Rubbing Compound is a polish with an abrasive for car bodywork. This polish perfectly copes with problems such as scratches and minor damage to the body, and also easily cleans the car body from traces of rain or snow, removes tar residues and other persistent contaminants. Polish with Rubbing Compound abrasive will restore the lost shine to the body surface and help prepare the body for painting.
- Higlo Wax is an express polish for car bodies. An effective and easy-to-use polish suitable for cars with any body color. The product has an excellent water-repellent effect, prevents rapid contamination and damage to the paintwork and adds shine to the body.
- Cosmic – body polish. This durable protector contains carnauba wax. Thanks to this, the polish not only forms a durable water-repellent shell that protects the paintwork from harmful influences, but also gives the body a beautiful shine. The product is easy to apply and suitable for cars of all colors. Does not contain abrasive substances.
- Easy Tex Multi-Polishing Glove – microfiber mitten. The microfiber polishing mitt makes polishing your car or dashboard an easy and enjoyable task. Due to their structure, microfiber fibers have a large surface area, which allows EasyTexMulti-PolishingGlove to effectively absorb water, small dirt, and excess polish.
- Portable car wash or bucket with clean water.
- Rubber gloves – it’s better to stock up on 2-3 pairs
- A drill or screwdriver is not necessary, but it will make polishing much easier and faster.
- Polishing attachments (polishing wheels) - sold in car dealerships. For the drill, you can buy a special polishing attachment with Velcro - it will be convenient to attach and change it.
A couple of tips, or what NOT to do when polishing:
— Do not polish in dusty or windy places! The newly applied polish will be of no use, because it will immediately collect all the fine dust brought by the weather.
— The machine should not be in direct sunlight and the body should not be heated, since the polish should not be used on heated surfaces to avoid streaks and stains.
— The body should not be heated, since polishes cannot be used at high temperatures, humidity, in cold weather and in bright sunshine!
— There is no need to apply polish after each wash; usually the protective layer lasts on the car for more than a month.
— Each of the presented polishes can be used as an independent product.
Removing scratches using Rubbing Compound abrasive polish
So, first of all, we remove scratches and deal with the cloudy body. To do this, we use RubbingCompound - this is an abrasive polish. It is used when you have superficial scratches in the varnish rather than deep scratches in the paint. This is a polish that restores the entire body coating.
How we apply Compound:
— To protect the decorative elements of the body, before polishing it is necessary to cover all plastic and rubber parts, as well as cracks on the car body, with masking tape. Since after complete drying, the polish in these areas may appear in the form of matte deposits, which will not be so easy to remove. To make it easier to clean the polish, we will also seal the edges of the glass.
— Visually divide the car into main sections - roof, doors, hood, and divide each of these parts into several more sections - this will make it much easier to process the surface. You should not try to process the entire body at once, as the polishing agents will have time to dry and will be difficult to remove.
- Apply a small amount of RubbingCompound polish to a sponge or cloth (do not put a lot of polish on the sponge, otherwise it will be difficult to clean the surface) and lightly rub it over the car in the selected area until the polish is barely noticeable and the sponge begins to move easily over surfaces.
— Try to polish so that the next row minimally overlaps the previous one; ideally, they should run parallel.
— Polish the surface in the longitudinal and transverse directions. Do not use circular movements - this may result in uneven polishing!
— Next, using a special microfiber polishing mitt EasyTexPolishingGlove, carefully remove all remnants of the product from the body until it disappears completely. It is important to work with a dry mitten (napkin or rag). Do not leave the product on the surface for a long time - it will be difficult to get rid of it later.
- Hold the treated area up to the light. If there are no scratches left, move on to the next part; if roughness is visible, repeat polishing.
- Remember that if you overdo it, you can damage the body coating. Therefore, use an abrasive polish without fanaticism.
— Thus, a complete restorative polishing of the entire body will take from three hours, depending on the condition and dimensions of your car
— Just one can of polish is enough for 2-3 applications.
If you have a drill:
- Use it to speed up the process. To do this, use special attachments that are sold in construction or auto stores.
— The principle of operation is the same as when polishing by hand.
— A nuance: always press the polishing disc evenly and with the same force onto the surface being treated, since if the disc is placed at an angle, this can cause the formation of stains and abrasions, visible transitions from one area to another.
— Using a drill will significantly save your time.
The most difficult and lengthy stage of polishing the car body has been completed. The result of working with abrasive polish: roughness and scratches have been removed from the coating. As a bonus: this product will remove stubborn tar, foreign paint, markers and other contaminants.
If your car has deep chips, they can be removed using TouchupPaint pencil product .
This product hides more obvious defects that have damaged the paint. But, naturally, if the scratch is half a nail deep, then this remedy, alas, will not help you.
See how to use the product here>>
We perform protective polishing of the body using Cosmic
After restorative polishing, the body will look like new. However, if the car is constantly used, this will not last long (a few weeks). In order for restorative polishing to make sense and the result to last for a long time, protective polishing must be carried out immediately after it. Then the effect will last for about 6 months.
For a protective polish, use Cosmic. This is a polish that not only cleans and adds shine, but also protects the body of your car from rain, sunlight and exhaust fumes. At the same time, it is very easy to use. All thanks to the unique composition, namely natural carnauba wax and mineral additives. They form a dense protective shell on the surface of the body, which covers the car body with a film that protects your car from various environmental influences - from ultraviolet radiation, preventing the paint from fading, to road service agents, preventing the paint from corroding.
Proceed with protective polishing of the body:
— Application of this polish should be very quick.
— Apply the polish completely to the entire body using a sponge.
— Spread the polish evenly and vigorously over the surface in a thin and uniform layer, avoiding open areas.
— Wait until the product dries (10–15 minutes) and forms a uniform protective coating.
— Wipe the car body clean using a dry EasyTexMulti-PolishingGlove microfiber mitt, removing any remaining product.
— Attention: do not leave the polish on the surface for a long time to avoid stains!
— Apply very carefully when polishing the joints of parts and places of contact between plastic and metal, since after drying the polish will be quite difficult to remove from the cracks and plastic.
— The entire process of applying protective polish takes on average 30-40 minutes.
— One jar of this product is enough for a large number of polishes.
Add shine to the body using liquid Higlo wax
At the final stage, use liquid wax Higlo wax from Kangaroo - an “express” polish in the form of a spray that will give your car extra shine after a protective polish. It can be compared to wax that is applied to the body in car repair shops. The effect lasts until the first wash, but the product is applied very quickly.
Higlo wax polish can be applied to both wet and dry bodywork:
— Shake the bottle of polish and spray the product on the surface of the body.
- And rub it with a microfiber cloth until it shines in a circular motion.
— It only takes 20 minutes to process the entire car.
We removed scratches, minor roughness, chips, added shine and preserved the effect. Now your car should shine like a mirror!
The simplest test of your work can be an ordinary bucket of water.
Pour over the polished part of the body; you should see that the water collects in large drops and rolls freely off the car.
If you decide to do the polishing yourself, choose a weekend, as polishing takes a lot of time, but it's worth it!
Watch the video “How to polish a car body with your own hands”
Do-it-yourself body polishing
Car body before and after polishing.
Why do it?
- Gives the car a good appearance. The paintwork of a car body after it leaves the assembly line is exposed to active influence of the external environment. These are temperature changes, dirt, precipitation and many other factors. There is no escape from mechanical loads, vibrations, and collisions, which cause defects in the paintwork. Polishing can be performed to restore an already tarnished coating, as a result of which the car will “look younger” and acquire a marketable appearance.
- Restorative polishing of the body will get rid of microcracks in the paint and scratches. The fact is that scratches and cracks in the paintwork that appear during operation of the machine can lead to the formation of corrosion. You can avoid this by carrying out a protective polishing of the body.
- By applying a special layer of protective polishing, you can extend the life of your car's paintwork. At the same time, the shine of its surface is preserved.
Types of car body polishing
- Restorative. It is carried out to eliminate small scratches that have a shallow depth.
If damage to the paint layer occurs before the primer itself, then polish will not help. Restorative polishing can remove various abrasions, streaks and stains. The work involves mechanically removing the thinnest layer of coating using abrasive pastes. During the work, about five microns are removed, but there is a clear dependence on the grain size of the paste. This is not much for the original factory coating, since the thickness of the varnish and paint can be from 100 to 150 microns. Most often, this type of work is used before selling a used car to give it a marketable appearance. Let us add that restorative polishing should not be used too often, since it can be sanded to such an extent that places where the primer can be seen through the paint will be visible. - Protective polishing . Produced to protect the body from adverse environmental influences. This type of polishing work is carried out without the use of abrasive pastes. It is carried out using a non-abrasive polish created on the basis of synthetic substances and various types of waxes. During body work, the paint layer is not removed at all. Protective polishing is ideal for new cars to protect the car body from minor damage.
The period of time during which protection will be effective depends on the composition of the mixture. For example, a protective layer applied with a polymer polish protects the car body for at least six months, and one based on silicone or wax – for several months. But if you apply a polymer polish, it will require more time and appropriate special equipment.
How to polish a car at home
Preparing for body polishing
After washing the car, you need to dry it and cover parts of the car with adhesive tape so that abrasive products do not damage them.
Video: Self-polishing preparation
- Carrying out washing
The car is thoroughly washed using detergents;
The body is cleaned of bitumen, primer, anti-corrosion treatment, etc.;
Seal the areas that do not need polishing using special tape (paper). These are plastic, rubber parts, headlights; - What the room should be like
To perform high-quality polishing of a car body, you need to carry out preliminary preparations and create conditions. For this, a suitable closed room is selected, with limited dust ingress and reliable ventilation. One of the significant conditions for selecting a room is the absence of direct sunlight in the room, as this can cause the polishing components to dry out too quickly. - Of course, you should provide excellent lighting in the room in order to see and identify various defects in the car body. If you are unable to find a room, then it is advisable to carry out work outdoors in the shade.
Polishing process
Video: How to quickly and easily polish a car
1. Body cleaner 2. Scratch remover (Anti-scratch) 3. Professional polishing paste (abrasive) Farecla G6 4. Fine polish (finishing) Runway
1) So, the car is washed and free of insects and heavy dirt.
- It is necessary or desirable to carry out an operation to degrease the body using a degreaser, for example, W900 APP, or white alcohol. With these products, dirty film is removed from the body, small stains are cleaned, and the car body is prepared for work.
- To carry out protective polishing, the paste is applied to a piece of clean rag and rubbed in a circular motion over the body. However, do not get carried away with applying an excessively thick layer. This will cause the surface to become cloudy, which is difficult to correct. It is better to carry out polishing in small parts, since the paste dries quickly and while you are busy polishing the hood, it may already dry out and become rough in another place. The body must be protected from exposure to direct sunlight.
- After applying the polishing compound, do not rush, you need to wait a while for a white film to form, after which the area is sanded with a soft and dry cloth. In this case, do not use any towels, but use a special microfiber car cloth. There is a very expensive branded option on sale, but if you want a less expensive one, then use Taiwanese-made napkins. The Chinese produce such napkins with synthetic thread, which, with prolonged use, can cause minor scratches.
- Sanding a body by hand is a very labor-intensive process, and therefore a special polishing machine is often used, or a drill is used.
Video: Car polishing (tools)
You will need an attachment for the grinding drill so that you can attach the necessary wheels. Usually a standard circle with a diameter of 18 cm is used. You will also need a backing for the circle; usually, for simple polishing on your own, Velcro-type fasteners are used. All this can be bought.
This is what a drill attachment with Velcro looks like:
2) Independent restorative polishing of a car body with an abrasive polish will require 2 - 3 times more time and effort than protective polishing. Therefore, it is definitely advisable to use equipment, that is, either a polishing machine or a drill.
- At the first stage, a coarse-grained abrasive polishing paste is applied to a small surface of the body and rubbed evenly with foam rubber or simply with your hands.
- Then a nozzle is put on the drill, preferably with a hard felt circle, the speed is set to 1200 - 1600 and we begin to carefully rub the paste with horizontal movements of the drill. Do not press the disk very hard against the surface, but let it slide along it. The disc must be held without distortion, otherwise stains may form on the surface. You need to work with abrasive polish carefully. If you show excessive zeal, you can literally “wipe out a hole.”
- It is recommended to polish manually in places of any sharp transitions in the body surface, moddings, bumpers, and various corner transitions. These weak spots can be stripped down to paint. Therefore, large flat areas are sanded with a drill, and polishing of other areas is carried out manually using a special cloth.
- After polishing, the car is washed and the body is degreased again and a composition with a fine abrasive is applied exactly as in the previous method. This is done to remove a cloudy tint, hide small scratches and microcracks. At this stage, it is practiced to use a softer foam polishing disc at increased drill speeds to speed up the process.
- Having completed this procedure, the surface is washed again, wiped, after which a protective polish is applied.
In order to check the quality of the work, you can pour water over the polished body. If the quality is good, the water should collect in large drops and drain from the body. This is called the “drip effect” and is considered the main indicator of good performance.
Protective polishing at home is performed 2 times a year. Usually before winter and after it ends. This way you can protect the body of your own car from rapid aging caused by the influence of poor ecology. In addition, the appearance of your car will be respectable and sparkling, pleasing to the eyes of strangers and your own pleasure.
Advice:
Ideally, if you have no experience, then conduct training on an unnecessary part from any car (fender, hood...).
Practice in this matter will be very useful. As experts in this field say, you need to feel the paintwork...
How to polish a car body with your own hands
A car is the favorite child of a car enthusiast. Keeping it in good technical condition is only part of its care. Appearance is no less important. The paintwork protects the car from corrosion and makes it beautiful and shiny. But over time, scratches, abrasions, chips inevitably appear on it, and it simply becomes cloudy from dust and rain.
The best way to return the original shine to the “iron horse” is to polish the car body yourself. It must be carried out competently, carefully and slowly.
Types of body polishing
It would seem that nothing could be simpler: clean, apply paste and polish.
But this is only at first glance. There are two types of polishing, differing from each other in purpose and materials used. When there is no visible damage to the car body, but the color has faded and become darker, protective polishing will do the job. This is a procedure that any car owner can perform. To implement this, you need various non-abrasive polishing pastes. They differ only in the duration of the protective functions:
- wax polish is the most unstable and after two or three washes is completely washed off from the surface of the car, but it is the cheapest;
- Teflon polish based on synthetic polymers. When applied, a durable coating is created that has strong water-repellent properties. This polishing gives the car a deeper color with a gorgeous wet shine. The coating protects against ultraviolet rays, oxidation and metal corrosion. Withstands 6-8 car washes;
- epoxy polish, which contains epoxy resins and other polymers. It has water and dirt repellent properties and prevents aggressive substances from penetrating under the paintwork. This coating can protect the car from six months to 9 months. Working with polish is more complicated, and the price is higher than previous types of polishes, but this is quite justified;
- Preservative varnish is designed for harsh vehicle operating conditions. It has high resistance to aggressive substances and water repellency. The created protective film is quite elastic and successfully resists mechanical stress. Liquid varnish coating lasts an average of a year or two and depends on operating conditions.
Polishing a car body with your own hands involves the use of these polishes and manual processing. But it is also possible to use a drill with various grinding attachments. Drivers perform protective polishing once every 3-4 months.
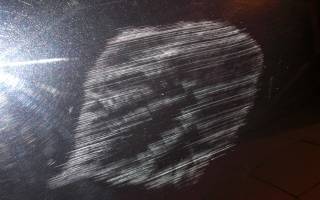
Abrasive polishing is required if there are scratches, cracks and chips on the surface of the body. This type of processing is more complex, requires adherence to process technology and much more time. First you need to prepare the paintwork, i.e. remove the top oxide layer of the coating and smooth out abrasions and scratches.
The process is also called restorative. Detected damage is treated with sandpaper, the size of which is selected depending on the depth of cracks and chips. After cleaning, the surface is treated with abrasive pastes and then polished according to the type of protective polishing. Abrasive polishing of a car body is carried out in detail. This method is used by professionals; it gives better and more effective results.
Body polishing process
For work we will need the following materials and equipment:
- polishing pastes of various types: abrasive, medium-abrasive and non-abrasive;
- sandpaper P1500 and P2500;
- polishing machine;
- polishing wheels;
- soft rubber scraper;
- microfiber cloths or soft cotton rags that do not leave lint on the surface;
- water sprinkler.
Mechanical polishing of a car body is carried out in several stages using pastes of various compositions.
To remove deep and medium scratches, first use P1500 sandpaper. It should be cut into pieces that are comfortable to hold in the hand and soaked briefly in water. It will become soft and will not leave rough marks. We make forward movements and periodically remove water and cleaned material with a scraper.
Then we sand it in a circular motion with P2500 sandpaper, removing the smallest shells. After this, spray water on the workpiece and take a white circle (the roughest). We apply abrasive paste to it and, without turning on the machine, manually distribute it evenly over the part. If you don’t know what abrasiveness to use, purchase paste from Farecla G3 - this is a universal paste that is recommended by professionals at service stations, and liquid wax from the same company to consolidate the result. The grinding machine should be selected so that its speed can be easily adjusted. Polishing the car body begins at the lowest speed of 900 rpm.
Do not press too hard on the machine, as you can very easily damage the paintwork.
Work calmly, smoothly, without staying in one place for a long time.
Be especially careful when polishing the corners and edges of the surface. When the polishing process is completed, the car needs to be washed with car shampoo. After drying, you will see the results of your work: the dry surface will shine no worse than a wet one or a completely new one. Then apply a protective layer. This can be a non-abrasive polishing compound or the liquid wax we mentioned above. The wax can simply be dripped onto the surface and lightly smeared without rubbing. After it dries, wipe the surface with a flannel or cotton rag to remove excess wax. It washes off without difficulty. And you will see the radiant shine of the car, from which you cannot take your eyes off. High-quality work, and even done with your own hands, always brings great satisfaction.
After polishing the part, wipe it with a napkin, evaluate the result and move on to the next one. So gradually, without going to the previous row, polish the entire body. The machine moves easily over the surface until it is heated and there is water and paste on it. If overheating occurs, you need to let the part cool down or spray water again.
Professional car polishing is not inferior to the factory coating in terms of service life. However, to prolong the effect, experts recommend applying protective compounds after it. In any case, whether it is professional care or done at home with your own hands, your faithful car friend will last much longer and will evoke admiring glances.