How to increase the density in a battery for the winter
How to increase the battery density in a car for the winter
Some low-price car batteries require regular maintenance, especially when the seasons change. However, not all drivers know about this, which leads not only to a reduction in battery life, but also to the impossibility of starting the engine in cold weather. How to increase the density of the electrolyte in the battery in order to increase its service life and start the car normally in cold weather?
Reasons why the density of the electrolyte in the battery may decrease
First you need to understand the principle of operation of the battery. The entire process of generating constant voltage occurs in an acid-resistant plastic housing. It contains six separate cans, each of which produces a voltage of 2.1 V. All sections are connected to each other in a serial electrical circuit. As a result, the output is 12.6 V. Each jar has a set of positive and negative plates, the space between which is filled with electrolyte (a mixture of distilled water and sulfuric acid in the ratio of 65% and 35%). The chemical reaction between lead and solution produces an electric current. The essence of the battery is periodic discharges and restoration of its full functioning using a car generator.
It’s worth noting right away: a drop in density in a battery is a completely natural process. If the battery is discharged, the concentration of sulfuric acid in the solution drops and vice versa. But situations arise when the battery cannot be charged. And one of the reasons for this annoying phenomenon is the insufficient density of the chemical poured into the jars. There are not so many factors why it falls:
- Deep discharge of the battery.
- Unprofessional recharging, as a result of which the electrolyte boils away (not in the literal sense of the word: as a result of electrolysis, bubbles of oxygen and hydrogen are formed).
- Low outside temperature.
- Self-discharge caused by vapors emitted by the battery, which settle on the battery body, creating a short-circuit “path” between the positive and negative terminals.
- Incorrect measurement of electrolyte density after adding distilled water.
If you operate the battery in the condition described above, the process of plate sulfation will inevitably start, which may become irreversible. The question arises: how to increase the density in the battery for the winter? First of all, it is worth understanding that when the temperature drops to negative, the concentration of acid in the electrolyte must be increased, and in the heat, on the contrary, decreased. To control the situation, you will need an inexpensive and simple device with a rubber bulb at the end in the form of a thick glass tube - a hydrometer. Since we are talking about the winter period, you first need to prepare the battery.
How to increase battery density using corrective electrolyte?
First, the battery needs to be removed from the car, cleaned, checked for mechanical damage and brought to a warm place - if you don’t have a garage, you’ll have to go home. Leave the battery alone for a day after the cold. How to increase the density of a car battery and where to start? Measure the voltage, if it is less than 12.5 V, charge the battery. After completing the process, check the density of the electrolyte with a hydrometer: test each jar separately at an outside temperature of +20–22 degrees. To do this, lower the device into a liquid medium, press the bulb and look at the divisions: the desired parameter for the winter period is 1.30–1.31 kg/cu. cm. Normal density for the summer period is 1.26–1.27. Moreover, each jar should have the same value (the difference is no more than 0.1). If adding distilled water and subsequent charging does not solve the problem, it is worth adjusting the solution. How to increase the density of electrolyte in a battery? To do this, you need to pump the solution out of the jars using a hydrometer. Never remove the chemical from the battery by inverting it: then any lead pieces present may get stuck between the plates and short them out. You need to fill in the electrolyte with the required density. There are two options for increasing battery density:
- You buy a ready-made chemical solution where the acid concentration is 1.4 kg/m3. cm and immediately pour it into jars.
- Distilled water and acid are purchased separately. According to the rules known from school, both liquids are mixed, while acid is strictly added to the water, but not vice versa. You need to carry out the procedure with rubber gloves to avoid getting burned.
After this, send the battery for charging and check the density of the electrolyte after a couple of hours. If it does not meet the norm, the procedure must be repeated.
To correctly solve the problem of how to increase the battery density, the correction solution can only be used in two cases:
- A drop in the liquid level in cans occurs due to its leakage associated with mechanical damage to the housing or other reasons.
- The battery contains an excessive amount of distilled water.
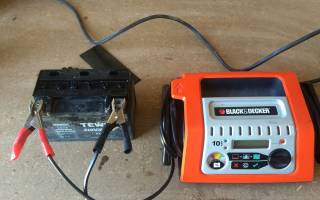
However, before pouring a new solution, it is worth trying less labor-intensive methods. For example, a popular method is to increase the density in the battery using a charger. This is a relatively inexpensive device that can be purchased at any auto store.
How to increase the electrolyte density using a charger?
This option is simpler. But there is a requirement: you need a device where the output voltage is strictly regulated. The fact is that there are devices where the current automatically drops when fully charged. How to increase battery density at home? Here's what you need to remember:
- When the normal capacity and voltage are reached, the battery will begin to boil: in this case, the charging current must be reduced by a couple of amperes.
- Check the electrolyte level: if it has become lower, measure the density and add distilled water or correction solution.
What to do if the electrolyte density drops below a critical minimum?
If the value on the hydrometer is less than 1.18, measures must be taken to increase the density of the solution to the required value. To achieve this, you will have to drain it completely, which cannot be achieved by sucking out the chemical with a hydrometer. What then should be done with the low density of the electrolyte in the battery? In this situation, after removing the solution in the usual way, the battery must be turned upside down and holes of small diameter (10–12 mm) drilled in it. Place the battery upside down again and completely remove the electrolyte. And only after that, fill the battery with the correction solution and charge it. The disadvantage of this method is that it reduces the battery life. But, knowing how to increase the density of the electrolyte in the battery, it is more advisable to extend the life of the product by several months than to go shopping for a new one.
The next step is to rinse the jars with distilled water. Then the drilled holes must be sealed with suitable (acid-resistant) plastic. The best option here is plugs from used batteries. Now you can fill the jars with electrolyte. It is worth remembering that its excessive density leads to corrosion of the positive electrode, and too low - to freezing of the solution at negative temperatures.
As can be seen from the above, the procedure for increasing the density of the electrolyte is not particularly complicated. However, you can avoid unnecessary actions if you monitor the battery being serviced (there are products that do not require intervention during the entire service life, but they are more expensive) and check its condition in a timely manner. It is recommended to do this at least once every two weeks, subject to daily intensive driving. This is especially important for cars whose age has already exceeded 5 years.
A detailed guide to increasing the electrolyte density in a battery at home
You can increase the density of a battery at home in several ways: completely replace the old electrolyte with a new one or replenish the battery charge. Both manipulations should be carried out in well-ventilated areas in compliance with safety precautions. After completing the procedure, you need to adjust the volume of the working solution, and then measure the density parameter with a hydrometer.
Why does the density of the electrolyte decrease?
How to prepare a battery for restoration?
Video: Guide to Using a Hydrometer
How to increase the electrolyte density yourself?
Step-by-step instructions for increasing electrolyte density by adding liquid
How to lift with a charger?
Guide to Increasing Density in a Maintenance Free Battery
How to increase density if it is below 1.18
Video: self-increase in electrolyte density
Comments and Reviews
Why does the density of the electrolyte decrease?
The main reasons why the electrolyte level in car battery banks may drop:
- Device discharge. As a rule, a car battery is discharged during the cold season, so in winter special methods are used to restore and increase the charge level. The problem may manifest itself in a car battery that is close to normal wear and tear. With a rapid discharge, we can conclude that the proportion of the working solution has dropped to a critically low level. The discharge problem may be associated with mechanical damage to the device or a malfunction of the generator set, as a result of which the vehicle's electrical system is powered by the battery.
- Boiling of the working fluid as a result of battery overcharging. If a constant voltage is applied to the device, this causes the water to split into oxygen and hydrogen. As a result, when charging, the liquid boils away and the electrolyte level decreases.
- Constantly adding distilled water instead of a chemical solution. If you add fluid once, the density level of the battery in the car should not drop, but constant topping up will contribute to this.
How to prepare a battery for restoration?
Before restoring the electrolyte density on a serviced battery, you must perform a number of actions:
- The battery is removed from the car; to do this, the terminal clamps of the device are first loosened.
- If there is protection, it is removed. To do this, you will need a wrench of the appropriate size.
- Using a screwdriver or other device with a flat tip, unscrew the caps on the cans. It is recommended to use safety glasses and gloves to prevent burns.
- The user performs diagnostics of the volume of working fluid in the device. For passenger vehicles, this parameter should be about 1.5 centimeters above the plates. Diagnostics of electrolyte density should be carried out 3 hours after recharging the device or approximately 10 hours after stopping the engine. If the liquid level is normal, then the hydrometer is lowered into the jars and a small volume of water is drawn using a bulb.
- Depending on the air temperature, the obtained parameters are assessed. The check is performed for each bank separately. Ideally, this indicator should be in the range from 1.25 to 1.29 g/cm3.
When preparing the battery, the following nuances must be taken into account:
- Before opening the cans, the user needs to clean the device body from dirt with a clean rag. This must be done so that when unscrewing the plugs, dirt does not get inside the battery. Otherwise, the device may completely fail.
- If diagnostics will be performed without dismantling the battery, then you need to make sure that it is properly seated. The device should not dangle.
- When preparing the battery, do not turn it over as this may destroy the plates located inside. As a result, the battery will be completely damaged beyond repair.
Video: Guide to Using a Hydrometer
The “Battery Man” channel in its video described in detail the process of preparing the battery and talked about using a hydrometer.
How to increase the electrolyte density yourself?
To carry out the procedure correctly, the following nuances must be taken into account:
- When preparing a new working solution, acid is added to distilled water, and not vice versa. Otherwise, the liquid will begin to boil.
- The user will need accurate calculations of the required volume of acid, since during the charging process the level of electrolyte density increases.
On a new battery, it is not recommended to independently increase the electrolyte density, as this will lead to a faster discharge of the device. An increased operating parameter will negatively affect the functionality of the battery.
It is necessary to begin the procedure in compliance with safety precautions, since the electrolyte is nothing more than an acid solution, therefore:
- put on rubber gloves;
- Protect yourself as much as possible from getting electrolyte on your clothes and especially your skin;
- use safety glasses and a respirator.
What will you need?
To properly increase the battery density before the winter, you need to prepare the following materials and tools:
- hydrometer;
- measuring cup or other similar container;
- separate container for diluting a new working solution;
- enema pear;
- correction solution or acid;
- distilled water.
Step-by-step instructions for increasing electrolyte density by adding liquid
The correct way to increase the battery electrolyte density parameter:
- Before increasing the density of the battery, the battery is removed from the car. To do this, the terminal clamps are disconnected and the fixing plate is dismantled. Actions to complete the task are carried out using a wrench.
- A small volume of working solution is taken from the battery can. A hydrometer is used for this.
- Instead of the withdrawn volume of liquid, a correction solution of the substance is added to the jar if it is necessary to increase the density. If it is necessary to lower this parameter, distilled water with a density of 1.00 g/cm3 is used.
- Then the battery is charged. Over the next 30 minutes, the device is recharged with rated current. Such actions will allow the poured correction solution to mix with the working fluid.
- The battery is disconnected from the charger for one to two hours. This will allow the density in the jars to “level out” and reduce the temperature level. Also, in two hours all the bubbles will come out of the cans, thereby eliminating the possibility of error during the control measurement.
- The electrolyte density level is re-diagnosed and, if necessary, the procedure is repeated. Also, if necessary, liquid is added to the jars to increase or decrease the parameter, and then the measurement is taken again.
It must be taken into account that the difference in the density parameter between the banks should be no more than 0.01 g/cm3. If during the task it was not possible to achieve such a result, then it is necessary to perform additional, “leveling” charging for 1-2 hours. In this case, the current parameter should be 2-3 times less than the nominal one.
Formula for calculating the amount of liquid to adjust the electrolyte density
Where:
- Ve—volume of electrolyte removed from the jar, cm3;
- Vb - volume of electrolyte in one jar, cm3;
- ρн is the initial density of the electrolyte before adjustment, g/cm3;
- ρк is the final density to be obtained, g/cm3;
- ρd - density of the added liquid, (water - 1.00 g/cm3 or correction electrolyte - * g/cm3).
When using this formula, the volumes of removed and added electrolytes are equal.
Table: density adjustment in battery
How to lift with a charger?
To increase the density of the charging equipment, the following actions are performed:
- The battery is brought to full charge. First you need to remove the device from the car and connect it to the equipment that will charge the battery, observing the polarity. First, a connection is made to the device, and then it is connected to the network.
- During the charge restoration process, the user needs to monitor the condition of the electrolyte. After the liquid begins to boil, it is necessary to reduce the current setting to 1-2 amperes. When water boils, it evaporates, which leads to the fact that the density of the electrolyte concentration begins to increase.
- The time it takes for the liquid to evaporate depends on the specific situation, and in some cases it may take more than 24 hours.
- After the water level in the jars decreases, electrolyte is added and the density is measured.
- If necessary, this operation is repeated.
Guide to Increasing Density in a Maintenance Free Battery
The steps to increase density are similar, the difference is in gaining access to the working fluid:
- In maintenance-free devices, the case is completely closed, so the user must remove the battery and remove the sticker from it. There is no need to remove the battery cover as it will be difficult to put it back on.
- You need to make a hole in the lid using an awl or drill. It should be small, since you will have to seal it later.
- Using a disposable syringe, distillate or correction electrolyte is added to the battery, depending on what needs to be done with the operating parameter. Add 5 ml of liquid. It is recommended to use a battery can that contains a density indicator. If the indicator turns black or green, then you need to add another 20 ml of liquid to the battery.
- To determine the level of the working solution, the needle is lowered into the jar and the rod is pulled in the opposite direction. When drawing the working solution into the syringe, it is recommended to mark the level with a marker. If the battery uses light-colored plastic, the liquid level can be determined against the light or measured using a ruler. The remaining cans are topped up to a level that should be 1.5-2 cm above the surface of the plates.
- After completing the task, the holes need to be sealed with sealant or special rubber plugs. The battery should then be gently shaken to mix the electrolyte. But you must act carefully so as not to damage the plates.
How to increase density if it is below 1.18
If the working density value is less than 1.18 g/cm3, the described methods will not solve the problem and the user will need to completely drain the acid from the cans.
The algorithm of actions will be as follows:
- The electrolyte is pumped out of the battery as much as possible (an enema bulb can be used for pumping out).
- The battery is carefully turned over without any sudden movements. This will prevent possible shedding of the plates. In the bottom of the device, you need to drill holes in each can using a drill. It is recommended to perform these actions in a container, for example, a bowl or basin.
- Then the battery is installed in a vertical position and the remaining working solution is drained from it.
- The battery is washed using distillate.
- The holes in the bottom of the battery are sealed; at this stage it is important to ensure that the device is sealed to prevent further leakage of liquid. A new solution is poured into the battery.
The plastic used to seal the hole in the battery should be as resistant to sulfuric acid as possible. In addition, if the color of the electrolyte is brown or black, there is no point in restoring the battery. A dark shade indicates shedding of the plates or destruction of the battery.
Video: self-increase in electrolyte density
The Denis MECHANIC channel in its video described in detail the process of charging the battery and adding electrolyte, as well as increasing its density.
Battery density
The density of the electrolyte in the battery is a very important parameter for all acid batteries, and every car owner should know: what the density should be, how to check it, and most importantly, how to properly increase the battery density (specific gravity of the acid) in each of the cans with lead plates filled with a solution H2SO4.
In the article about battery electrolyte density you will learn:
Checking the density is one of the points in the battery maintenance process, which also includes checking the electrolyte level and measuring the battery voltage. In lead batteries, density is measured in g/cm3 . It is proportional to the concentration of the solution , and inversely dependent on the temperature of the liquid (the higher the temperature, the lower the density).
The density of the electrolyte can determine the condition of the battery. So if the battery does not hold a charge , then you should check the condition of its liquid in each of its jars.
The density of the electrolyte affects the battery capacity and its service life.
It is checked with a densimeter (hydrometer) at a temperature of +25°C. If the temperature differs from the required one, corrections are made to the readings, as shown in the table.
So, we figured out a little what it is, and that you need to check it regularly. What numbers should we focus on, how much is good and how much is bad, what should be the density of the battery electrolyte?
What density should the battery have?
Maintaining the optimal electrolyte density is very important for the battery and it is worth knowing that the required values depend on the climate zone. Therefore, the battery density must be set based on the totality of requirements and operating conditions. For example, in a temperate climate, the electrolyte density should be at the level of 1.25-1.27 g/cm3 ±0.01 g/cm3. In the cold zone, with winters down to -30 degrees, it is 0.01 g/cm3 more, and in the hot subtropical zone it is 0.01 g/cm3 less . In those regions where winter is especially harsh (up to -50 ° C), in order to prevent the battery from freezing, it is necessary to increase the density from 1.27 to 1.29 g/cm3 .
Many car owners ask the question: “What should be the density of the electrolyte in the battery in winter and what in summer, or is there no difference, and should the indicators be kept at the same level all year round?” Therefore, let’s look at the issue in more detail, and a table of the density of the electrolyte in the battery , divided into climatic zones, will help to do this.
You also need to remember that, as a rule, the battery, while in the car, is charged to no more than 80-90% of its nominal capacity, so the density of the electrolyte will be slightly lower than when fully charged. So, the required value is selected a little higher than that indicated in the density table, so that when the air temperature drops to the maximum level, the battery is guaranteed to remain operational and not freeze in the winter. But, regarding the summer season, increased density may threaten boiling.
Battery electrolyte density table
The density table is compiled relative to the average monthly temperature in the month of January, so that climatic zones with cold air up to -30 ° C and moderate ones with temperatures not lower than -15 do not require a decrease or increase in acid concentration. All year round ( winter and summer ) the density of the electrolyte in the battery should not be changed , but only checked and ensure that it does not deviate from the nominal value , but in very cold areas, where the thermometer is often below -30 degrees (up to -50), adjustments are allowed.
Electrolyte density in the battery in winter
The density of the electrolyte in the battery in winter should be 1.27 (for regions with winter temperatures below -35, at least 1.28 g/cm3). If the value is lower, this leads to a decrease in electromotive force and difficulty starting the engine in cold weather, up to freezing of the electrolyte.
When the density in the battery is reduced in winter, you should not immediately run for a correction solution in order to raise it; it is much better to take care of something else - high-quality charging of the battery using a charger.
Half-hour trips from home to work and back do not allow the electrolyte to warm up and, therefore, to charge well, because the battery only accepts a charge after warming up. So the rarefaction increases day by day, and as a result the density also decreases.
For a new and serviceable battery, the normal range of changes in electrolyte density (full discharge - full charge) is 0.15-0.16 g/cm3.
Remember that operating a discharged battery at sub-zero temperatures leads to freezing of the electrolyte and destruction of the lead plates!
Using the table of the dependence of the freezing temperature of the electrolyte on its density, you can find out the minus threshold of the thermometer at which ice forms in your battery.
As you can see, if the battery is 100% charged, it will freeze at -70 °C. At 40% charge it freezes already at -25 °C. 10% will not only make it impossible to start the engine on a frosty day, but it will also completely freeze in 10 degree frost.
When the density of the electrolyte is not known, the degree of discharge of the battery is checked with a load fork. The voltage difference in the elements of one battery should not exceed 0.2V.
Load plug voltmeter readings, B
Battery discharge level, %
If the battery is discharged by more than 50% in winter and more than 25% in summer, it must be recharged.
Density of electrolyte in the battery in summer
In summer, the battery suffers from dehydration , so given that increased density has a bad effect on lead plates, it is better if it is 0.02 g/cm3 below the required value (especially for the southern regions).
In the summer, the temperature under the hood, where the battery is often located, is significantly increased. Such conditions promote the evaporation of water from the acid and the activity of electrochemical processes in the battery, ensuring high current output even at the minimum permissible electrolyte density (1.22 g/cm3 for a warm, humid climate zone). So, when the electrolyte level gradually drops , its density increases , which accelerates the process of corrosive destruction of the electrodes. This is why it is so important to monitor the fluid level in the battery and if it drops, add distilled water, and if this is not done, then overcharging and sulfation threatens.
If the battery is discharged due to the driver’s carelessness or other reasons, you should try to return it to its working condition using a charger. But before charging the battery, they look at the level and, if necessary, add distilled water that may have evaporated during operation.
After some time, the density of the electrolyte in the battery, due to its constant dilution with distillate, decreases and falls below the required value. Then the operation of the battery becomes impossible, so there is a need to increase the density of the electrolyte in the battery. But in order to find out how much to increase, you need to know how to check this very density.
How to check battery density
To ensure proper operation of the battery, the density of the electrolyte should be checked every 15-20 thousand kilometers . Measuring the density in a battery is carried out using a device such as a densimeter. The device of this device consists of a glass tube, inside of which is a hydrometer, and at the ends there is a rubber tip on one side and a bulb on the other. To check, you will need to: open the cap of the battery can, immerse it in the solution, and use a bulb to draw in a small amount of electrolyte. A floating hydrometer with a scale will show all the necessary information. We will look in more detail at how to properly check the battery density below, since there is also a type of battery called maintenance-free, and the procedure for them is somewhat different - you do not need absolutely any devices.
Density indicator on a maintenance-free battery
The density of a maintenance-free battery is displayed by a color indicator in a special window. The green indicator indicates that everything is normal (the degree of charge is within 65 - 100%), if the density has dropped and recharging is required , then the indicator will be black . When a white or red light , an urgent addition of distilled water . But, however, the exact information about the meaning of a particular color in the window is on the battery sticker.
Now we continue to further understand how to check the electrolyte density of a conventional acid battery at home.
Checking the electrolyte density in the battery
So, in order to be able to correctly check the density of the electrolyte in the battery, first of all we check the level and, if necessary, adjust it. Then we charge the battery and only then start checking, but not immediately, but after a couple of hours of rest, since immediately after charging or adding water there will be unreliable data.
It should be remembered that density directly depends on air temperature, so check the correction table discussed above. After taking liquid from the battery can, hold the device at eye level - the hydrometer should be at rest, floating in the liquid without touching the walls. Measurements are taken in each compartment, and all indicators are recorded.
Table for determining battery charge based on electrolyte density.
How to independently increase the density of electrolyte in a battery
You can increase the density of a battery at home in several ways: completely replace the old electrolyte with a new one or replenish the battery charge. Both manipulations should be carried out in well-ventilated areas in compliance with safety precautions. After completing the procedure, you need to adjust the volume of the working solution, and then measure the density parameter with a hydrometer.
Why does the density of the electrolyte decrease?
1. Device discharge. As a rule, a car battery is discharged during the cold season, so in winter special methods are used to restore and increase the charge level. The problem may manifest itself in a car battery that is close to normal wear and tear. With a rapid discharge, we can conclude that the proportion of the working solution has dropped to a critically low level. The discharge problem may be associated with mechanical damage to the device or a malfunction of the generator set, as a result of which the vehicle's electrical system is powered by the battery.
2. Boiling of the working fluid as a result of overcharging the battery. If a constant voltage is applied to the device, this causes the water to split into oxygen and hydrogen. As a result, when charging, the liquid boils away and the electrolyte level decreases.
3. Constantly adding distilled water instead of a chemical solution. If you add fluid once, the density level of the battery in the car should not drop, but constant topping up will contribute to this.
How to prepare a battery for restoration?
Before restoring the electrolyte density on a serviced battery, you must perform a number of actions:
1. The battery is removed from the car; to do this, the terminal clamps of the device are first loosened.
2. If there is protection, it is removed. To do this, you will need a wrench of the appropriate size.
3. Using a screwdriver or other device with a flat tip, unscrew the caps on the cans. It is recommended to use safety glasses and gloves to prevent burns.
4. The user performs diagnostics of the volume of working fluid in the device. For passenger vehicles, this parameter should be about 1.5 centimeters above the plates. Diagnostics of electrolyte density should be carried out 3 hours after recharging the device or approximately 10 hours after stopping the engine. If the liquid level is normal, then the hydrometer is lowered into the jars and a small volume of water is drawn using a bulb.
5. Depending on the air temperature, the obtained parameters are assessed. The check is performed for each bank separately. Ideally, this indicator should be in the range from 1.25 to 1.29 g/cm3.
When preparing the battery, the following nuances must be taken into account:
— Before opening the cans, the user needs to clean the device body from dirt with a clean rag. This must be done so that when unscrewing the plugs, dirt does not get inside the battery. Otherwise, the device may completely fail.
— If diagnostics will be performed without dismantling the battery, then you need to make sure that it is properly seated. The device should not dangle.
— When preparing the battery, do not turn it over, as this may destroy the plates located inside. As a result, the battery will be completely damaged beyond repair.
How to increase the electrolyte density yourself?
To carry out the procedure correctly, the following nuances must be taken into account:
— When preparing a new working solution, acid is added to distilled water, and not vice versa. Otherwise, the liquid will begin to boil.
— The user will need accurate calculations of the required volume of acid, since during the charging process the density level of the electrolyte increases.
On a new battery, it is not recommended to independently increase the electrolyte density, as this will lead to a faster discharge of the device. An increased operating parameter will negatively affect the functionality of the battery.
To properly increase the battery density before the winter, you need to prepare the following materials and tools:
- measuring cup or other similar container;
— a separate container for diluting a new working solution;
— correction solution or acid;
Step-by-step instructions for increasing electrolyte density by adding liquid
The correct way to increase the battery electrolyte density parameter:
1. Before increasing the density of the battery, the battery is removed from the car. To do this, the terminal clamps are disconnected and the fixing plate is dismantled. Actions to complete the task are carried out using a wrench.
2. A small volume of working solution is taken from the battery can. A hydrometer is used for this.
3. Instead of the withdrawn volume of liquid, a correction solution of the substance is added to the jar if it is necessary to increase the density. If it is necessary to lower this parameter, distilled water with a density of 1.00 g/cm3 is used.
4. Then the battery is charged. Over the next 30 minutes, the device is recharged with rated current. Such actions will allow the poured correction solution to mix with the working fluid.
5. The battery is disconnected from the charger for one to two hours. This will allow the density in the jars to “level out” and reduce the temperature level. Also, in two hours all the bubbles will come out of the cans, thereby eliminating the possibility of error during the control measurement.
6. The electrolyte density level is re-diagnosed; if necessary, the procedure is repeated again. Also, if necessary, liquid is added to the jars to increase or decrease the parameter, and then the measurement is taken again.
It must be taken into account that the difference in the density parameter between the banks should be no more than 0.01 g/cm3. If during the task it was not possible to achieve such a result, then it is necessary to perform additional, “leveling” charging for 1-2 hours. In this case, the current parameter should be 2-3 times less than the nominal one.
How to lift with a charger?
To increase the density of the charging equipment, the following actions are performed:
1. The battery is brought to full charge. First you need to remove the device from the car and connect it to the equipment that will charge the battery, observing the polarity. First, a connection is made to the device, and then it is connected to the network.
2. During the charge restoration process, the user needs to monitor the condition of the electrolyte. After the liquid begins to boil, it is necessary to reduce the current setting to 1-2 amperes. When water boils, it evaporates, which leads to the fact that the density of the electrolyte concentration begins to increase.
3. The evaporation time of the liquid depends on the specific situation, in some cases it may take more than 24 hours.
4. After the water level in the jars has decreased, electrolyte is added and the density is measured.
5. If necessary, this operation is repeated.
Guide to Increasing Density in a Maintenance Free Battery
The steps to increase density are similar, the difference is in gaining access to the working fluid:
1. In maintenance-free devices, the case is completely closed, so the user must remove the battery and remove the sticker from it. There is no need to remove the battery cover as it will be difficult to put it back on.
2. You need to make a hole in the lid using an awl or drill. It should be small, since you will have to seal it later.
3. Using a disposable syringe, distillate or correction electrolyte is added to the battery, depending on what needs to be done with the operating parameter. Add 5 ml of liquid. It is recommended to use a battery can that contains a density indicator. If the indicator turns black or green, then you need to add another 20 ml of liquid to the battery.
4. To determine the level of the working solution, the needle is lowered into the jar, and the rod is pulled in the opposite direction. When drawing the working solution into the syringe, it is recommended to mark the level with a marker. If the battery uses light-colored plastic, the liquid level can be determined against the light or measured using a ruler. The remaining cans are topped up to a level that should be 1.5-2 cm above the surface of the plates.
5. After completing the task, the holes need to be sealed with sealant or special rubber plugs. The battery should then be gently shaken to mix the electrolyte. But you must act carefully so as not to damage the plates.
How to increase density if it is below 1.18
If the working density value is less than 1.18 g/cm3, the described methods will not solve the problem and the user will need to completely drain the acid from the cans.
The algorithm of actions will be as follows:
1. The electrolyte is pumped out of the battery as much as possible (you can use an enema bulb for pumping out).
2. The battery is carefully turned over without any sudden movements. This will prevent possible shedding of the plates. In the bottom of the device, you need to drill holes in each can using a drill. It is recommended to perform these actions in a container, for example, a bowl or basin.
3. Then the battery is installed in a vertical position and the remaining working solution is drained from it.
4. The battery is washed using distillate.
5. The holes in the bottom of the battery are sealed; at this stage it is important to ensure that the device is sealed to prevent further leakage of liquid. A new solution is poured into the battery.
The plastic used to seal the hole in the battery should be as resistant to sulfuric acid as possible. In addition, if the color of the electrolyte is brown or black, there is no point in restoring the battery. A dark shade indicates shedding of the plates or destruction of the battery.
How to increase the electrolyte density in a battery. On your own, with or without a charger. Simple steps
Surely most motorists have encountered a situation where a car left for some time stops starting. In this case, the starter may not show any signs of life at all. The main reason for this is most likely the battery, which was completely discharged in a few days. Trying to charge it in this case will not lead to a positive result. This problem is the result of a decrease in the density of the electrolyte that is poured into the battery banks...
THE CONTENT OF THE ARTICLE
After all, this liquid is essentially a catalyst for the electrochemical process; without it, the battery is a set of lead and plastic that will not work. As you and I know, it consists of distilled water (approximately 65%) and sulfuric acid (35%), this liquid has a certain density, which can decrease and increase, depending on the charge.
Why does the electrolyte density decrease?
Most often, in order to maintain the required level of liquid inside a car battery, car owners add distilled water to it. In this case, the density of the resulting solution is rarely checked. At the same time, when the amount of distilled water is large enough, when recharging, the electrolyte will boil away along with this liquid, which leads to a decrease in its density.
Sooner or later, this indicator will drop below a critical level, and it will no longer be possible to start the vehicle.
In this case, it becomes necessary to increase this parameter of the solution in the battery, which will restore its functionality.
Preparing to restore the battery
Before increasing the density level of a battery on your own, you should carefully prepare for this process. First of all:
- This basic indicator of a car battery is measured at a temperature of about 22 degrees. This can be done using a special device - a hydrometer. In this case, you can only work with gloves and safety glasses to avoid possible burns.
- When preparing a new electrolyte, acid is added to water. If you do the opposite, the liquid will begin to boil , which can lead to acid burns.
- It is strictly forbidden to turn the battery over when working with it, as this may cause its plates to fall off, which will lead to failure of the device.
- You should prepare containers in advance into which the old liquid will be drained and the new liquid will be prepared.
- Accurate calculations of the required volume of acid will be required, since during the charging process the density of the liquid in the battery will increase.
Increasing electrolyte density
There are several jars in the battery; each of them contains an electrolytic solution. It is necessary to check and, if necessary, increase the density level in each jar.
The normal level of this indicator depends on several factors, primarily on air temperature. A value of 1.25-1.29 g/cm3 is considered normal. The difference in such indicators between banks should not exceed 0.1.
If the measurement of this indicator is below normal, you need to increase the density of the electrolyte in the battery.
Using a syringe, the solution is pumped out of each jar. In this case, you need to draw as much liquid as possible, measuring its volume, and then add exactly the same amount of fresh electrolyte.
Having filled in the same amount of fresh solution as the old one was removed, the battery is thoroughly pumped in order to mix the new and old electrolyte.
After this, this indicator is measured again: if it is still below the norm, all actions are repeated until the desired density value is achieved. Upon completion, distilled water is added to the car battery jars if necessary.
Density below minimum value
There are cases when the level of this indicator drops below 1.18. In this case, the above method will not help.
To restore the functionality of a battery, instead of an electrolytic solution, you need to use an acid whose density is higher than that of the electrolyte. In this case, all actions are carried out in exactly the same way as in the previous case until the indicator returns to normal.
Is it possible to increase the minimum density?
If the density level of the solution that conducts current in the car battery has fallen much below 1.18 g/cm3, there is no point in raising it. In this case, it is necessary to drain the entire solution, replacing it with fresh one.
First, as much electrolyte as possible is pumped out from the jars using a syringe. Next, the battery is placed in a large container, carefully turned on its side, and a small hole is drilled in the bottom of each can. By turning the device over, all excess remaining liquid is drained from it.
Next, distilled water is poured through the lids of the jars to rinse them. After this, the holes made are sealed with plastic that is resistant to electrolytic fluid.
Having done this, fresh solution is poured into the battery, after which the device will be ready for use. The disadvantage of this method is that the end result is a reduced service life of the device, but it will still work for some time before purchasing a new one.
How to boost using a charger
Everything here is also simple, we need to charge the battery at a low current for a long period of time. The bottom line is this: when a full charge is reached, the electrolyte will begin to boil, bubbles will appear, it will disintegrate and the water will evaporate. To increase the density, we need the excess water to evaporate, but the acid remains. Of course, the level in the battery will drop - but instead of the lost level, we add the required electrolyte density. This process is long and tedious (boiling - adding), but after about a couple of days you can reach a density of 1.27 - 1.29 g/cm3, which is already normal.
As you can see, you can increase the density, and this process is often done with your own hands, but in different ways - choose the one you need.
Now a short but useful video.
And that’s all for me, read our AUTOBLOG.
( 38 votes, average: 4.11 out of 5)
Similar news
How much lead is in the battery. Let's look at car options.
What is an AGM battery? 8 fundamental differences of this technology.
How to check for current leakage in a car. Multimeter or simply.