How to check your car battery for performance
Checking the car battery - when else can you fix it?
When the key is turned in the ignition, it is the battery that provides the impulse to start the engine. If the battery is completely discharged, the car is unlikely to move. It is for this reason that it is important to check the car battery in a timely manner (with a multimeter, for example), because problems noticed in time will not only allow you to avoid searching for someone to light a cigarette, but will also save you from much larger problems. Checking a car battery should be comprehensive and thorough and include both an external inspection and a check of the “inner world”, as well as electrical indicators.
Visual inspection
First of all, carefully inspect the battery: normally it is dry, clean and without signs of damage. It's bad when:
- the surface of the battery is heavily contaminated;
- terminals are oxidized;
- the battery case is damaged;
- There are traces of electrolyte.
Any of the items listed will lead to rapid discharge of the battery, and therefore increase the risk of getting into unpleasant situations. What to do?
The same solution will help deal with terminal oxidation - apply the mixture to contaminated areas, wait a couple of minutes and thoroughly clean with a brush (not a metal one!). After the procedure, rinse the cleaned surfaces with distilled water.
If the oxidation is extensive, then the first step is to resort to mechanical cleaning, the main thing is not to damage the wires.
Exploring the inner world
The battery check should continue with electrolyte measurements. It is he who is responsible for most of what happens to the car. The electrolyte is checked according to the following parameters: density and level.
To check the level you will need a glass graduated tube. Unscrew the washers covering the so-called banks - sections in the battery. Lower one end of the tube all the way down and close the upper end with your finger. Pick up the tube.
It is optimal if the solution covers the upper edge of the plates by 10–15 mm. The total liquid content should be 30–40 mm. So check each section.
The next step is to check the density of the electrolyte using a hydrometer. The normal value is 1.26–1.28 g/cc. see at above-zero temperatures. The indicator will be lower if measurements are taken at zero temperature, but this indicates a low battery charge.
If the density of the electrolyte is higher than the required values, and its level is lower, then it is worth adding distilled water. It is important that it is not any other water, since only the distillate does not contain impurities of salts and metals that can damage the battery.
If the density is slightly lower (1.24–1.25 g/cc), then the electrolyte is added. You can either make it yourself or purchase it in specialized stores. Excess liquid is removed using a “pear”. Any leaks of electrolyte must be removed from the housing!
Making electrolyte at home
For this recipe you will need a well-ventilated area, personal protective equipment (at least gloves), non-metallic utensils, distilled water and 360 ml battery (sulfuric) acid.
First, water is poured into the container, then acid is poured in small portions and carefully. The mixture is thoroughly mixed at all stages. Then the resulting mixture is left to stand for several hours, and the electrolyte is considered ready.
After the completed manipulations, but before repeated measurements, the battery must be charged using a low current. This is the moment when longer is better. After charging, the measurements are repeated.
If during measurements the readings differ in only one section, this indicates damage to the plates. Maintaining life in such a battery will cost much more than purchasing a new one.
Using a Multimeter
A common question is: “How to test a car battery for performance with a multimeter?” First, it’s worth understanding what is measured using this device:
Even the simplest multimeters will help in measuring air temperature and other indicators. Hence the name: “multi” translated as “many”, which means that the device can measure a lot of things. However, when it comes to the battery, it is the first three indicators that will tell you about its health. Let's take a closer look.
Voltage check
This manipulation will allow you to assess the current state of battery charge. To carry out the measurement, the multimeter is switched to the voltage measurement mode at around 20 units. Connect the red wire of the device (also known as “plus”) to the positive terminal of the battery, and the black (sometimes blue) wire to the negative terminal.
If the car is not started, then the optimal indicators will be numbers in the range from 12.4 to 13 V. In this case, a higher value indicates a 100% charge, and a lower value indicates an incomplete charge. It is better to carry out such a check when the car has been parked for a long time (at least several hours), in which case the measurement will be the most informative.
If the numbers are slightly less than 12, then the situation is bad - the battery is close to natural death. There is a chance to try charging it with a low current. Numbers close to 11 mean the death of the battery, and it is better to take care of purchasing a new one.
When checking with the car running, the readings will be different: from 13.5 to 14 V, the readings are good. If the figure is greater than 14.2 V, then we can judge that the battery is being recharged by the generator. However, if measurements are taken in winter, you should wait 15 minutes and repeat the procedure - perhaps the generator was intensively recharging the dead battery.
Capacity check
The battery capacity is usually indicated on the accompanying sheet. Another thing is that over time the capacity decreases, and it is important to keep track of this point. In this case, checking the car battery with a multimeter will be a good help.
To check, you will need:
- disconnect the car battery from the generator;
- connect an energy consumer with fixed consumption to the circuit (for example, a 12 V light bulb);
- The operation of the circuit is observed for several minutes (here it is important to see whether the light of the light bulb becomes noticeably dimmer, whether there are any interruptions in its operation, etc.);
- the consumer is switched off, battery readings are measured in voltage mode.
If the measurement result is 12.4, then this indicates that the battery is fully operational. If the readings are in the range from 12 to 12.3 V, then soon the battery may “forget how to work”.
Another method is the control discharge method. The steps are similar to the previous method, however, before starting the test, charge the battery to 100%, then connect a light bulb to the circuit, noting the exact time of switching on, and, under the control of an ammeter, wait until the battery charge is reduced by exactly half.
Next is the question of calculations: the time spent discharging the battery is multiplied by the current in the circuit. The result should be the same as in the technical passport or close to it. If this does not happen, then the battery capacity has already suffered greatly.
Resistance check
To understand what is happening, you can also check the internal resistance of the battery. To do this, you will need the same 12 V light bulb. It is connected to the battery terminals, and the voltage at the terminals is immediately measured. After the measurement, the light turns off and the measurement is repeated. If the difference in measurements is within 0.05 V, then the battery is working. If the difference is greater, then the battery has problems.
Checking with a load fork
To obtain the most accurate measurement results, a load fork is used. Of course, this equipment is rarely seen in private hands, much more often in professional workshops or at technical diagnostic stations. However, if it does exist, then why not use it.
The load plug is a device that, like a multimeter, is connected to the battery terminals. It then supplies a short circuit current to the battery, which simulates the operation of the starter. As you know, without load the readings are about 13 V.
At the moment of turning the ignition key, which is simulated by the load fork, the readings normally “drop” down. The maximum normal drop can be up to 9 V and return to the initial reading after the voltage is removed. In this case, the battery can be considered serviceable.
If the readings drop below 9 V, then even if they return to their original state, such a battery is unlikely to start the car. It is important to remember that testing with a load fork should be carried out only in the warm season (optimally at a temperature of +20... +25 degrees), otherwise it is possible to drain the battery charge during testing.
A little theoretical knowledge
Knowledge of how to test a car battery should also be combined with knowledge of normal values and readings and why they change.
The density of the electrolyte can change due to temperature fluctuations - overheating or hypothermia. In this case, in case of overheating, the electrolyte may boil, in which case the distilled water will partially boil away, and the electrolyte will become more dense.
In the case of cold, the electrolyte, on the contrary, often begins to have a reduced density. In both cases, the conductivity becomes worse, and therefore there are problems with the establishment, rapid “landing” and work on its last legs.
But why is any liquid so important? The thing is that the battery only looks like a small box. In fact, it consists of many parts, the main of which are conductive plates, positive and negative, which make up 6 elements connected in series. They are in contact with the electrolyte, so the electrical impulses move with the necessary force.
For what other reasons could a battery suddenly stop working? For example, just from time to time. On average, batteries work stably for 3–4 years. Of course, many work longer, but their capacity and ability to hold a charge still decreases.
Another reason is frequent battery overcharging, undercharging, or complete discharge. It is very important for a car battery to maintain some kind of average state, without strong changes.
The next reason is hidden in the generator, or rather, in its breakdown. In this case, it may either constantly recharge the battery, giving too much current, or, conversely, may not even be able to maintain the existing charge. Both options indicate the need for urgent replacement of the generator.
The last on the list of unpleasant situations is current leakage: something in the car consumes too much energy even when the car is turned off and parked. This can be determined using the same multimeter. To do this, you will need to turn off the car and remove the negative terminal of the car from the battery. Turn the multimeter into current measurement mode, set the switch to 10 or 20 units. Connect one wire to the negative terminal of the car, and the other to the negative terminal of the battery.
Conclusion
Simple car diagnostics are available to any car owner. Careful attention to the battery will save a lot of effort and nerves, especially on long trips, in winter or at low temperatures.
The simplest thing that anyone can do is remember to inspect the battery every time you lift the hood. Quickly inspect the integrity of the case, wipe it with a rag to remove dirt, make sure that the terminals fit tightly and there are no signs of oxidation.
Once a month it is a good idea to check the level and density of the electrolyte, this is especially true in winter, during severe cold or long trips.
If suddenly the car begins to behave strangely when starting up, the starter turns sluggishly, and the engine does not start the first time, serious problems are not far off, and you need to check both the battery and the car’s alternator in the near future. To do this, you will need a multimeter, which can be purchased at almost any auto store for a fairly modest amount. Timely attention to detail often helps to avoid serious troubles.
How to check a car battery
Today's article is about checking your car battery .
While operating a car, we periodically face the question of how to check the battery. This usually happens in two cases: when purchasing a new battery and when problems arise with the battery during operation.
So I advise you: if you don’t want problems, especially in winter, check the battery in a timely manner to ensure its functionality as a source of EMF for your car, since in some operating modes the battery can quickly become unusable. The reason for this is frequent undercharging or overcharging of the car battery.
The reason for undercharging may be frequent trips over short distances, turning on the warm-up mode in winter, as well as a malfunction of the car's generator voltage regulator. As a result, such an unpleasant phenomenon as sulfation of the battery plates occurs. The phenomenon is bad and this is the topic of a separate article, so if you don’t want to miss out, subscribe to new issues of ELECTRON magazine at the bottom of the article.
Now about recharging. Overcharging can lead to shedding of the plates, and if the battery is not maintained, then to its mechanical deformation. And overcharging occurs if, as a result of improper operation of the voltage regulator, an excessive voltage is supplied to the battery from the generator, as well as as a result of long and protracted trips at high engine speeds.
I hope I have convinced you that you should know the question of how to check the battery so as not to turn your battery into a piece of lead worth 300 rubles (at best) and take timely measures to increase the battery life.
In general, I would recommend carrying out the battery testing process by following the following points.
1. External inspection of the battery
2. Checking the electrolyte level in the battery
3. Checking the density of the electrolyte in the battery
4. Measuring the voltage on the battery with a voltmeter or multimeter
5. Checking the battery with a load fork.
External inspection of the battery
I recommend carrying out an external inspection of the battery at any opportunity when you look under the hood of your car. The reasons for this action lie on the surface of the battery. Namely, during operation, dirt, moisture, and electrolyte drips accumulate on the surface of the battery (evaporation during boiling). All this leads to the occurrence of battery self-discharge currents. And if we add to this the oxidized battery terminals, as well as leakage currents on the car’s electronics, then if you do not recharge the battery in time, the battery will be deeply discharged, and frequent deep discharges are a direct road to sulfation of the plates and a decrease in battery life.
You can verify the presence of self-discharge by connecting one voltmeter probe to the battery terminal and running the other one across the surface of the battery, and the voltmeter will show some voltage corresponding to a certain self-discharge current of the battery.
Usually, electrolyte drips are removed with a solution of soda in water (a teaspoon per glass of water), which is understandable: the electrolyte is an acid, the soda solution is an alkali (for those who don’t remember chemistry!).
The terminals are cleaned with fine sandpaper and the reliability of their connection to the wires and battery is checked.
Well, pay attention to the body as a whole. If the battery is poorly secured, especially in cold weather, when the plastic case is quite fragile, cracks may occur in the case.
Checking the electrolyte level in the battery.
The next step, after checking and eliminating the self-discharge of the car battery, is to check the electrolyte level in it. Of course, this only applies to serviceable batteries.
The electrolyte level is checked using a special glass level tube, and the electrolyte level should be within 10-12 mm above the battery plates.
A level tube is an ordinary glass tube with divisions in millimeters marked on it. In order to measure the electrolyte level, you need to place the tube in the battery filler hole until it comes into contact with the separator mesh, pinch the upper end of the tube with your finger and pull out the tube. The upper electrolyte level in the level tube will correspond to the electrolyte level in the battery.
Basically, a low level is a consequence of the electrolyte “boiling away”; in this case, the electrolyte level is adjusted by adding distilled water.
Topping up the battery directly with electrolyte is done only when you are sure that the drop in level was due to a spill of electrolyte from the battery.
Before proceeding with further testing of the battery, it is necessary to assess the degree of its charge and carry out further testing of the battery after it is fully charged.
The degree of charge can be determined in two ways: either measure the density of the electrolyte in the battery, or measure the voltage on the battery.
Checking the density of the electrolyte in the battery (for serviced batteries)
A device for checking the density of electrolyte in a battery is called a hydrometer .
To measure the density of the electrolyte in the battery, it is necessary to place the hydrometer in the filler hole of the battery, use a bulb to draw the electrolyte into the flask so that the float floats freely and take the density reading on the hydrometer scale in accordance with the upper level of the electrolyte.
The density value for a 100% charged battery will depend on the temperature operating conditions of the battery.
Table 1. Determination of electrolyte density for various climatic zones.
Moreover, you should know that a decrease in density by 0.01 g/cm3 from the nominal value corresponds to a battery discharge of 5-6%.
Table 2. Degree of battery discharge at different electrolyte densities.
However, the values given in the table will be correct if you checked the density at an electrolyte temperature of 20-30 ° C. If the temperature differs from this range, then a correction should be added (subtracted) to the measured density value according to the table.
Table 3. Correction to the hydrometer reading when measuring density at different temperatures.
Typically, in car batteries that you can buy in a store, the electrolyte density is 1.27 g/cm3. Let’s say that when checking the density of the electrolyte in the battery, the hydrometer showed a value of 1.22 g/cm3 (that is, the density dropped by 0.05 g/cm3), this means that the battery was discharged by 30% of the nominal value.
In this case, the battery must be charged. After this, if the battery is in good condition, the electrolyte density will be restored to the nominal value. The most important thing is not to let the battery discharge by more than 50%.
It should be noted that its freezing temperature depends on the density of the electrolyte.
Table 4. Freezing point of electrolyte of different densities.
Therefore, the low density of the electrolyte in winter leads to its freezing, rapid loss of battery capacity, and sometimes even to physical deformation and the appearance of cracks.
Measuring battery voltage with a voltmeter or multimeter
You can assess the state of charge of the battery by measuring the voltage on it. To do this, you need a voltmeter or a device that is popular nowadays - a multimeter. To measure voltage using a multimeter, turn it on in DC voltage measurement mode, and set the range above the maximum voltage value on a charged battery. For example, for the popular inexpensive multimeter DT-830 (M-830) series this is 20 volts. Next, connect the black (COM) probe of the multimeter to the minus of the battery, the red (positive) probe to the plus of the battery and take readings from the multimeter display.
The voltage of a fully charged battery should be at least 12.6 volts. If the battery voltage is less than 12 volts, its charge level has dropped by more than 50%, the battery must be charged urgently! Deep discharges of the battery should not be allowed; this leads, I repeat once again, to sulfation of the battery plates. A battery voltage of less than 11.6 V means the battery is 100% discharged.
Again, you cannot be rigidly tied to a specific voltage value, since it is related to the density of the electrolyte in the battery.
A car battery consists of six cells connected in series. The voltage of one bank can be calculated using the formula:
Ub= 0.84 +ρ
where, ρ – electrolyte density;
Then the voltage on the battery will be equal to:
Uakb = 6*(0.84 +ρ)
With a battery density of 1.27 g/cm3, the voltage on the battery will be:
Ub = 6*(0.84 +1.27) = 12.66 volts
Accordingly, with different initial densities of the electrolyte in the battery, the voltage on it will also be different.
Checking the battery with a load fork.
However, simply checking the voltage on the battery is not enough to fully and qualitatively assess its performance.
The next step is to check the battery’s ability to perform its functions when a load is connected to it. After all, there may be a case when, when measuring the voltage, it is determined that the battery is fully charged, but the engine “turns” poorly or does not “turn” at all. It can be assumed that such a battery has lost capacity as a result of long, and more often incorrect, use and it discharges so quickly that it “dies” in one second.
So, to check the operation of the battery under load, a load fork is used. The load fork diagram is shown in the figure.
That is, the load plug is a voltmeter that can be connected in parallel with its load terminals. For starter batteries, the load resistance is selected in the range of 1-1.4 times the battery capacity. This is considered the maximum discharge current for the battery. Not to be confused with starter current.
First, the battery voltage is measured without load and the degree of its charge is determined using a table.
Table 5. Dependence of battery charge level on idle voltage. (The battery is left at rest for at least 24 hours).
The second stage is to measure the voltage on the battery with a load connected and determine the degree of charge according to the table. The reading under load is taken at the end of the fifth second from the moment the load is connected.
Table 6. Dependence of the battery charge level on the voltage at the end of 5 seconds of testing with a load fork.
The values in these tables are taken directly from the load fork instructions.
Thus, with a 100% charged battery, the voltage measured under load should not be less than 10.2 volts. Otherwise, the battery is considered to be undercharged and needs to be charged.
If such a situation occurs that without a load the battery shows the voltage of a 100% charged battery, and when the load is turned on, the voltage drops significantly and is very different from the values indicated in the table, then this means that there is a malfunction in such a battery (sulfation, short-circuited plates etc.).
Therefore, it is necessary, if possible, to fix the malfunction or purchase a new battery so that one day it does not let you down.
That's all for today. In this article I only touched on the issue of checking batteries. I will tell you how to properly charge the battery, try to restore it after sulfation, and many other questions in the next issues of ELECTRON magazine.
Therefore, do not forget to subscribe to new issues of the online magazine on electrical engineering and electronics.
And now a detailed video on how to check a car battery:
DID YOU LIKE THE ARTICLE? SHARE WITH YOUR FRIENDS ON SOCIAL NETWORKS!
How to check a car battery for performance?
How to check a car battery for performance?
Checking a car battery using a multimeter
To do this, you need a multimeter - a device for measuring voltage. If you don’t have it, you can ask your friends or buy it in a store. The device itself is not expensive, and if you carry out repair work on electrical equipment more than once, it will come in handy more than once.
I recommend buying a digital multimeter, because... it is more convenient to use.
You should not rely on measuring the battery voltage using the car's on-board computer, because they may be wrong. This happens because these voltmeters are not connected directly to the battery, which means losses are possible. Therefore, the voltage on them may appear less than on the battery itself.
Checking the battery with the engine running
We first measure the voltage with the engine running. Normal voltage should read between 13.5 and 14.0 V.
If the battery voltage with the engine running is greater than 14.2 V, this indicates that the battery is low and that the generator is working in overdrive to charge the battery. This does not always happen, for example, in winter there may be increased voltage, because... The battery may have discharged a little overnight due to cold temperatures, or the electronics detect the air temperature and give more charge to the battery.
There is nothing wrong with increased battery voltage. If everything is fine with the electrical equipment of the car, then after 5-10 minutes the electronics itself will drop the voltage to normal: 13.5-14.0 V. If this does not happen, and the voltage is not gradually reset to the optimal value, then this may result in overcharging the battery. It will always work at maximum efficiency and the electrolyte may boil away.
If the voltage is less than 13.0-13.4 V when the engine is running , this means that the battery is not fully charging. You shouldn’t immediately run to a car service center; first, the measurement should take place with all consumers turned off, which means turn off the music, lights, heating, air conditioning and all energy-consuming devices.
What is the current voltage on the battery when measured with a multimeter? During normal operation of the car’s electronics, it should be in the range from 13.5 to 14. If it is lower, then this means that the car’s generator is not working. Especially when the voltage with the engine running and consumers turned off is less than 13.0 V.
Low voltage is also possible if the battery contacts are oxidized, so before going to a car service center, check all contacts and clean them with sandpaper.
How else can I check the operation of the battery and generator, respectively? There is one way. For example, with the engine running and consumption sources turned off, the voltage on the battery is 13.6. Now turn on the low beam. The battery voltage should drop slightly - by 0.1-0.2 V. Next, first turn on the music in the car, then the air conditioner and then other consumers. We do everything gradually and each time consumers are turned on, the voltage on the battery should drop slightly.
If the voltage drops significantly after turning on the vehicle's power sources, this indicates that the generator may not be operating at full capacity, or the generator brushes may be worn out.
Even with all consumers turned on, the voltage on the car’s battery should not fall below 12.8-13.0 V. If it is less, then the battery is simply discharged, and perhaps it requires replacement and the purchase of a new battery, and we will discuss how to check this below.
Checking the battery with the engine off
We check the battery voltage with the engine off using a multimeter. If the voltage at its terminals is less than 11.8-12.0, then the battery is discharged, the car may not start, and you will have to light it from another car.
The normal voltage on the battery when the engine is not running should be approximately 12.5 to 13.0 V.
There is an old and very simple method for car enthusiasts to find out the battery charge level by voltage. So, a voltage of 12.9 means that the battery is 90% charged, a voltage of 12.5 is 50% charged, and 12.1 is 10 percent charged. This is an approximate method for measuring the battery charge level, but it is very effective, which has been confirmed by our own experience.
There is one caveat when you measure the voltage on the battery with the engine not running. If the measurement takes place immediately after the engine is turned off, then one reading is possible, but if the next morning, the voltage will be different. The best thing to do is measure the voltage on the battery before driving.
The battery charge level indicates its ability to hold voltage for some days. If the battery is fully charged, then even if you have not driven for more than a week, the voltage will not drop much. Otherwise, if the car battery is discharged, the voltage will drop quickly and the battery charge will not last long.
We told you about a simple method for measuring the voltage on a battery, but it is very approximate, although quite effective. If you want to know one hundred percent about the performance of the battery, then we’ll talk about it in the next section.
Testing the battery using a load fork
This method of testing a battery using a load fork is a very effective way to check the performance of a car battery. It is based on its results that you can declare whether the battery is charged or not.
How to check battery charge? To do this, connect the load plug, observing the polarity. The joining time should not exceed 5 seconds. At the beginning of the measurement, the voltage is 12-13.0 V. At the end of the fifth second, the voltage should be more than 10 Volts. Such a battery is considered charged and capable of operating under load.
If, when tested with a load plug, the voltage drops below 9 volts, the battery is considered weak and unreliable. In this case, you will have to think about buying a new one (how to choose a battery for a car).
How to check your car battery for performance
Any car enthusiast with basic knowledge of electrical engineering and an accessible set of tools can independently check the performance of a car battery. Typically, problems with the battery appear when cold weather sets in, since sub-zero temperatures negatively affect the electrical equipment of the car, significantly increasing the load on the battery.
The ability to check the battery for performance may be needed not only during the operation of the car, but also to check a used battery after it has been restored, or to check the battery when buying a car second-hand.
In this article we will talk about how to test a car battery for performance using a multimeter, a hydrometer and a load fork. And at the bottom of the page , watch a video about checking your battery yourself at home.
You may also be interested in the following materials on our website:
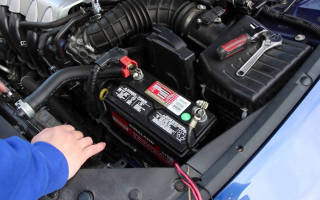
It is necessary to begin checking the battery's performance with its external inspection. Naturally, before inspecting the battery, you need to remove it from the car and install it in a convenient, well-lit place. During the inspection, make sure that the battery case is not damaged and its surface is sufficiently clean (no traces of dirt or electrolyte leaks).
How to test a battery with a multimeter
A multimeter is one of the most popular and affordable instruments for measuring various electrical parameters. You can check the battery with a multimeter to determine the level of discharge of the battery and the presence of current leaks in it.
If, during inspection of the battery, electrolyte leaks were found on its surface, then most likely there is a current leak through them, leading to rapid self-discharge. Checking the battery for current leakage using a multimeter is very simple:
- Switch the multimeter to voltmeter mode (measure direct voltage up to 20 Volts);
- Connect the red probe of the multimeter (positive) to the positive terminal of the battery, and slowly move the contact of the black probe along the battery body in areas of electrolyte leaks or other contaminants.
- If there are current leaks, you will see voltage readings on the multimeter screen that will be greater than zero.
Even if the multimeter readings indicate that there are no electrical leaks, then electrolyte leaks and other contaminants should still be eliminated using a rag soaked in a 6% soda solution (one tablespoon of soda per glass of warm water).
To check the level of discharge of a car battery with a multimeter, you need, as in the previous case, to turn it on in the DC voltage measurement mode with a limit of up to 20 Volts, and measure the voltage at the battery terminals.
The table below shows the dependence of the voltage at the battery terminals without load on its state of charge:
How to properly test a car battery for performance?
Every car owner is faced with the need to determine the health of the battery. The manufacturer guarantees its normal operation for two years. But this does not always happen. How can you check the performance of your car battery yourself?
We will conduct a visual inspection
When operating a car, the driver is required to regularly monitor the condition of the battery. When inspecting the device, most attention needs to be paid to several factors:
- Condition of the case. Cracks and chips are not allowed.
- Dirt.
- Terminal cleanliness.
- Electrolyte leaks.
- Terminal clamp.
- Reliable fixation.
If moisture gets on the body of the machine, this will certainly lead to rapid self-discharge. If the battery terminals are not securely secured, tight contact with the terminals will disappear. As a result, the resistance in contact connections will increase. The starting current of the starter will decrease and the engine will stop starting. The terminals will start to heat up and the battery charge will drop sharply.
To prevent such problems from occurring, the battery must be clean. Constantly check fastening connections. Electrolyte leaks can be easily eliminated with an alkaline solution, which includes:
The mixture is removed from the surface with a dry cloth. The contacts are cleaned with fine sandpaper, then lubricated with machine oil. This maintenance will minimize the occurrence of battery malfunctions.
Checking the condition of the electrolyte
It is possible to determine the existing electrolyte density only on serviced devices. Place the device on a flat, horizontal surface and unscrew all plugs. The electrolyte must completely cover the plates.
To check the electrolyte level in the battery, you need to take an ordinary glass tube. Then lower it into the jar until it touches the plate. The upper end is closed with a finger. In the removed tube, the height of the electrolyte should be within 10–15 mm. Such measurements are carried out in all banks. To ensure that the acid level reaches a normal value, distilled water is added.
The density of the battery is checked with a hydrometer on a pre-charged battery. The air temperature should be no more than 25 degrees. The device consists of two parts:
- Rubber bulb.
- Graduated float.
The scale shows the specific gravity of the electrolyte, according to the GHS system. Operations with electrolyte require compliance with safety precautions. Eyes and hands must be well protected.
To check the density of the electrolyte, place the tip of the hydrometer into the battery jar. The electrolyte is drawn in using the bulb. Moreover, the device should float freely at this moment. The line on the surface of the electrolyte, which is shown on the hydrometer scale, corresponds to its density.
There are special tables that can be used to determine the correspondence of the electrolyte density value in relation to the state of charge of the battery. In this way, the performance of the battery is checked.
The standard value of normal density is in the range of 1.28 + -0.01 g/cm3. If the density value decreases by 0.01 g/cm3, therefore, the can is discharged by approximately 4–6%.
For example, let’s take the device readings - 1.23 g/cm3. Normal density should reach 1.28 g/cm3, the difference is 0.05. Consequently, the battery is approximately 30% discharged and urgently requires recharging. To check the battery for performance, such an operation should be carried out once every six months.
Checking the battery with a load fork
This device can test any batteries. It shows the value of the battery charge level, which characterizes the performance of the battery. The load fork includes a voltmeter located in a durable housing. It is connected to additional load resistances. Special contacts are brought out.
Testing with a plug is carried out only on serviceable batteries that are disconnected from the vehicle. The terminals are pre-cleaned, the housing is wiped, and the jars remain closed.
First, the battery voltage is checked without load. Take the plug and disconnect the load resistors. Then the legs are pressed tightly against the terminals. The voltmeter data is recorded. If the electrolyte density reaches 1.28 g/cm3, and the voltage determined without load exceeds 12.7 volts, then the battery is completely discharged. If the voltage value decreases by 0.2 volts, then the battery is discharged by 20%.
The load fork allows you to take measurements, simulating the real operation of the battery. Take a plug and connect a load resistance equal to 1-1.4 battery capacity to it. During measurement, the legs are held tightly on the terminals for approximately five seconds.
The voltmeter data is recorded at the last, fifth second. If the voltage reaches 10.2 volts, the battery is considered fully charged. If during measurement, the voltage begins to drop, its value does not exceed 7.8 volts, then the battery is completely discharged. When the voltage decreases by 0.6 volts, the charge rate drops by approximately 25%. When an unloaded battery shows a full charge, and when loaded, the voltage value begins to drop sharply, which means the battery has failed.
Battery test multimeter
This device allows you to measure voltage and also find out the state of charge of the battery. To work with such a device, you need to carry out several actions in a certain sequence:
- A constant voltage is established.
- The required limits are set.
- The black probe is connected to the negative.
- Red is fixed on the positive.
- The data shown on the device screen is recorded.
A charged battery shows a voltage greater than 12.7 volts. When its value is 11.7 V, the battery is said to be completely discharged. The amount of battery charge is easily calculated if you consider that a decrease in voltage by 0.1 volts means a decrease in the degree of charge by approximately 10%.
How can you check the battery without equipment?
The latest maintenance-free batteries are equipped with built-in indicators, some have a self-diagnosis system. It is enough to read the instructions for such a battery to determine the state of the battery charge.
If such a system does not exist, you can perform a simple check. The battery must be thoroughly cleaned of dirt and wiped with a dry cloth. Check the fixation of the terminals. If necessary, increase the tightening force. With the engine running, the battery charge voltage generated by the generator is checked.
If within five minutes after turning on the headlights when the car is not running, the brightness remains unchanged, therefore, the battery charge corresponds to the normal value.
By following the recommendations described above, you can easily establish the performance of any battery. In order for the battery to last much longer, regular maintenance is required. It is strictly forbidden to carry out measurements if the battery is frozen.
Video about checking the battery for functionality